

Last time I showed an example of creating a custom HTML form with the Power Pages WebAPI to create new records in Microsoft Dataverse. This demonstrated a different method of using a fully-customizable HTML form rather than a form component based on a form form a model-driven app.
See Build custom HTML forms in Power Pages: Part 1
Prefer video? Here is the YouTube version:
This time lets consider updating existing records.
This time we are going to need a few things to update a record, namely, what record are we going to update?
For this we will pass the GUID of the record as a parameter via the URL. This is also actually the most common method when using an out-of-the-box form component, and we’ll do essentially the same thing.
The easiest way to do this is from a regular Power Pages list component, you could also build a custom “list” component, I wrote a post a few years back:
See Dynamics 365 Portals – Overcoming Entity List Roadblocks with HTML and Liquid (the code and setup works the same for Power Pages)
We’ll configure a list, and in the list actions point to a web page where we’ll have the custom form built to edit the record.

NOTE: If you are using the enhanced data model, you will need to configure the edit record parameters using the Power Pages management app.
Now, lets get into building a custom web template. We will need to the following:
- Get the parameter passed to the page
- Reference to the Power Pages WebAPI helper template
- Get the reference to record using Liquid
- An HTML form to populate with the record
- Script to write the updates back to Dataverse
- Corresponding WebAPI and Table permissions configured
- CSS to format the form
Getting the parameter
Using the List component configuration, we know that the GUID of the Dataverse record will be passed using the id parameter. We can extract that using the Liquid request.params.id tag and assign that to a variable.
<!--Get the GUID of the record from the parameters-->
{% assign session_id = request.params.id %}
While we are at it, we’ll grab a site marker reference to the the webpage with the list component. We’ll use that link later to navigate back to the list after successfully updating the record.
<!--Get the URL via sitemarker of the sessions page-->
{% assign session_page = sitemarkers["sessions"].url %}
Reference to Power Pages WebAPI helper template
Same as part 1, this helper has the functions to call the WebAPI.
<!--include PortalWebAPI helper for WebAPI-->
{% include 'portalwebapihelper' %}
Get record reference using Liquid
Using Liquid, we can get a reference to the Dataverse record. Note that we could also get the record using the Power Pages WebAPI as a direct call from the client, which may be required depending on the actual use case. In this instance, using Liquid (which runs server side) is a simple, elegant option.
We use the entities tag and the GUID to get a reference to the record and assign it to an object.
<!--Get the record from the Liquid object-->
{% assign session = entities.docs_session[session_id] %}
An HTML form to populate with the record
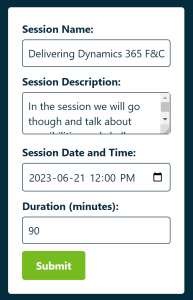
Next we build an HTML form, and depending on the data type, we’ll inject the Dataverse table field names using Liquid. We can also configure the form for fields to be required, etc. You have full control on how you build your form. For example, you could (and maybe should) use content snippets for the labels to make it multi-lingual.
Note that the date field is using a filter to appear in a specific format.
We also don’t have any optionset or lookup fields as these would need to be populated with potential values. We’ll cover these types of fields in a later post. You could use Liquid or the Power Pages WebAPI to retrieve and populate these values.
<!--Create a form to update the record-->
<form id="myForm">
   <label for="docs_sessionname">Session Name:</label>
   <input type="text" id="docs_sessionname" name="docs_sessionname" value="{{session.docs_sessionname}}" required><br>

   <label for="docs_sessiondescription">Session Description:</label>
   <textarea id="docs_sessiondescription" name="docs_sessiondescription" required>{{session.docs_sessiondescription}}</textarea><br>

   <label for="docs_sessiondateandtime">Session Date and Time:</label>
   <input type="datetime-local" id="docs_sessiondateandtime" name="docs_sessiondateandtime" value="{{session.docs_sessiondateandtime | date: 'yyyy-MM-ddTHH:mm:ss'}}" required><br>

   <label for="docs_duration">Duration (minutes):</label>
   <input type="number" id="docs_duration" name="docs_duration" value="{{session.docs_duration}}" required><br>

   <input type="submit" value="Submit">
</form>
Script to write the updates back to Dataverse
When a user selects the submit button on the HTML form, this will call the script to write the values in the form back to Dataverse. Again, like the create function, the “easy” way is to use the Dataverse Rest Builder to generate the function.
We’ll take the HTML form values, put them into an object, and the use the PATCH command to update the record in Dataverse.
Once the update is successful, we’ll show an alert (not elegant, but its just a demo) and then navigate back to the webpage (using window.location) with the list component using the site marker we setup earlier.
<script>

$(document).ready(function() {
  $('#myForm').submit(function(event) {

    event.preventDefault(); // Prevent the default form submission

    var record = {};

    record.docs_sessionname = $('#docs_sessionname').val(); // Text
    record.docs_sessiondescription = $('#docs_sessiondescription').val(); // Multiline Text
    record.docs_sessiondateandtime = $('#docs_sessiondateandtime').val(); // Date Time
    record.docs_duration = parseInt($('#docs_duration').val()); // Whole Number

    webapi.safeAjax({
	    type: "PATCH",
	    contentType: "application/json",
	    url: "/_api/docs_sessions({{session_id}})",
	    data: JSON.stringify(record),
	    success: function (data, textStatus, xhr) {
		    alert("Record updated");
        console.log("Record updated");
        window.location.href = "{{session_page}}";
	    },
	    error: function (xhr, textStatus, errorThrown) {
		    console.log(xhr);
      }
    });
  });
});

</script>
You also need is CSS to format the form. I used the same CSS as part 1 to style the form and embedded it inline (I know, lazy).
The full source code for the web template can be found on my GitHub:
Like in part 1, you will need corresponding WebAPI and table permissions configured. Remember to only setup the WebAPI fields (not * like my example) you need and keep table permissions to the bare minimum.

Once the web template is built, create a corresponding page template and a web page based on that page template.
Configure your list component to drill down to that field for the edit action.

This should retrieve the record and display the custom update form, where you should be able to update a record.

Want to learn mode?
Join me on September 22, 2023 as I deliver a full day class on how to Build powerful websites using Power Pages at the Nordic Summit pre-day. Along with the basics, we dive into techniques like the above post to give you the tools to enhance your Power Pages projects.
Register now before all spots are taken!

Summary
Cover Photo by Markus Winkler on Unsplash
Nick Doelman is a Senior Content Developer at Microsoft, Power Platform trainer and coach, presenter, Microsoft Certified Trainer, competitive Powerlifter, former Microsoft MVP, and cohost of the Power Platform BOOST! podcast.


2 thoughts on “Build custom HTML forms in Power Pages: Part 2”