
A few months back I wrote a post on how to implement simple PowerShell scripts to export, unpack and import solutions for Dynamics 365 and Power App projects. That post can be found here and is still relevant;
Simple ALM for Dynamics 365/CDS Projects
Summary
- All PowerApps/Dynamics 365/CDS projects, big or small should be using some form of source control for customization.
- You don’t necessarily need to build complicated build pipelines or continuous integrations to implement an ALM process.
- This edition walks through using Power Apps Build Tools to automate some tedious chores when working with Dynamics 365/Power Platform solutions.
PowerShell vs Azure Dev Ops Pipelines
After my post on using PowerShell for ALM tasks, I was approached by a couple folks in the community asking me why wouldn’t I use Build Pipelines in Azure Dev Ops, either the Microsoft Power Apps Build Tools or Wael Hamze’s Dynamics 365 Build Tools.
To be honest, I assembled the PowerShell scripts a few years back, prior to some of these tools being available. They work well for many of my smaller projects, the are extremely flexible and easily launched from shortcuts on my desktop. Like all things Power Platform, there are a number of ways to do things and sometimes its a matter of choosing what works best for you.
UPDATE MAY 2020: Running PowerShell scripts on your local workstation will get right to work right away. Azure DevOps Build tasks? Sometimes not. I have been noticing that an Agent sometimes (not always) may wait 5 minutes or more before resources are ready to start running. Not ideal if you want a solution deployed quickly.
Many of the blog posts, documentation and presentations on the various pipeline tools reflected large development teams. Setting up large complex pipelines with automated builds, testing and deployment is many times overkill for small projects where there may be only one person configuring the solution.

That being said, I feel that no project is too small for some good habits. All configuration changes should always be done at very least on a sandbox environment and all configuration (entity, form, field, view, flows, apps, etc) changes as well as code should always be saved to some form of source control.
I decided to explore the Power Apps Build Tools to see if I could put together a fairly simple package that a “one person” project could use based on the following parameters;
- There is at least one Sandbox and Production Environment
- All configuration work is done on the sandbox
- All configuration is saved to source control
- The solutions are deployed to production, ideally as managed (but could be unmanaged if you haven’t seen the light yet.)
- The process is easily to setup and maintain
As you can see from the following post, I was successful in setting up some simple pipelines, which already have saved me a lot of time.
Credit where Credit is Due
I stole many of these steps from a set of hands on labs that can be found on Github by clicking here. These are an excellent resource and great way to get introduced to the Power Apps build tools.
The steps I have prepare here more recent screen shots and I took a different approach in which I simply exported a managed solution direct from the sandbox and deployed to the production, as opposed to assembling the managed solution in a temporary build environment.
I hope I add value by putting a simpler spin on it and provide some additional context.
Some Terminology
Pipeline
Think of a pipeline as a type of script or steps that you will define to do a series of tasks.
Repository
A repository is like a file folder that contains your source files (configuration, code, etc). However, it will keep track of the specific changes, who made them, and when.
Setup Azure DevOps
If you have not done so already, you will need an Azure DevOps environment. In most cases, you should be able to use the free account.
Navigate to https://azure.microsoft.com/en-us/services/devops/ and click on the Start free option.
You will need to sign in with a Microsoft account if you have not already done so. Choose your country/region.

Start off by creating a new project in Azure DevOps. This will contain your pipeline and your source repository.

Your project will have a series of options on the left hand of the screen. We will be looking only at Repos (repositories) and Pipelines. However, Azure DevOps has a number of other very useful features for managing projects.

Install PowerApps BuildTools
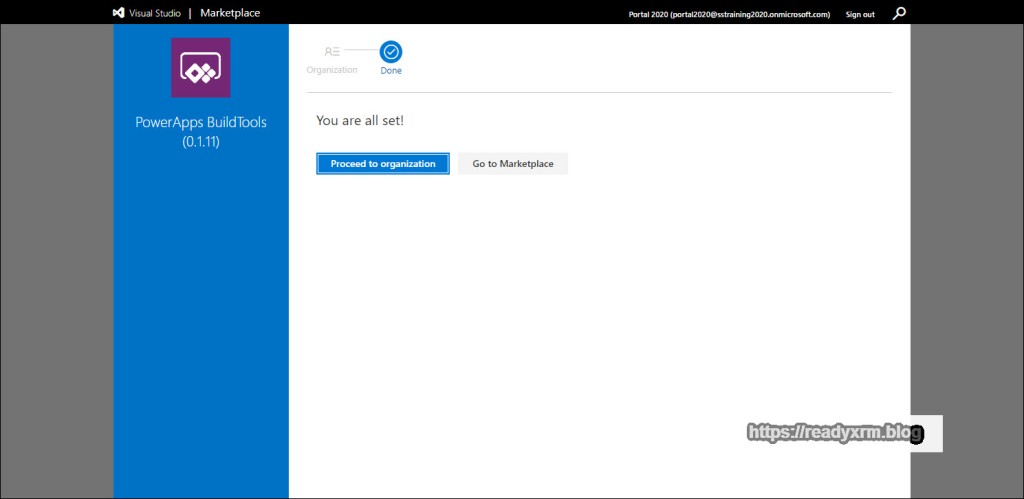
Azure DevOps is extensible, and the PowerApps Build Tools need to be installed. While logged into Azure DevOps, navigate to https://marketplace.visualstudio.com/items?itemName=microsoft-IsvExpTools.PowerApps-BuildTools Note these tools are still considered to be in preview, so all gotchas apply here. Click on “Get it free” to install the Power Apps build tools in your Azure DevOps environment.

Choose your specific Azure DevOps organization (in case you have many)

The install process should only take a few moments.
Setup Repository
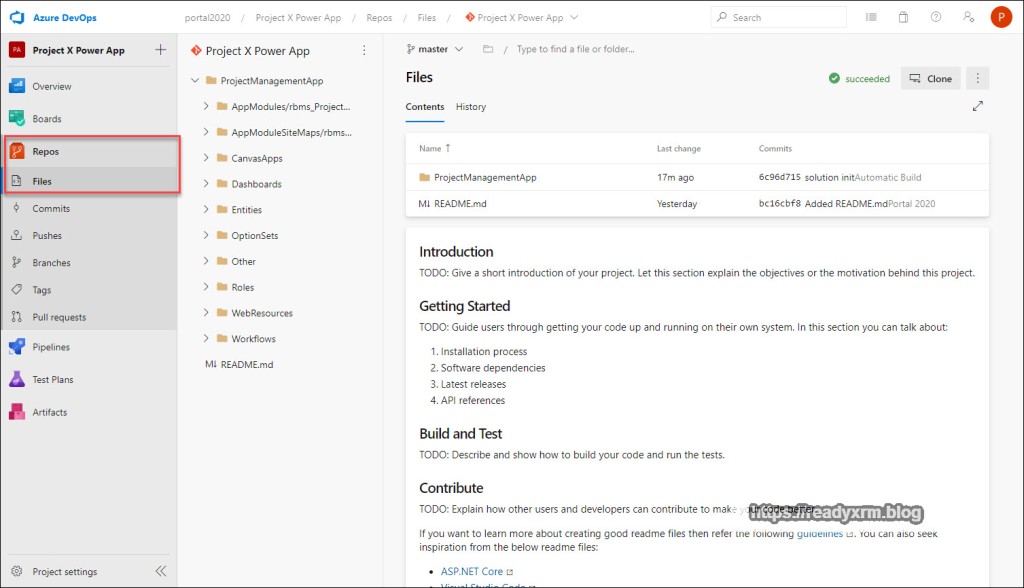
We need to setup a repository (or what the cool kids call “Repos”) where we will store our source solution, which is all our configuration files like entities, forms, views, flows, apps, etc. Having a “dev” Power Platform environment (even that gets backed up) should NOT be considered your source control. Your files should be pushed to source regularly.

Initialize with a README file and get the repository created.
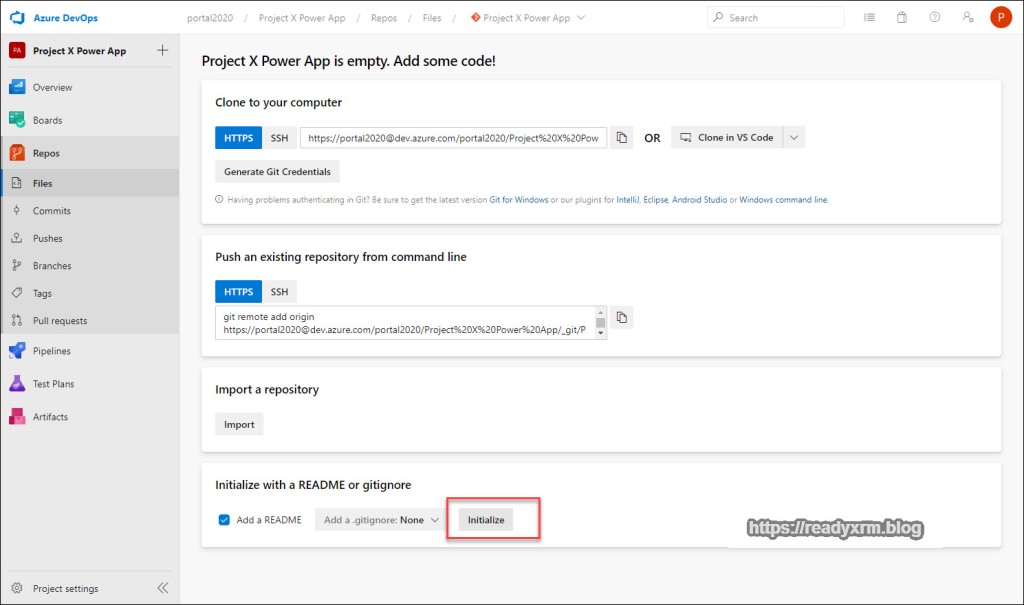
You will now have an empty repository with a README file that is formatted with markdown. Eventually, we will be pushing our source configuration files here. This should become your “source of truth” when it comes to configuration.

Allow Build Service to Access Repository
There is some security to setup to allow our pipeline to be able to upload the configuration to source control. We need to allow the Project Collection Build Service to have contribute access to the repository.
- Click the Gear Icon in the bottom left corner to get access to Project Settings
- Choose Repositories
- Locate Project Collection Build Service
- Add the Project Collection Build Service

Once you have added the Project Collection Build Service, choose “Allow” on the contribute permission.

Create A Pipeline to save a Power Platform solution to Source Control
Are you backing up your solution files somewhere? You should be! However it is tedious to download the unmanaged zip file and save it somewhere. Also, what happens if something breaks? Do you have any way of tracking changes made to your solution? This is where source control helps, and ideally, it should be automated. This is pipelines come into play.
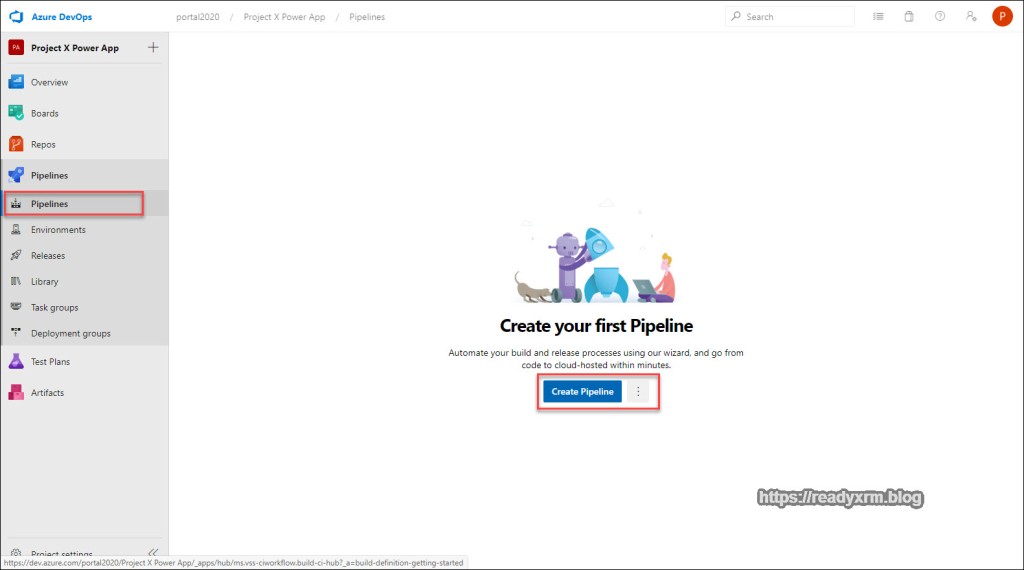
In Azure DevOps, click on the Pipelines link on the left side and create your first Pipeline.
For the Power Apps Build tasks, we will use the classic editor.

We will use Azure Repos Git (which is default) for our repository. Click continue. Other source control systems are available (I don’t see sourcesafe?) 🙂

We will build our pipeline using an Empty job.

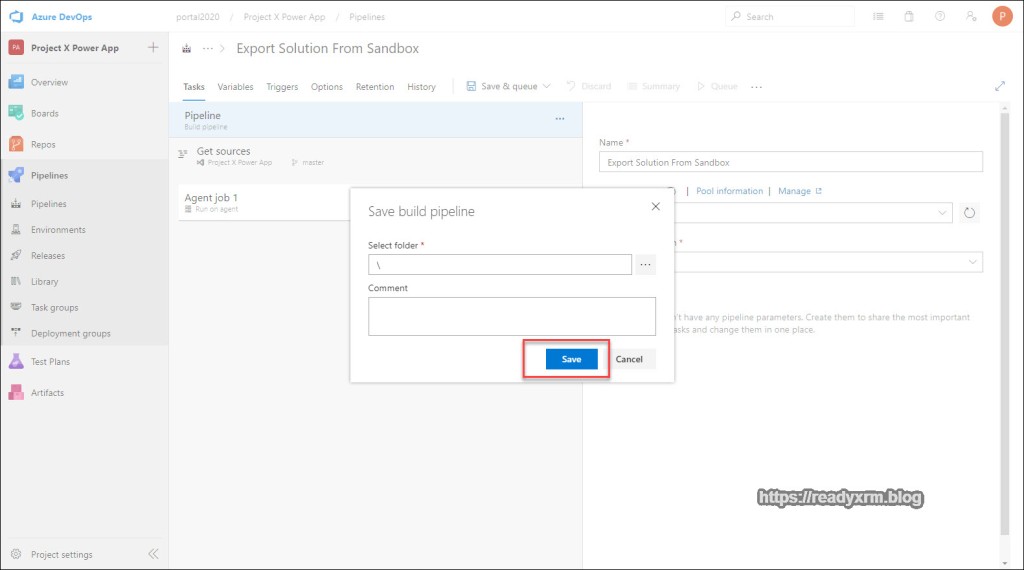
Give your pipeline an easily identifiable and recognizable name. Save your pipeline by choosing the “Save & queue” and then “Save”

Note that each time you save, you can log an comment to keep track of what you did. In most cases, you can leave this blank.
Now that our pipeline is created, lets start by adding some tasks. On the “Agent job 1” section, click the “+” button to add a new task.

On the left of the screen, search for “powerapps tools” and add the PowerApps Tool Installer.
What will happen is the build pipeline will spin up a temporary virtual machine on Azure to do our work. Since the machine is temporary, we will need to install the PowerApps Tools each time.

PowerApps Export Solution task
The next step is to add the PowerApps Export Solution task. This task (you guessed it!) exports solutions from the Power Platform. This step will export the solution to a folder on the temporary virtual machine.

Once you have added this task you will notice that you need to configure some additional settings. The tool needs to know what environment to export the solution from and also what solution!
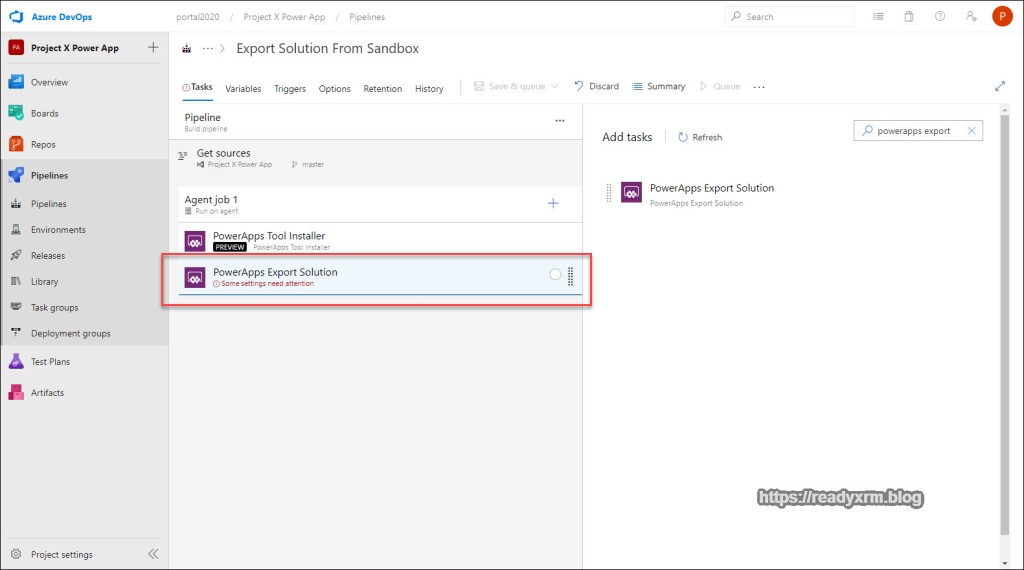
The right hand properties window will show what settings need to be defined. Beside “PowerApps Environment URL” click on Manage.

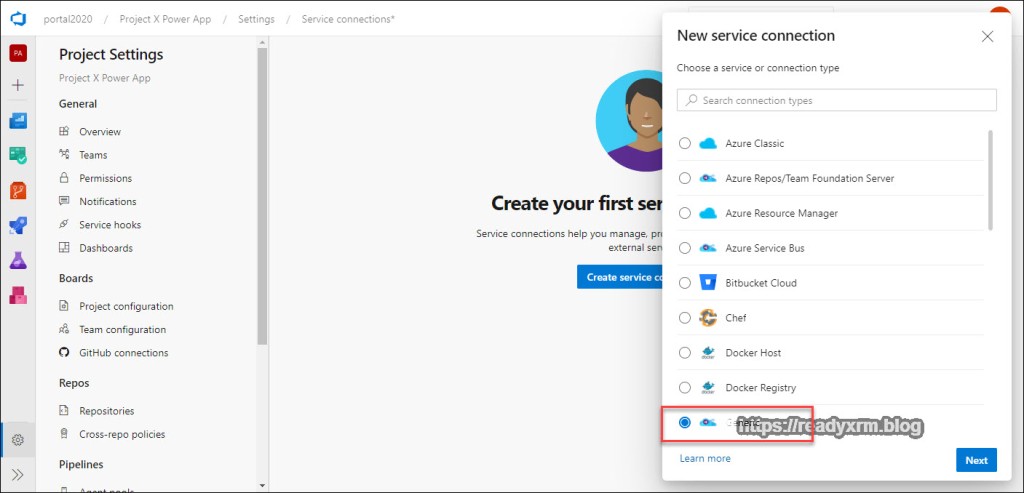
Service Connections
A service connection is a link to an application external to Azure DevOps. We will create a service connection to our Power Apps Environment that we can use for multiple tasks in our pipeline.
Click on “Create Service Connection”

In the list of Service Connection types, the Power Platform is conspicuously absent. We will the choose “generic” service connection type.
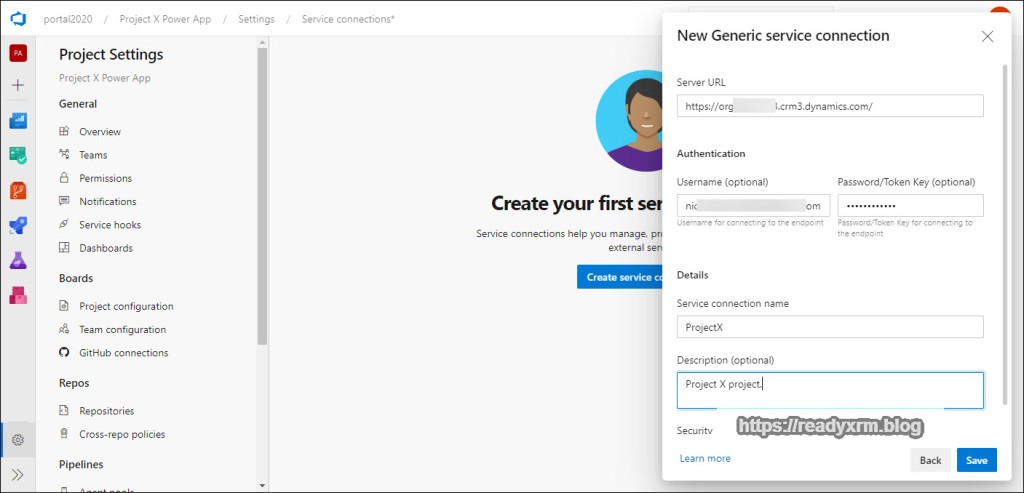
In the service connection settings, will get the URL from our Power Platform environment (You can find this in the Power Platform Admin Center) You will also need to specify a username and password. Also give the service connection a meaningful name.
NOTE: Multi-Factor is not yet available. Yes, this could be an issue. Yes, Microsoft is aware of it.
You will see your service connection in the list. You could add multiple other connections to various other environments.

Continuing PowerApps Export Solution Setup
Back on the PowerApps Export Solution step configuration, choose the service connection you just added as well the following;
Solution name
$(SolutionName)Solution Output File
$(Build.ArtifactStagingDirectory)\$(SolutionName).zipThe solution name is actually a variable that we will setup in a few steps below. We can then reuse that variable in multiple places.

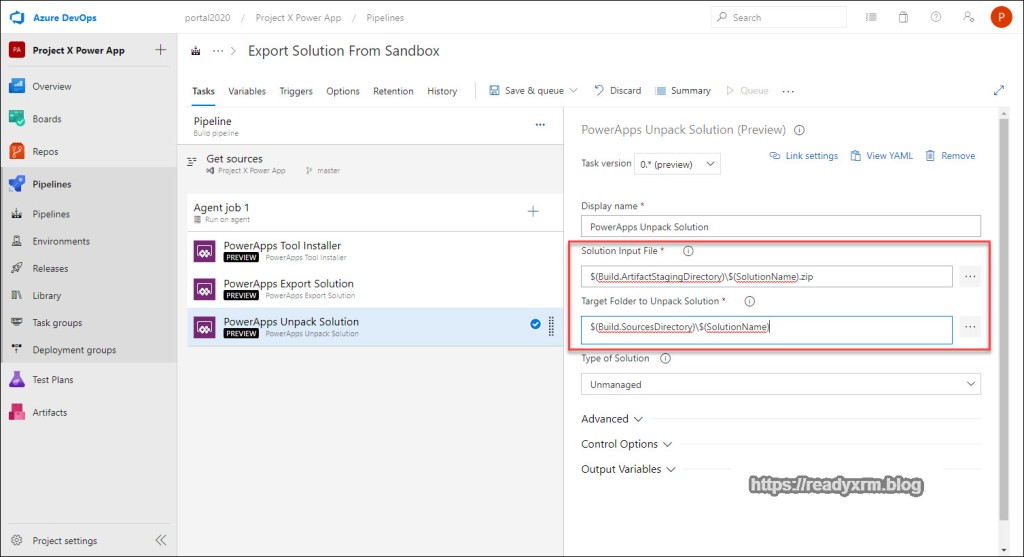
PowerApps Unpack Solution Step
Now that we have exported the solution from our source sandbox environment, before adding to source control, we will unpack it. The solution file is essentially a .zip file with the configuration files in mostly XML format. Pushing it to source control “unpack” means we can easily see the changes to the configuration and when they were done. In more advanced cases, changes from other developers can be merged into this code and re-packed, but lets keep things simple for now.
Add a new task and locate PowerApps Unpack Solution.

The PowerApps Unpack Solution step also requires some additional settings.
Solution Input File
$(Build.ArtifactStagingDirectory)\$(SolutionName).zipTarget Folder to Unpack Solution
$(Build.SourcesDirectory)\$(SolutionName)Type of Solution
UnmanagedWe will be unpacking the solution that we exported in the previous step.
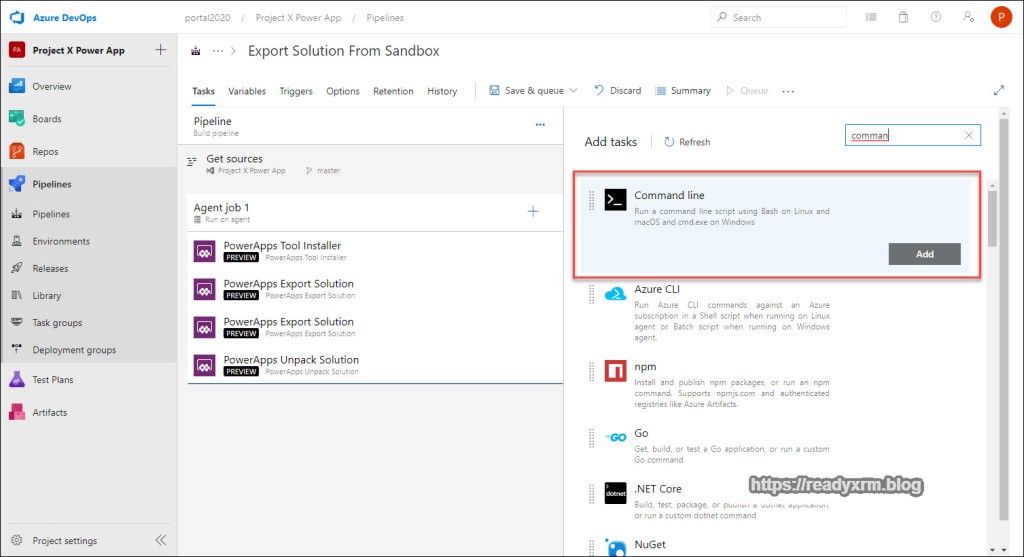
Pushing Unpacked Solution to Source Control Repository
The final task in our pipeline is to push the unpack solution files to source control. Git is a command line tool, so we need to add the Command Line Script task to our pipeline.
Add a new task, search for Command line and add it to the pipeline.
We will need to add the script that will run the Git commands (add, commit, push) to push the unpacked files to source control. You can cut and paste it from here, you will need to specify your Azure DevOps login (replace userXXX@something.onmicrosoft.com in the script.)
echo commit all changes
git config user.email "userXXX@something.onmicrosoft.com"
git config user.name "Automatic Build"
git checkout master
git add --all
git commit -m "solution init"
echo push code to new repo
git -c http.extraheader="AUTHORIZATION: bearer $(System.AccessToken)" push origin master
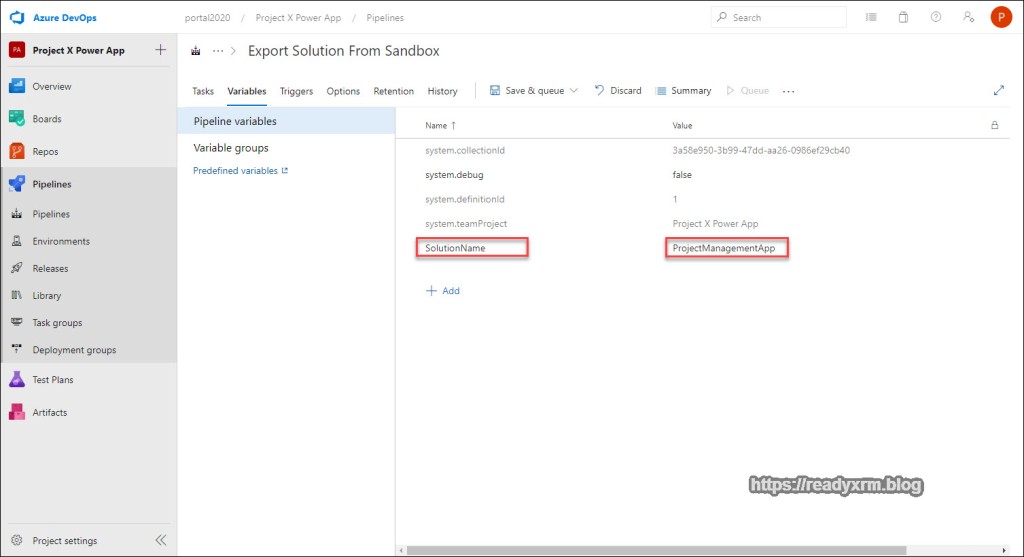
Set Variables
Before we attempt to run our script, we need to define our $solution variable that used in our Export and Unpack solution steps earlier.
Choose “Variables” tab in the pipeline editor, and then “+Add”

Key in your solution name. You are adding all your Power Apps configurations using solutions, right?
Export Solution Pipeline
The pipeline should look something similar to the following screenshot:

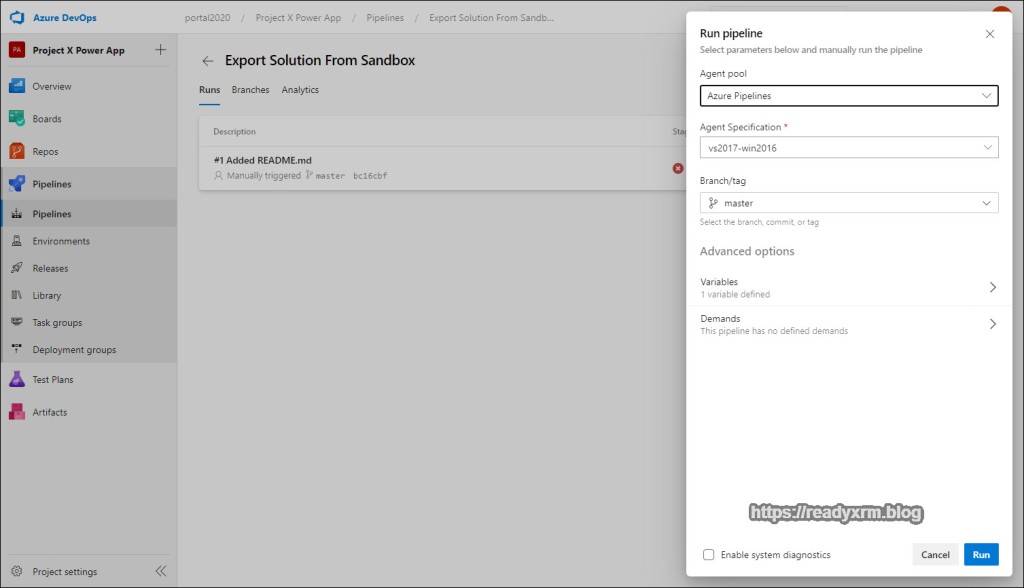
First Attempt to run Pipeline
For the next step, we need to do a “2 steps forward, one step back” maneuver. Choose the option to run your Pipeline.

Leave the defaults and run the pipeline.

The pipeline will begin to run. Click on the Agent job to see the details.

The first time you run this particular job, you most likely will get an error (128). This is because the job creates a new Build Service user when it runs the first time, but we need to step back and give it contribute permissions. Unfortunately, we can set this up prior to running the job (or at least I don’t know how… if you do, please comment below!)

To fix:
- Click on the Project settings gear icon
- Choose Repositories
- Choose the new Build Service user (Pipeline name + “Build Service”)
- Change Contribute to “Allow”

UPDATE: April 24, 2020
Some folks have commented running into a different issue that will also give a error 128. If may need to configure the Agent Job to allow scripts to access OAuth token. Select the Agent job, scroll down on the properties and check the “Allow scripts to access the OAuth token” and you should be good to go.

Run Export Solution Pipeline (for real this time)
Once the build service user has permissions, run the pipeline again.
Click on the Agent job to view progress. After a few minutes, the pipeline should be complete and the solution should be in the source repo.

Click on the Repos and you should see your unpacked solution files. Each time your run this pipeline, you should be able to see your changes to your configuration in the various files.
Updating Production from Sandbox
If you follow the labs on github that inspired this post, you will see that they step through a process of setting a temporary Power Platform build environment to assemble and repack the solution and then deploy to production. As your team expands and you need to consolidate code and solutions, and run automated testing, then that is the approach you should consider.
In the meantime, our “simple” process is getting your solution from your sandbox to your production, without having to save the solution, wait for it to download, copy the solution zip file, then import the solution to your production, and then publish if you are still transporting changes unmanaged (going forward you should be considering managed).
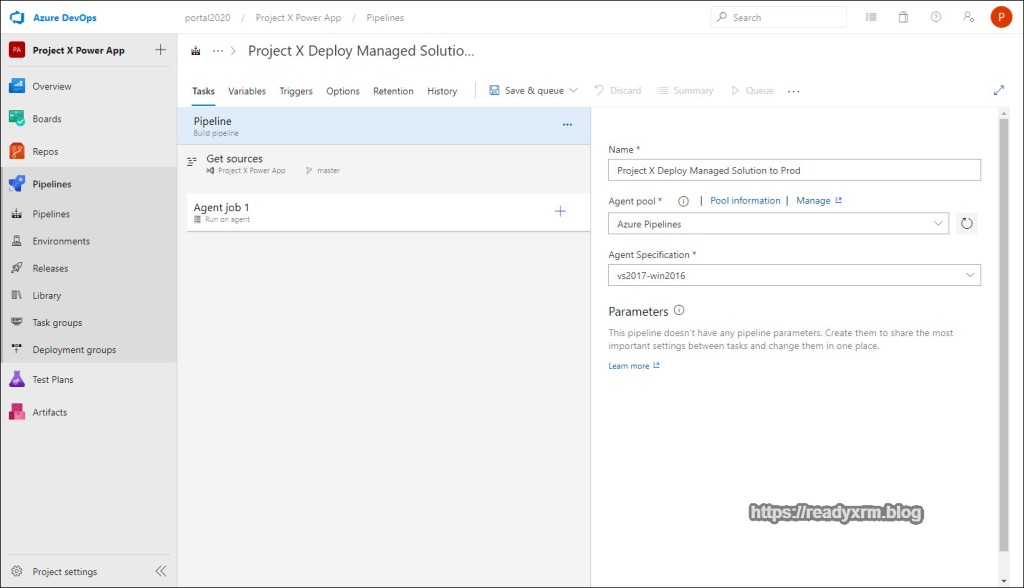
The first step is to create a new pipeline. While we could run all steps in one pipeline, I prefer to break out the saving to source control, as you will likely be doing that on a regular basis (at least daily, if not more) and deploying to production on a less regular basis.
Create Solution Deployment Pipeline
Click on New pipeline

As before, you the classic editor.

In these steps we won’t be using the repository, so keep all the defaults.

There are no templates, so choose “Empty Job”

Give the pipeline a meaningful name. As you create a series of pipelines, you will want to be able to easily identify them.
PowerApps Tool Installer
Again, the pipeline will spin up a temporary virtual machine. Add the PowerApps Tool Installer task to install the tools.

PowerApps Export Solution
We need to export the solution from our sandbox environment. We could instead repack the solution from our source control, but since we are not currently merging or adding anything to that solution (and its stored in source as unmanaged) we will instead just grab it directly from the sandbox.
Add the PowerApps Export Solution task to the pipeline.

As before we will need to configure specific properties of the export solution step.
We already have our source environment service connection configured from our first pipeline, so we can re-use that for our environment URL.
We will again specify our solution name variable, export it as managed to a temporary folder.
Solution Name
$(SolutionName)Solution Output File
$(Build.ArtifactStagingDirectory)\$(SolutionName)_managed.zip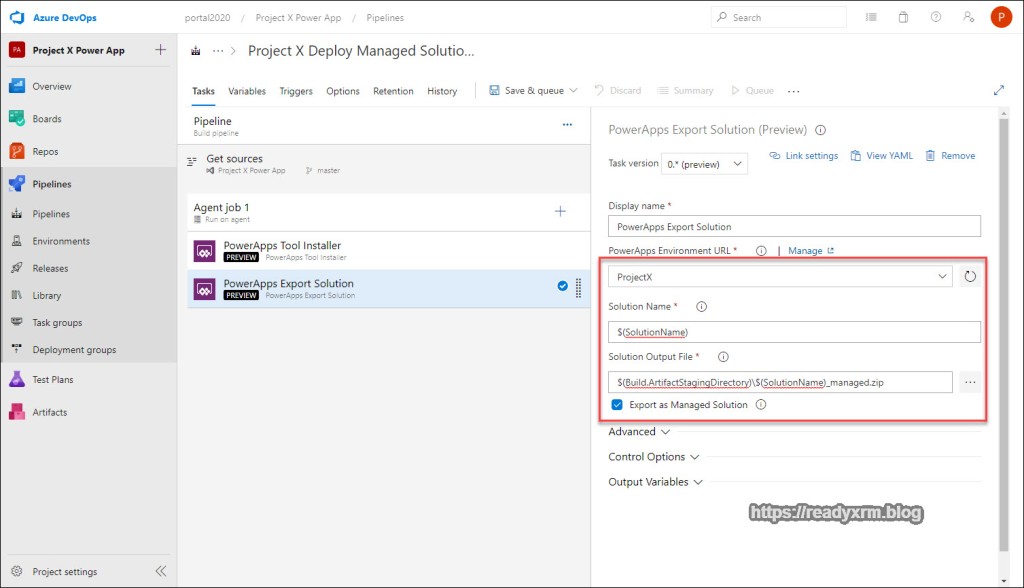
Now that we have the exported managed solution, we need to import it to our destination (production) environment.
Add the PowerApps Import Solution step to the pipeline. Enter in the following properties;
PowerApps Environment URL – you will need to add a new service connection to your project. See below for a refresher on the steps.
Solution Input File
$(Build.ArtifactStagingDirectory)\$(SolutionName)_managed.zip
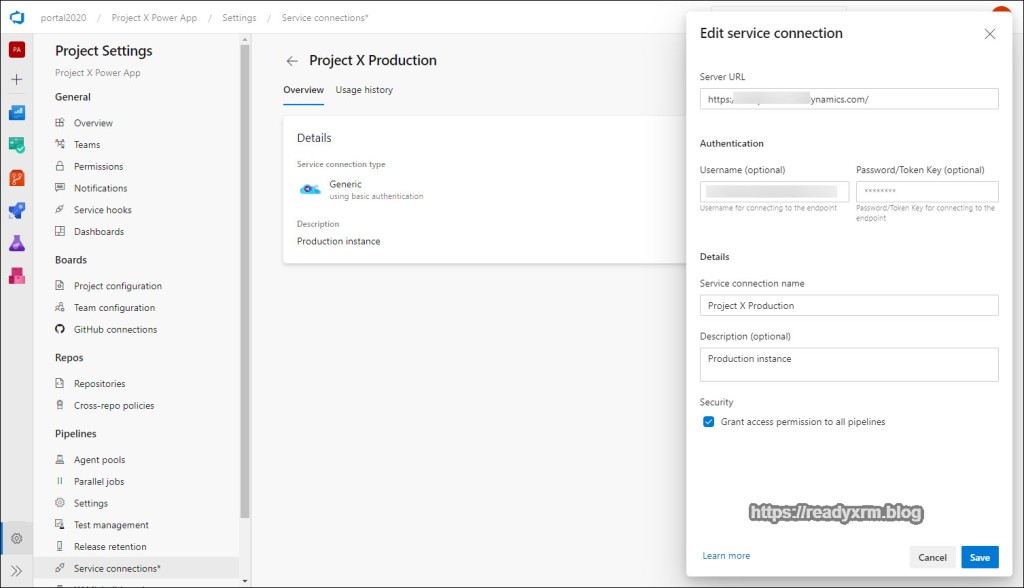
Production Service Connection
We need to have a service connection for the PowerApps Import Solution step. Click on “Manage” and add a new service connection (the sandbox connection should already be in the list) Choose “generic” service connection type and click Next

Next, fill in the URL and connection details (again, no support for MFA)
Solution name variable
You will need to add the solution name variable that is referenced in the steps above. Click on the variables tab and then add SolutionName variable and the actual name of the solution you want to export and import.

Run the Pipeline
The pipeline should look similar to the following screenshot. Note, if you are still deploying unmanaged solutions to production (and not going to get into that debate here), you can add an additional step to publish your solution after import (not needed for managed).

Finally, launch your pipeline.

Leave the various defaults and run the pipeline. You can click on the agent so view the steps in progress. If everything runs correctly, your solution should be successfully deployed to production.

Now that you have the pipelines set up, you can run these quickly and consistently every time without a lot of tedious importing/exporting.
Now that the basics are setup, you can experiment and add additional tasks/pipelines such as;
- Pipeline to repack unmanaged solution from source and deploy to a new development environment.
- Add steps to run the solution checker.
- Add steps to update the solution version number.
- Incorporate automated testing
- Integrate with Power Automate (e.g. deploy solutions from buttons)
Conclusion
Despite the size of your project, there are now tools available (various build tools, PowerShell, etc) to make your life easier as a Power Apps/Dynamics 365 builder, maker, developer, no matter how big or small your project. The time invested to setup even very simple pipelines will save many hours/days/weeks of time in a project.
I am amazed to see and hear folks still manually importing and exporting solutions and NOT saving solution files to source control (even on enterprise projects!) I am hoping this post removes some of the mystery and sets you down a path of good solution deployment habits.
Pipeline Photo by Mike Benna on Unsplash
Project Team Photo by Annie Spratt on Unsplash
Nick Doelman is a Microsoft Business Applications MVP and is always open to learning new things and really likes to learn techniques that removes tedious work like exporting and importing solutions. Follow Nick on twitter @readyxrm
Interesting in learning about Power Apps Portals? Check out my new Power Apps Portals Fundamentals self-paced learning class by clicking here.


This is simply Amazing! thanks Nick
LikeLike
Absolutely brilliant post Nick, thanks for investing so much time to document this. In my experience, one of the biggest barriers to getting the concept of ‘formal’ ALM off the ground is the sheer weight of the full-blown solution so this puts paid to that argument. I will absolutely be implementing your approach on my next (small) project.
LikeLike
Thanks Greg!
LikeLike
Appreciate your tutorial ! Thank you Nick
One thing, for me I had to check “Allow scripts to access the Oauth token” on Agent level to get rid of the (128) error
LikeLiked by 1 person
Thanks for letting me know, that might help someone else. Cheers, Nick
LikeLike
Interesting post! I agree that “no project is too small for some good habits”.
That statement made me wonder whether you have changed your stance on managed solutions: “The solutions are deployed to production, ideally as managed (but could be unmanaged if you haven’t seen the light yet.)”
LikeLike
Hi Brigitte, thanks for reading my post! Yes, I have changed my position on managed solutions. A lot of my objections/hesitations on using them have been addressed by Microsoft. That story is for another post! Cheers, Nick
LikeLike
Hi Nick,
Thanks for the article. I tried to follow your article and add performed all steps for Exporting Solution from Sandbox to Devops (git).
I faced issue when running pipeline. As mentioned in article I do get 128 error and I performed settings mentioned as well. But I think my 128 error log is slightly different than you mentioned.
I am sure I am missing something here but could not figure it out.
Logon failed, use ctrl+c to cancel basic credential prompt.fatal: could not read Username for ‘https://xyz.visualstudio.com’: terminal prompts disabled
my Git script
echo commit all changes
git config user.email “xyz@abc.onmicrosoft.com”
git config user.name “Automatic Build”
git checkout develop
git add –all
git commit -m “solution init”
echo push code to new repo
git -c http.extraheader=”AUTHORIZATION: bearer $(System.AccessToken)” push origin develop
LikeLike
Hi Ankush, someone else reported that they ended up having to fix the 128 error by checking “Allow scripts to access the Oauth token” on Agent level to get rid of the (128) error. Not sure if that is your issue, but something to check.
LikeLike
hi Nick, this process will work if a solution is being used but in my case i have a canvas app button triggered flow that isnt supported by solution yet and needs to be created outside a solution and hence i cant use powerapp build task to push it from tenant to tenant, is there a way to push the app including the flows instead of a pushing solution ?
LikeLike
Since Microsoft is working towards making all Power Platform components solution aware, I don’t know if there currently is something in the Power Apps build tasks to move non-solution components (except manually). I have a few projects where I also need to do this. If I find out something, I will post back here. Cheers, Nick
LikeLike
Hi Ankush, Nick Well I do get an permission error along with # 128. Any clues?
remote: 0000000000aaTF401027: You need the Git ‘GenericContribute’ permission to perform this action. Details: identity ‘Build\d62d8b1e-06b9-4132-bb09-c3b453882a91’, scope ‘repository’.
remote: TF401027: You need the Git ‘GenericContribute’ permission to perform this action. Details: identity ‘Build\d62d8b1e-06b9-4132-bb09-c3b453882a91’, scope ‘repository’.
##[error]Cmd.exe exited with code ‘128’.
LikeLike
Hi Rohit. I realize that this is a relatively old comment, but I came across it while researching the same problem and thought I’d share the solution that I found in case you or others still need it:
https://powerusers.microsoft.com/t5/Building-Power-Apps/How-to-successfully-commit-PowerApps-Build-task-in-devops/td-p/558103
LikeLike
Thanks for sharing!
LikeLike
Hi Nick,
Thanks. Yes “Allow scripts to access the Oauth token” on Agent level to get rid of the (128) error was the solution for me.
It was not clear enough for me where to look for the “Allow scripts to access the Oauth token” option.
In your blog it is under “Agent job Run 1”– > Advanced options– > “Allow scripts to access the Oauth token”
Thanks again. Not sure if you should add this to your blog 🙂
LikeLike
Thanks! I didn’t run into this, but I know others have, so I update my blog over the weekend. I am glad you got this to work!
LikeLike
Thanks again, screenshot added!
LikeLike
Very useful, I am using that on a regular basis now! Thanks!
LikeLiked by 1 person
Hi Nick, very useful post. How would you organise multiple solutions in DevOps on a long term implementation? as a single project with multiple build/release pipelines or as different projects . I work in house and we do lots of small changes on a regular basis and then larger “projects” to implement new functionality in different business areas.
LikeLike
Hi Matthew, I generally have different solutions for specific projects or areas, and one repository per client. Using my “powershell” method (in the previous linked blog) I specify the solution in the command line, so same process, same repository, but different solution gets processed. The Azure DevOps pipelines has the solution name set as variable (so I can change for different projects), but I am looking at better ways to parameter-ize that so I can use the same pipeline for different projects. I started playing around with Power Automate (flow) to easily kick off different projects/solutions but likely will end up building a simple canvas app “pipeline admin” tool where I can easily choose a particular environment and solution and kick off the process. This might be a blog post in the future. I am still learning and sharing what I figure out along the way. Cheers, Nick
LikeLike
Hi Nick,
nice read! Very useful.
We are using JIRA on-premise for task management. and BitBucket as Source Control.
Do you see any way on how we can implement an ALM like this with JIRA on-premise?
Unfortunately I have absolutely no admin expertise in either of these applications, but I am pretty sure we would be able to have some action triggered upon merge of a branch.
I guess JIRA and Bitbucket run on a Linux server we could then execute a PowerShell script on.
So I guess that should in theory work… did I forget anything?
Also, what about Patches? We are right now using patches to deploy, because it basically lets us deploy within business hours (as patches only take like ~1 minute and only effect the included entities).
Are Patches also possible using PowerShell scripts?
LikeLike
Hi Serf
I have no experience with JIRA or bitbucket, but if you can interact using PowerShell then this should be doable. I believe bitbucket might be on the list of source control systems that Azure Dev Ops can interact with.
This should work with Patches, all I am doing in these pipelines is replicating all the “clicks and file copies” that are tedious when doing this manually. Its much easier to kick off a pipeline and let the computer do your work. Sorry I can’t be of more help. Cheers, Nick
LikeLike
Hey Nick,
Looks like Microsoft released a Power Platform (publicPreview) service connection! It looks like the way you authenticate is using an Azure Application ID, not the username and password like we did with the generic connection.
I grabbed a screenshot but it wouldn’t let me include them in the reply.
LikeLike
I did see that! I haven’t had a chance to look too deeply into it yet.
LikeLike
Hi, Can you please help with solution versioning with these tools? Is there any way to include dynamic logic to “Solution Version Number”.
LikeLike
You should be able to do this with PowerShell, I haven’t integrated this into ADO, but I have used PowerShell to create a custom version number. There is an example in my GitHub site: https://github.com/readyxrm/simplealm
LikeLike
Great explanations, however I am having following error:
SolutionPackager: Exception thrown: Microsoft.Crm.Tools.SolutionPackager.DiskReaderException: Cannot find required file ‘D:\a\1\s\Solution\package\PluginAssemblies\ATCPlugins-79EBA6DF-AB26-4CBD-AC2B-DC82C438840D\ATCPlugins.dll’
I am Unpacking solution in My VS using SPKL and then pushing it into Azure Devops Repo
But when using Power Platform Pack Task its throwing avobe mentioned exception:
Although if I Pack solution on my local machine it is generated without any issue
Any Suggestion
LikeLike
I am not sure, if you browse the files in your repo, can you locate that DLL in the same folder structure? I am wondering if something got truncated or moved around when you pushed it to your repo?
LikeLike
How do you share a canvas app if it’s deployed in a managed solution to your production environment?
LikeLike
Hi Philip, I believe this is still a work in progress on Microsoft’s end. Currently, a canvas app still gets transported as an “unmanaged” component, so you need to manually share it on the production side.
LikeLike
Hi, thanks for replying so quickly, sadly the canvas app goes in as managed. It’s a bit painful.
LikeLike
Thanks Nick – great article and thanks for helping evangelizing that thou shall not import/export manually and always have source control! Note that we recently released the GA product (https://marketplace.visualstudio.com/items?itemName=microsoft-IsvExpTools.PowerPlatform-BuildTools) that also supports SPN auth which solves the MFA challenges. Happy to get any feedback
LikeLike
Thanks Per! Its on my list of to-dos to review the updated tools and update this post! Keep up the great work!
LikeLike
Thank you Nick this was amazing! Some work had to be done to set up a service principal to get around MFA but it wasn’t too bad.
Is it possible to create a pipeline that automatically connects a Canvas App to different endpoints? If, for example, the development environment connects to a development instance of Azure SQL Server and you want the production environment to connect to the production instance?
Thanks
LikeLike
Hi Sean, not yet, but I believe it will be coming eventually. Here is a link with known limitations; https://docs.microsoft.com/en-us/powerapps/maker/common-data-service/solutions-overview#known-limitations
LikeLike
Hey Nick,
Thanks for this incredibly helpful and detailed explanation!
For some reason, I’m not able to get ANY of the Power Platform build tasks to run, as they keep failing with the following message: You cannot call a method on a null-valued expression
I did some digging, and it looks as though the tasks all fail on this line of code in the PS script: Trace-VstsLeavingInvocation $MyInvocation
Admittedly, while my understanding of PS is abbreviated (at best), I tried doing a fair bit of research to determine the root cause of the issue, however, I still wasn’t able to figure it out. Any idea what can be causing this?
Thanks!
-Chris
LikeLike
Sorry for the massive delay in responding. I hope you did find a solution, but if not, I suspect permissions issues, double-check you have the right permissions selected for the right elements. Cheers, Nick
LikeLike
Hi Nick, Thanks for this amazing post. I want to know that after exporting solution to repos can we edit the code or add new features to the solution from repo itself by adding few lines of code and also i am able to see only files in xml format.
Actually in power app while editing we have some visalization of things but how can you do it in repos while developing new features.
LikeLike
I think you might be asking about merging code into the unpacked solution files and then packing into a solution file and importing to a new environment? Its possible, but has some issues. I will defer you to Alex Shlega’s post on the topic which might provide better insight: https://www.itaintboring.com/uncategorized/devops-for-dynamicspowerapps-q-a/
LikeLike
Nick, will the Build tools work against a service connection pointint to on-premise D365 orgs or is it only for Online orgs?
LikeLike
Hi Prahhaker, I am about 99% sure its for online only, I can’t test because I haven’t been working with on-premise for a few years now and don’t any environments setup. I would suggest to try it? If you learn anything, please share in a comment back here. If it doesn’t work, my other post using PowerShell commandlets to export/import solutions *does* work for both online and on-premise. Cheers, Nick
LikeLike
Hey Nick,
I’m getting the error message “##[error]The given solution unique name (pfc_Recruitment) is not valid” but that is the Unique Name that’s shown on the Properties tab in the App Designer. I have tried the Name which is RecruitmentHub but this has also failed. I have no idea what to do next can you point me in the right direction?
James
LikeLike
It should be the solution name that is listed on the Solutions tab under the “name” column, not what is shown in the App Designer. I hope that helps.
LikeLike
James Ryan . Did u end up solving this issue ? Ime too facing the same .
LikeLike
Found the Solution. Solution Unique Name can b found –> 1.Export Solution zip file from the https://make.powerapps.com/
2. –Unzip the zip file. Then open the Solution.xml file
the –
TestDevToSIT
tab has the SolutionName that is provided
3. Check if the above provided Uniquename matches with the
SolutionName that you have provided in the Variable ‘SolutionName’ in Azure Devops.
In my case the 2 did not match.Oncei regerenarated the zip file (after clicking on Export Solution). Uploaded new zip file into REPO.Ran the Pipeline.
Voila , it works !!!!!!
LikeLiked by 1 person
Incredibly useful, thank you!
LikeLike
Hi Nick,
I just wanted to let you know that I tried clicking the link for the GitHub you linked, but it’s coming back with Page not found.
Thank you so much for this article, it’s been really helpful!
LikeLike
Thanks! That’s a bummer and I am trying to find the updated link (and not having too much success yet) and will update my post. Cheers, Nick
LikeLike
Hey Nick,
I keep on coming back to this article as my guide every time I start a project for a new client. Thanks so much!
One issue I came across recently is that Microsoft updated the name of the root level in Repos from “master” to “main” so anyone else using this will need to modify the git commands in the Command Line with that substitute.
All my previously created Repos and Pipelines are fine but any new ones created use the new name.
LikeLike
Thanks Scott for the heads up! There have been so many updates in this space, and its been on my backlog to update this blog post. Its hard to keep up!
LikeLike
Great Article! I’m wondering if anyone has experienced the following and know how to overcome. We following the steps and deployed a canvas app from dev environment to a test environment. However, shared users whom had access to it in dev do not have access to it in test. Also, the admin of the app does not have access nor ability to share it. We see the solution and the app within but can’t seem to do anything. Any insights, guidance would be appreciated.
LikeLike
Sorry for the delayed response, but the owner of the app (whomever imported it on test) should have the ability to share it? I know its been a month since this question has been posted so I hope you have found and answer, if not, definitely post on the community forums or open a ticket with MS.
LikeLike
I just ran into the same issue. There is a ticket in MS that suggests that the App is shared through the Power Platform Admin Center and this works. However, this too me seems impractical when you are trying to automate the whole process. I’ve been wondering if the permissions can be set in the solution before starting the pipeline, I’m just starting to work with solutions so I’m not too familiar with all the options that might be available.
LikeLike
Thanks for this article Nick! I have been using it just about since it came out as a reference. As an FYI – I have recently encountered an issue with the naming of the “master” branch in the repository. It looks like DevOps has changed the default name from “master” to “main.” Took me a while to realize when I created a new project but then everything went back to normal once I switched the command line script from your article and replaced master with main.
LikeLike
And just like that I didn’t realize that another commenter already had mentioned this!
LikeLike
What if we migrated apps from one tenant to another? Example, canvas app in production points to the site in dev, the app won’t work because SPO connection reference in production still points to dev SPO site which is a different tenant. We can’t modify a managed solution, even the connection references. How can we overcome this?
LikeLike
When you import a solution, even if it is managed and to a different environment, it should prompt you to update/configure the connection references. This is a fairly new feature.
LikeLike
Hi Nick,
Below is my git script which is same as your’s :
echo commit all changes
git config user.email “Xxx@Xxx.onmicrosoft.com”
git config user.name “Automatic Build”
git checkout master
git add –all
git commit -m “Power Apps solution commit”
echo push code to new repo
git -c http.extraheader=”AUTHORIZATION: bearer $(System.AccessToken)” push origin master
But somehow the changes are not getting committed in Git getting a message “nothing to commit, working tree clean”. Although I have new changes in my solution.
Could you please help me with this.
LikeLike
I believe you may have to change “master” to “main”, a few commenters noticed this as well.
LikeLike
I am using “master”, everything is fine the pipelines runs successfully even its moving the solution to the destination the only catch is that the apps are not moving along with the solution.
LikeLike
Are the assets in your solution Canvas apps? I was updating some changes yesterday and all my dataverse, model-driven, etc moves over, but my updates to the Canvas apps did not. I am now beginning to wonder if there is a bug with canvas apps in solutions? I am planning on trying to replicate the issue on a different environment and will post back here.
LikeLike
Awesome post (itself a seminar in technical blog writing)!
I’m curious what your thoughts are about setting up a DevOps pipeline WITHOUT “Solutions”. Being exclusively a Canvas app shop with NO CDS, Solutions have never appealed to me. There is the case where occasionally a Flow will be tied directly to a Canvas app rather than to the app’s data source. In those instances, a Solution would be nice to keep the two elements together.
Do you think keeping Canvas apps under version control is possible without Solutions?
LikeLike
I doubt it. Solutions are the defacto standard Microsoft is pushing for moving assets. There is an idea for MS to provide PowerShell scripts for this, but not sure where its at: https://powerusers.microsoft.com/t5/Power-Apps-Ideas/PowerShell-Cmdlet-to-publish-deploy-the-form-to-different-same/idi-p/253693#M25558
LikeLike
Yep, excellent post. Might the writing style and the justified actions influence the poorly written posts by well meaning folks.
Thank you Nick.
LikeLike