

Before we dive into today’s tutorial, today Adoxio (the consulting arm of the old Adxstudio) released Adoxio Connect Framework to allow seamless integration to other platforms. Something I will be definitely checking out.
Retrieving Dynamics 365 Data with Liquid
In Part 1 we looked at a very basic Web Template using Liquid. One of the great things about the Liquid Markup code is that it can be incorporated into other areas like Web Page copy and Content Snippets.
Microsoft’s implementation of Liquid can also be used to show data from Dynamics 365 (Customer Engagement).
In my example, I am going to use Liquid to retrieve an Invoice and show the Invoice Name, the Invoice Status and the Invoice Amount and display that on a Web page.
In order to be able to show some data, we need to be able to know what record we want to pull from Dyn365. We will discuss using FetchXML in a later post but now we will retrieve a record using a GUID.
A simple way to demonstrate this is to first setup a standard Entity List. Here I created a view in Dyn365 that shows a list of Invoices, filtered by the current logged in user.

When we setup the entity list in the Portal section of Dyn365, in the Grid Configuration section, we will configure a “Detail” Item Action to drill down to webpage. This is portal 101 stuff. Note that we will be passing a “Record ID Query String Parameter Name” defaulted to “id”. This is important for our next step! From the list of Invoices, this will pass the GUID of the Invoice that we want to display on our web page.
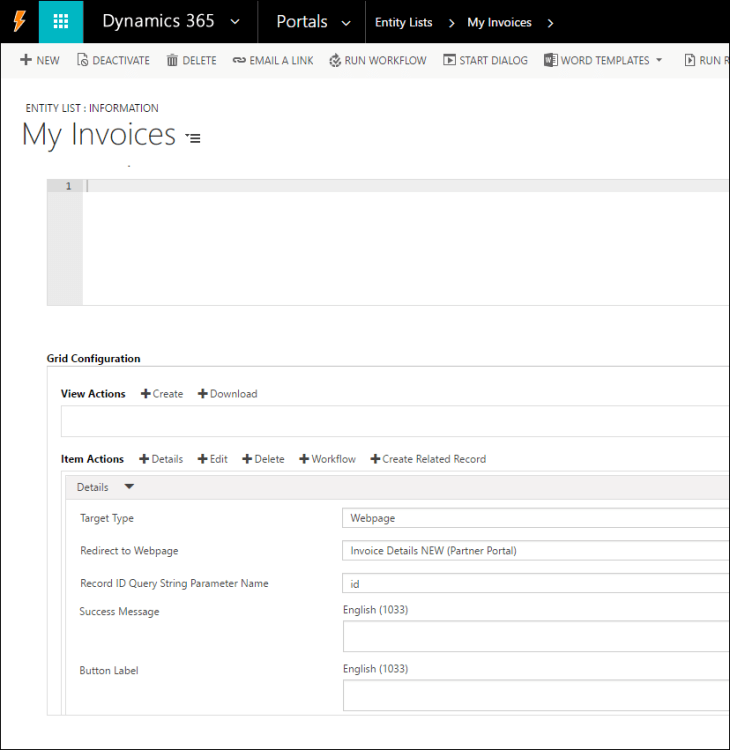
While I could setup a custom Web Template with Liquid code, in this example I am going to just embed the Liquid directly in the Web Page copy field. Note that I switched the editor to “HTML”

Here is a line by line breakdown of the Liquid Code:
The first line I want to display the GUID of the Invoice record, since this getting passed as a parameter (id) to this web page, I can show that with a Liquid Object “request.params” and the “.id”
You will see that we can add regular HTML formatting (<p></p>)
Request Params: {{request.params.id}}
The next section is a repeat of part 1, using Liquid tags “if – else” statement.
{%if user%}
Greetings {{user.fullname}}
{%else%}
Greetings Friend!
{%endif%}
FINALLY, into the meat and potatoes of this post, the next is where we will retrieve the invoice record from Dyn365 using the entities[<<entity name>>][<<guid>>] and “assign” it to custom Liquid object (invoice).
{% assign invoice = entities['invoice'][request.params.id] %}
If it can’t find the particular record for that entity, it will just assign NULL, there will be no error message.
Now that we have the Invoice record in a Liquid Object, we can display some of its attributes (fields)
{{invoice.name}}
{{invoice.statuscode.value}}
{{invoice.totalamount}}
The end result looks like this:
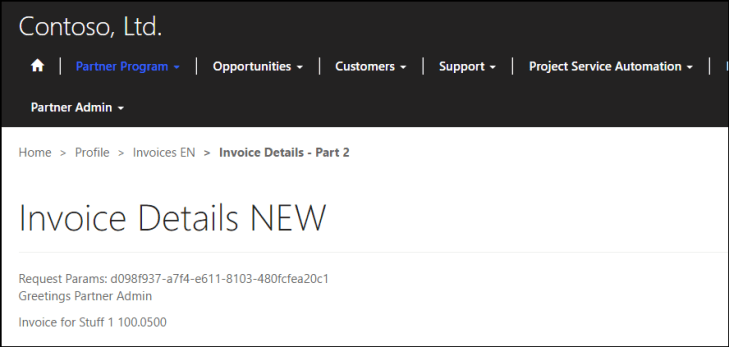
I didn’t put in any special formatting but you now see the Invoice record data being displayed. While you can still surface data using Entity Forms and Web Forms, using Liquid gives you a lot of flexiblity in layout and formatting.
Be sure to get your swim suits ready because there is a more Liquid coming up in future posts!

Cheers
Nick


Reblogged this on Nishant Rana's Weblog and commented:
Liquid Markup to show Entity Record in Portal in Dynamics 365
LikeLike