

If you work with building Power Apps portals, as you make updates to pages, assign users to Web Roles or make any other changes, you want to see these changes immediately on the portal.
You are likely very much aware of the Portal studio Browse Website function or the Clear Cache button available in the /_services/about page for administrators.
Clearing the cache ensures that all the latest updates to the portal metadata as well as Dataverse info are visible on the Power Apps portal. The process is so popular that even world famous podcasts use it as a title.

How Power Apps portal Caching Behaves
That works fine for development and administration, but what about day to day usage of the portal? The Power Apps portal uses caching to increase overall portal performance. This means that the portal does not make a direct request back to the Dataverse for each individual data update. If it did, the performance of the portal would be incredibly slow. The downside is that if you have updates made to Dataverse, either using an internal app (such as Dynamics 365 or a custom model-driven app) or updates via flow or other integrations, you may not see this updated data on the portal for quite a few minutes.
The actual SLA (service level agreement) is 15 minutes, as per Microsoft documentation.
So if I view a record on the portal;

And then update the record in a model-driven Power App and save;

If I go to the portal, there is no immediate visible change, as the cache has not yet refreshed. This will usually take only a few minutes but might be as long as 15 minutes (based on the SLA).

If you do the reverse, that is update data from the portal to Dataverse (via an Entity Form or Web Form) then the data is updated immediately in Dataverse and immediately visible in an app.

Since the Portal made the “last move” it will clear the cache for this particular record it just updated and will reflect that on the portal page.

In most cases, this operation is perfectly acceptable on portals and there isn’t necessary a need for “real time” data, having the data a few minutes old is not a show-stopper. However, in some situations you may want for users to see immediate results (potentially based on an action they have taken) or from other integrations or updates.
According to the documentation, using things like plug-ins or workflows to trigger some form of data reflection is not recommended. It also states that the 15 minute portal refresh timing cannot be changed (translation; don’t ask).
Portal WebAPI to the rescue?
I do get the question quite often about how to address situations where portal users need real-time information from Dataverse. I considered if using the Portal WebAPI could be used as a way to ensure the data viewed on the portal is up to date.
The following method would be considered a bit of hack/workaround and since the Portal WebAPI (at time of writing) is still currently in preview, my guess is this method would not be 100% supported. Therefore, I present it to you as an educational piece and make no warranties or advice on best practices (but it works).
The idea is simple, before we view a particular record, we make a very minor update using the Portal WebAPI. The portal to Dataverse updates are immediate, and since the portal “made the last” move, it will clear the cache for that particular table from Dataverse.
Here are the high level steps for this technique:
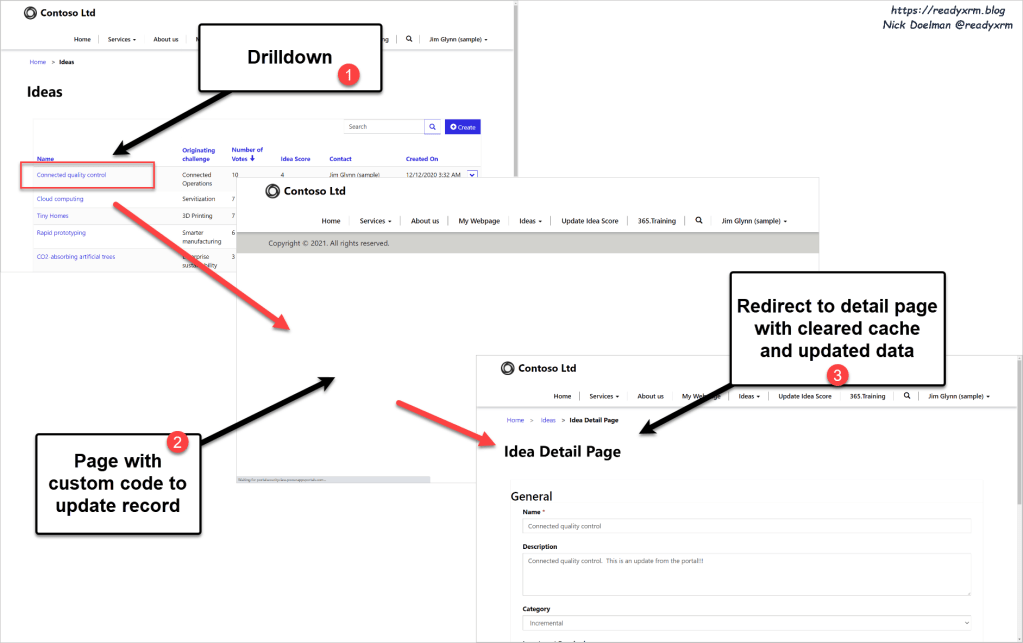
- The user retrieves a record (e.g. drill down link on portal Entity List component, passing the GUID as a parameter)
- The list will be configured to redirect to a web page with a custom web template
- The web template will have code that will update a single field on the particular record with unique information (time stamp info) using the Portal WebAPI
- The web template will redirect to an actual web page with an entity form component that displays the record from Dataverse, since it was just updated by the portal, the cache will be cleared and it will show the latest info
- The downside is that the users will likely see the intermediate page “flash” as it runs the code and this process will cause a potential performance hit
Detailed Steps
Customize Dataverse Table
The first thing is the create a column (field) on the row (entity) that you want to see “realtime” on the portal. A simple text field will work. This will never need to be displayed or searched. I called the field “CacheRefresh”. You will also need to note the logical name. Publish customizations.

Configure Portal WebAPI Settings
The next step is to configure all the necessary settings for the Portal WebAPI. You can refer to my previous blog on the topic or one of my videos. I would also highly recommend using the Power Portal WebAPI Helper on the XrmToolBox.
You will need to ensure that the appropriate entity permissions, web roles, etc. are configured for the table (entity) that you need to be viewed in realtime. You will need to ensure that *write* permissions are enabled (and that might cause you some grief in other areas of your portal, you have been forewarned!)
The key thing is that the new “Cache Refresh” field is also specified in the WebAPI site settings as a field enabled for the Portal WebAPI.

Create Custom Web Template
When we provide our user a method to view a particular record, we are going to redirect them to a web page with the code that will update the record they want to view first. The user may see a “flash” of this page, so we don’t really want to add much content to it. I called the web template “CacheRefresh” but you can call it whatever you want. I will go in detail of the code below.

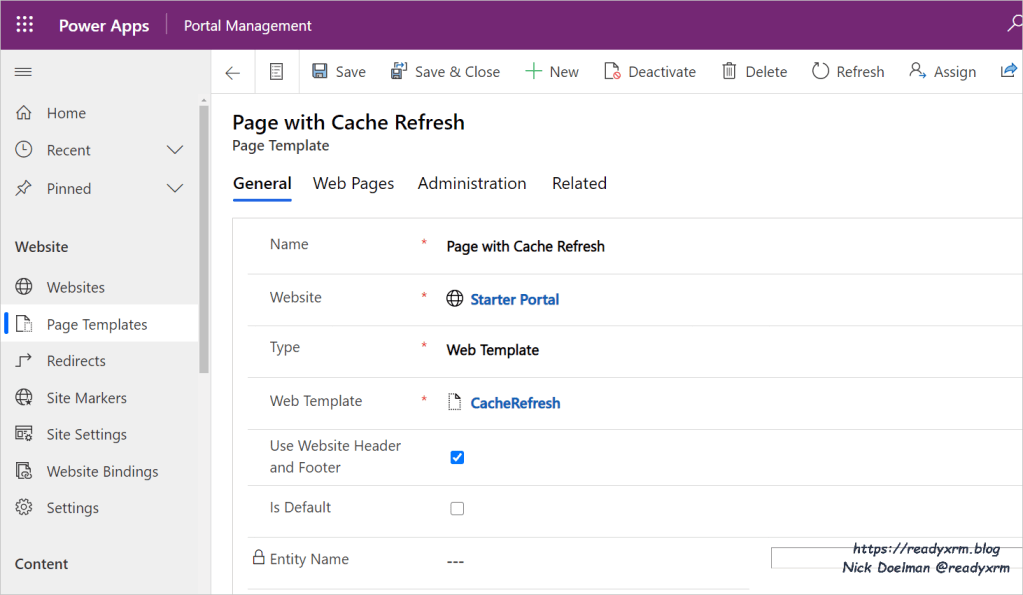
Create a Page Template
As we all know, you need to have a Page Template pointing to the Web Template in order to use as a basis for a web page. Note that even though we will not be navigating or not staying long on this page, we need the Website Header and Footer selected for the Portal WebAPI to work.
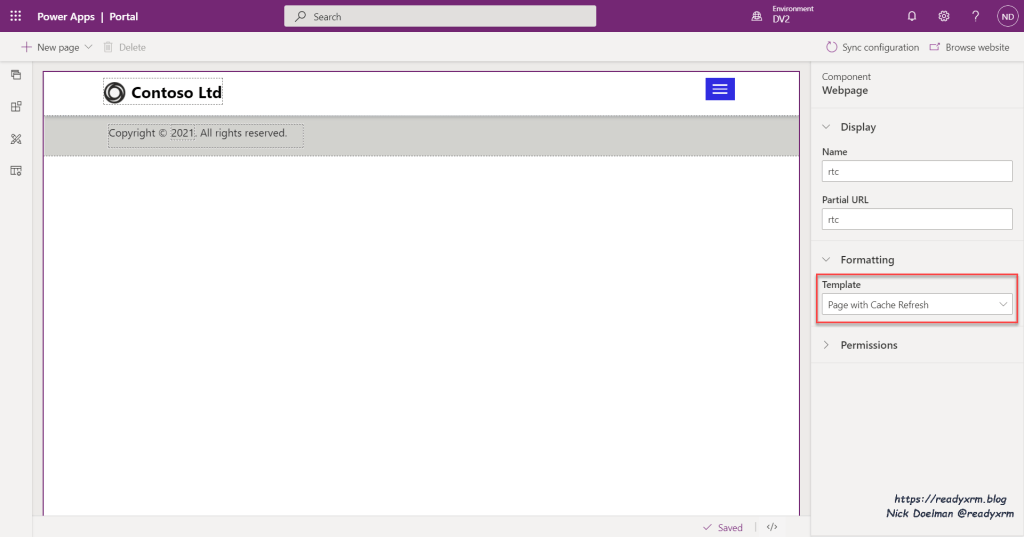
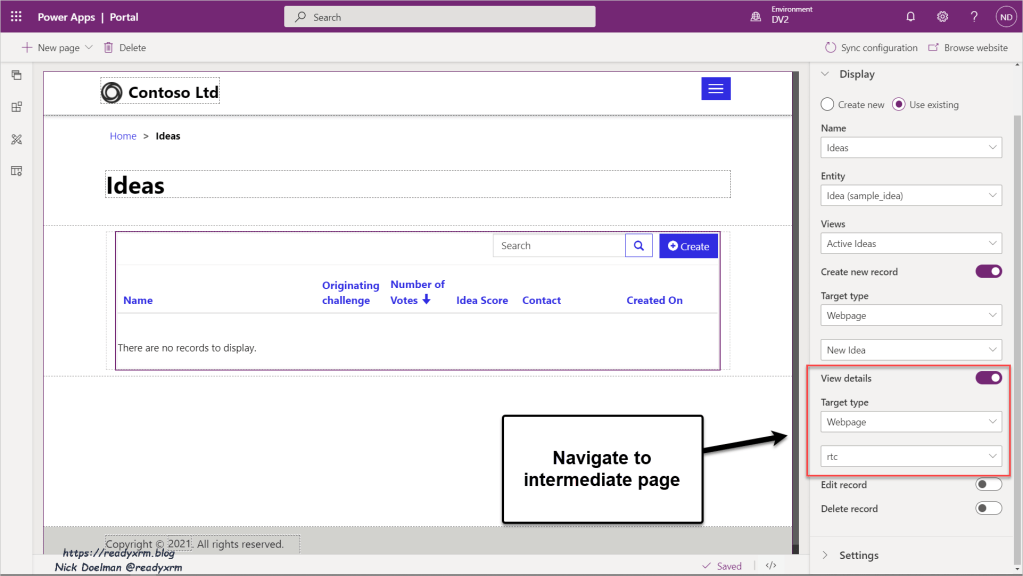
Create an Intermediate Page
Create a new web page (I use the Portal studio) and make sure you have chosen the Page with Cache Refresh template. This is where the Portal WebAPI code will be run to update the record you want to view.
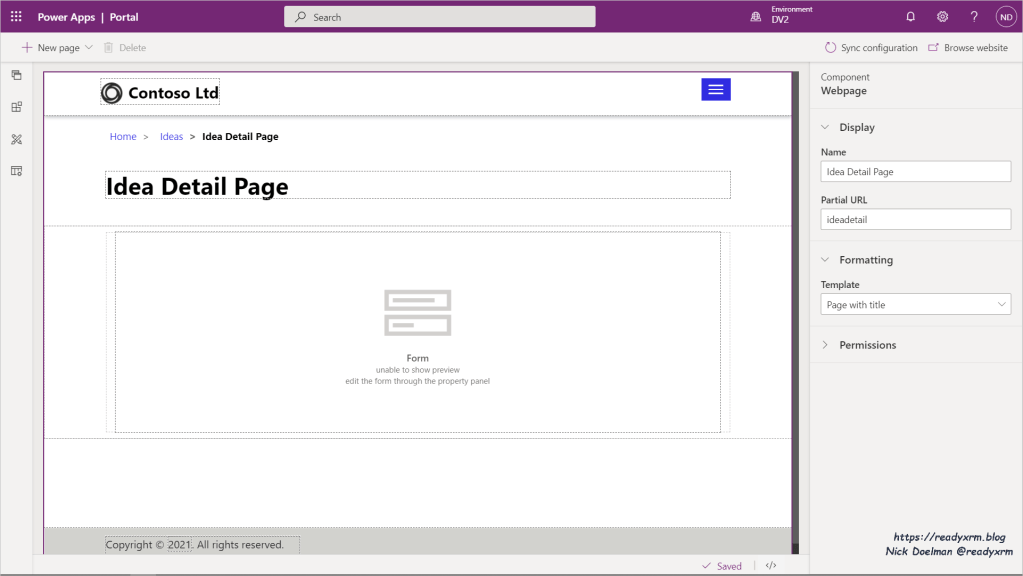
Create Detail Page
This will be the web page where you will view the particular Dataverse record that you need to see “Realtime” data. This can be a simple entity form or a more elaborate web template. There is really nothing different about this particular page that you would configure to view from a standard list..
Create a Site Marker to the Detail Page
We will eventually need to redirect to this page, as opposed to hardcoding the location, it is best to use a Site Marker that we can pull up in a custom Web Template.

Configure Drill Down Page
In this case I had an existing web page with a List component added. Instead of drilldown to the the detail page, I am instead navigating to the intermediate page I created earlier. The key is that the list component will pass the GUID of the particular Dataverse row (record) I want to view in “Real time”.
The Code!
As promised, here is the full code for the Web Template we created earlier;
{% block main %}
{% include 'PortalWebAPIAjax' %}
{% assign ideadetailpage = sitemarkers["IdeaDetail"] %}
{% assign guid = request.params['id'] %}
<script>
  function rtc() {
    try {
      var n = Date.now();
      var timestamp = n.toString();
      var guid = "{{guid}}";
      //alert(guid);
      webapi.safeAjax({
        type: "PUT",
        url: "/_api/sample_ideas(" + guid + ")/rxrm_cacherefresh",
        contentType: "application/json",
        data: JSON.stringify({
          "value": timestamp
        }),
        success: function(res) {
          console.log(res);
        }
      });
    } catch (err) {
      alert(err.message);
    }
  }
  $(document).ready(function() {
    rtc();
    //jump to actual detail page
    window.location.href = "{{ ideadetailpage.url }}?id={{guid}}";
  });
</script>
{% endblock %}
Let take a look piece by piece. We need a {%block main %} and {%endblock%} to contain our Liquid, HTML and JavaScript code on a template.
Next, we will use the Liquid include statement to reference the portal WebAPI helper code. As I mentioned in my previous post on the Portal WebAPI, we can keep this helper code in its own Web Template record to reference from various places in the portal.
{% include 'PortalWebAPIAjax' %}
The next line we want to retrieve the site marker info for our detail page, we will use this later to redirect the portal user to view the details.
{% assign ideadetailpage = sitemarkers["IdeaDetail"] %}
The next line will extract the GUID that identifies the Dataverse row (record) that we want to view. This will get passed automatically from a List component “View records” setting.
{% assign guid = request.params['id'] %}
Let’s dive into some JavaScript, obviously contained in <script> tags.
The function “RTC” (refresh the cache) will first get unique info from the Date.now() function that will return the number of milliseconds since 1970. This will generally always be an unique value which we will use to update the record in Dataverse, we will convert that to a string.
We will extract the GUID from Liquid and the rest of the code is “standard” Portal WebAPI syntax using a “PUT” statement that you can generate from the XrmToolBox Power Portal WebAPI helper or from copying from Microsoft docs and updating the values.
  function rtc() {
    try {
      var n = Date.now();
      var timestamp = n.toString();
      var guid = "{{guid}}";
      //alert(guid);
      webapi.safeAjax({
        type: "PUT",
        url: "/_api/sample_ideas(" + guid + ")/rxrm_cacherefresh",
        contentType: "application/json",
        data: JSON.stringify({
          "value": timestamp
        }),
        success: function(res) {
          console.log(res);
        }
      });
    } catch (err) {
      alert(err.message);
    }
  }
Before we run this function, we need to make sure the page is fully loaded, so we will use the $(document).ready(function() to wait for the page to load. We then will run the RTC() function above that will update the Dataverse record (and in the background, clear the cache for this data).
Finally, we will use the site marker and guid info to redirect to the actual detail page.
  $(document).ready(function() {
    rtc();
    //jump to actual detail page
    window.location.href = "{{ ideadetailpage.url }}?id={{guid}}";
  });
Like most things portals, there are a sequence of steps but from a high level I hope you find this overall process fairly straightforward.
Testing the Process
All of that work would have been pretty useless if it didn’t work, right?
Looking at the portal, I see my detail page showing some data from a Dataverse table (record).

If I go into my model-driven app, I update the record and hit save, notice the time is 5:22pm, meaning this update would NOT be visible on the portal for a few minutes and possibly as late as 5:37pm.

Now we will drill down on the record from the entity list.
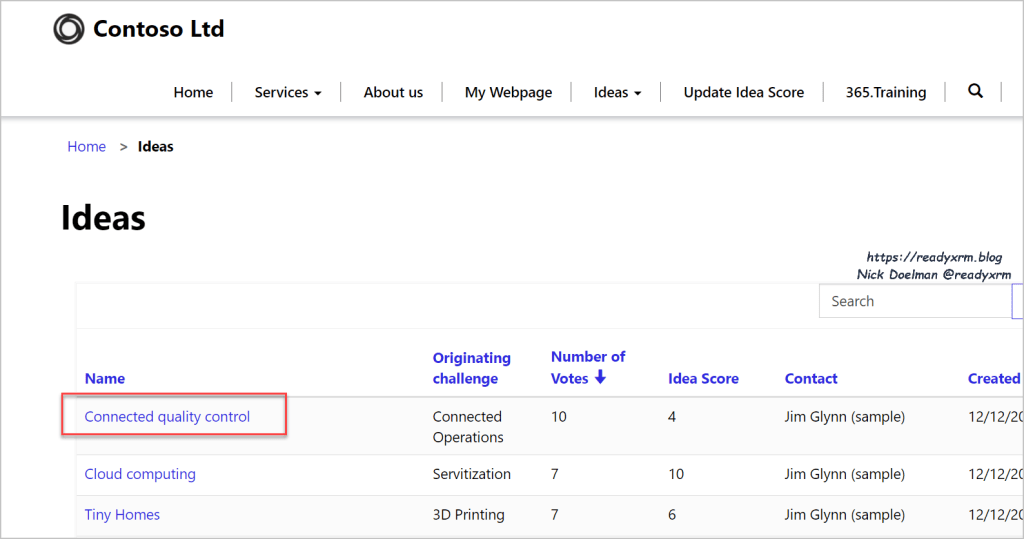
You might notice a quick view of the “intermediary page” before the detail page loads.
You now can see that on the details page, we see the updated data from Dataverse and the time is 5:23pm.

Questions and Thoughts
Do we need an intermediate page, could we not just add the code to the same page as the entity form?
That solution was my first thought, but remember that Liquid code is processed on the server, and this code is run on the client. So the entity form will need to be fully populated and rendered before the Portal WebAPI code could be run, so that is why we need to run it on a seperate page.
Could this affect performance?
Yes, anytime you clear the cache it will affect performance. I would suggest that this technique be only used when absolutely necessary, or for educational or demonstration purposes. 🙂
What about Entity Lists?
If you update just one record, it appears that the portal will clear the cache for the particular entity. In my scenario above, I updated a series of records in the model-driven app, open just one record, and then navigating back to the entity showed all the updates.
Is this supported?
Quick answer is no, because the portal WebAPI is still in preview, when it becomes Generally Available, then I would say that since we aren’t hacking with any kind of plug-in retrieve redirection scenario, I could argue it is supported, but Microsoft might disagree with me. I am sure I will get some feedback from this post.
Summary
The Portal WebAPI will open up a lot of possibilities when using portals, as well as other potential innovative techniques to solve everyday common issues. I hope you enjoyed this article and I also would like to wish you a happy new year!
Cover Photo by The Creative Exchange on Unsplash
Nick Doelman is a Microsoft MVP and Microsoft Certified Trainer. Nick has just launched a new course on https://365.Training called Power Apps portals Security Deep Dive. Follow Nick on Twitter at @ReadyXRM


Nice one Nick.
Would be great to have a supported Clear cache programmatically. But I think this approach might help in a good few scenarios.
LikeLiked by 2 people
Very well written and detailed article. Thanks for sharing!
LikeLike
ADX to Power Portals, versions changed but clear cache step( /_services/about) did not change for a long time. For sure a very good article as Cache is crucial in Portals. Thanks for Great article( idea ) Nick.
LikeLike
Nice idea and thought provoking as well.
It helped me to implement one scenario where we wanted portal to show real time updated on entity form.
I followed approach of adding code to same page to update Clear Cache custom field and hit OOB submit button programmatically. I have provided custom “Refresh page” button for user to click in order to see if any updates happened to record. I did not use Portal Web API as it was preview feature.
LikeLike