

When you build custom solutions where you need to create, read, update or delete data in the Common Data Service (including Dynamics 365 apps), you don’t necessarily want that application to use specific user credentials to do its work.
This used to be a common way for external applications and integrations to authenticate to the Common Data Service (Dynamics 365). A common example would be legacy portals where the username and password would be stored in the web.config file. Other custom applications could use the same approach. These “user accounts” would also at times be setup as non-interactive users so they wouldn’t consume a license.
A couple of key issues come up with the approach. First off, you need to store the username and password somewhere, ideally somewhere safe so malicious agents can’t extract the credentials and use them for other reasons. A server admin could stumble upon a config file and grab the credentials to an otherwise protected business system. “Oh, here is Dave’s login for Dynamics!” Oops.

Another reason is that you don’t want the “created by” or “modified by” values of your Common Data Service records to reflect a specific user when in fact it was an external application. “Dave, why did you update all of the account records last night at 2am?” When in fact, Dave’s user account was used in an integration to update discount rates from another system. Oops.
You also likely don’t want these integrating applications to fail when the specific password expires for that user account. “Dave, why didn’t the discounts get updated on the accounts last night?” Oops.
There are other issues such as if you enable multi-factor authentication, who will be able to confirm the login for these processes?
Application Users/Service Principal
The Common Data Service security structure allows the concept of Application Users. Application users a special accounts that allow access to the Common Data Service, however are managed from Azure Active Directory (Service Principal) and provide a way for external applications to securely access the Common Data Service.
One key use would for custom applications or integrations to talk to the Common Data Service through an API.
More recent popular uses would be setting Power Platform Azure DevOps pipelines or setting up Power Automate flows using the Common Data Services connector. This way the pipelines can run without worrying about expiring passwords and Common Data Service data can be updated by a Power Automate flow with the “modified by” field reflecting the application user. Access becomes secure using client secrets.
How to Set Up an Application User
The following instructions are available on Microsoft Docs here. However, I like screen shots and some context and hopefully help you avoid some pitfalls along the way.
The first step would be to login to https://admin.microsoft.com using an appropriate administrator account, in the same tenant as your Power Platform apps. This is the Microsoft 365 Admin Center, where you control many aspects of your overall Microsoft 365 tenant. Select Azure Active Directory on the left hand menu.
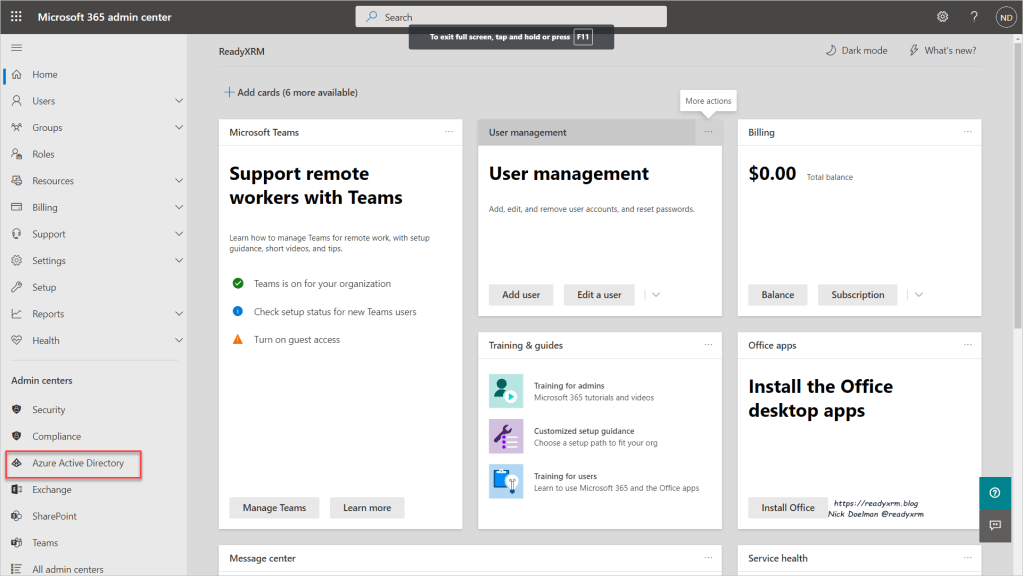
The technology that is the heart of controlling users, applications and access is Azure Active Directory (AAD). You will land on the AAD home page. Click on Azure Active Directory on the side menu to begin configuring assets.
Click on App registrations. We will be effectively setting up a way for our applications or tools to access our CDS environment and letting Azure Active Directory manage it. Click on App registrations and click on New registration.
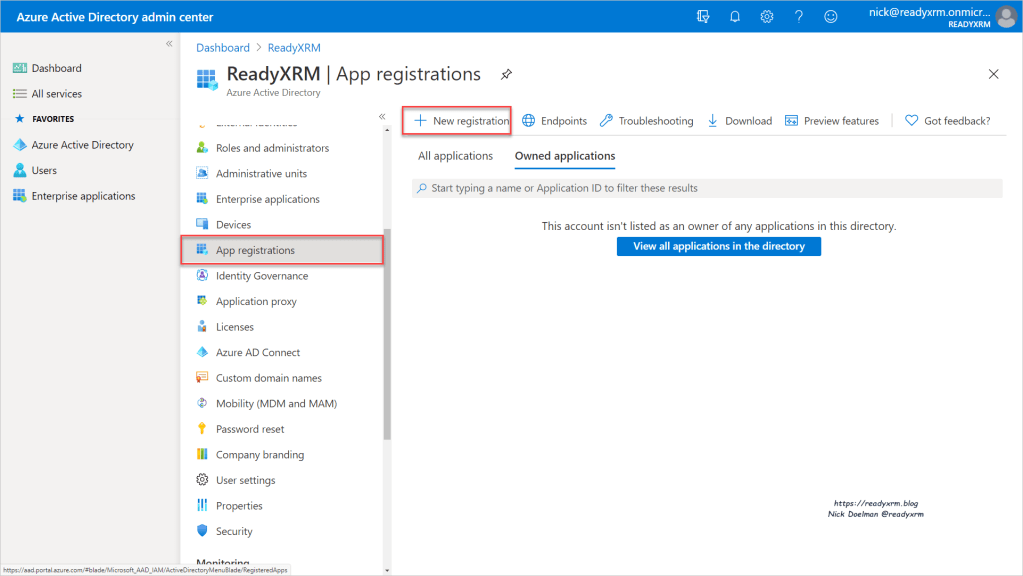
Give the application an meaningful name. For now we are only going to allow applications within this tenant access to our Common Data Service environment.

We now want to request API permissions from the actual application. Click on “Add a permission”
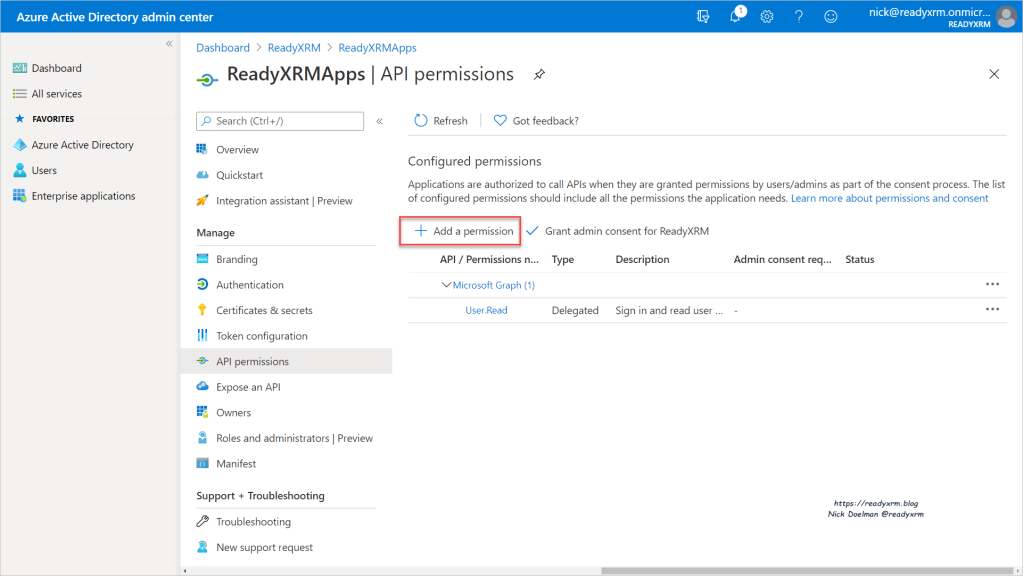
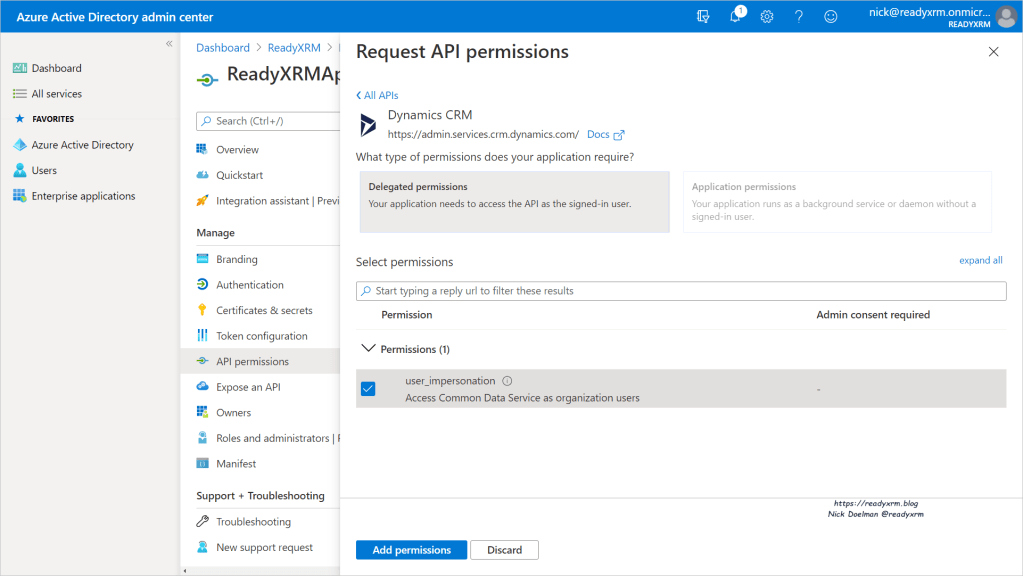
Here you will specify Dynamics CRM. WAIT A MINUTE! you shout. I don’t have Dynamics CRM! I have Common Data Service and apps, etc. I didn’t license any Dynamics CRM apps!
Calm down, take a breath. The marketing/rebranding folks at Microsoft haven’t found this part yet to apply a proper “Common Data Service” sticker. Essentially, what is Common Data Service today came from Dynamics CRM. The whole story can be found by clicking here. For now, to move on, trust me, choose Dynamics CRM.

Once that has been selected, with Delegated permissions highlighted, click the checkbox beside user_impersonation and click Add permissions
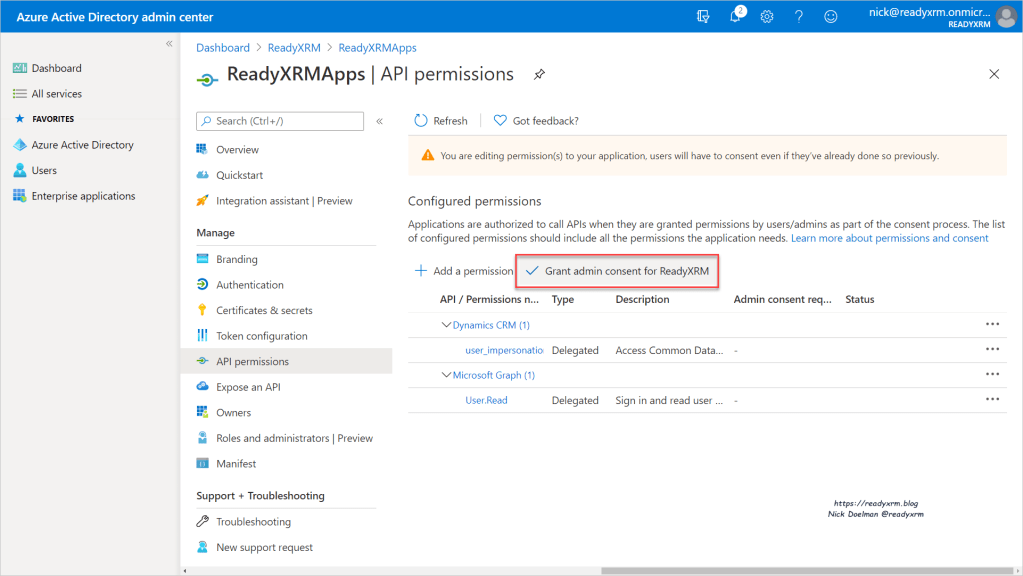
The next step we are allowing access to the Common Data Service by selecting the Grant admin consent.
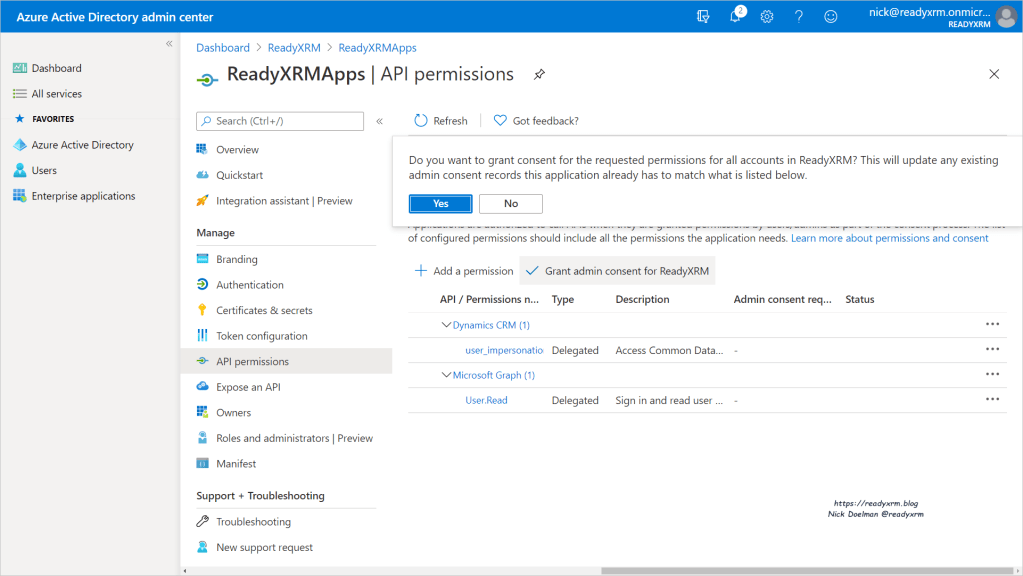
You will be asked to confirm, click Yes.
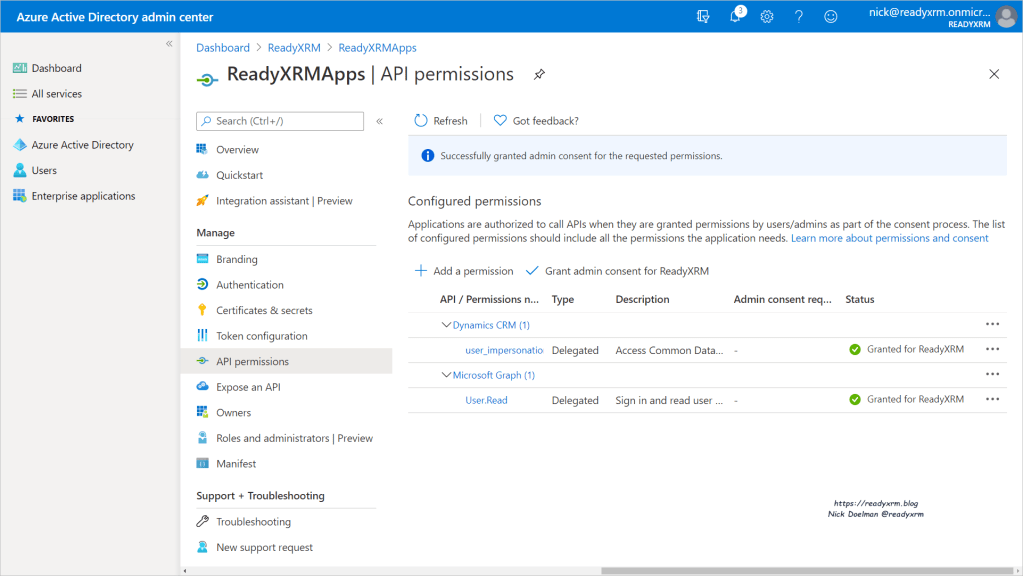
You should have a confirmation for granted admin consent.
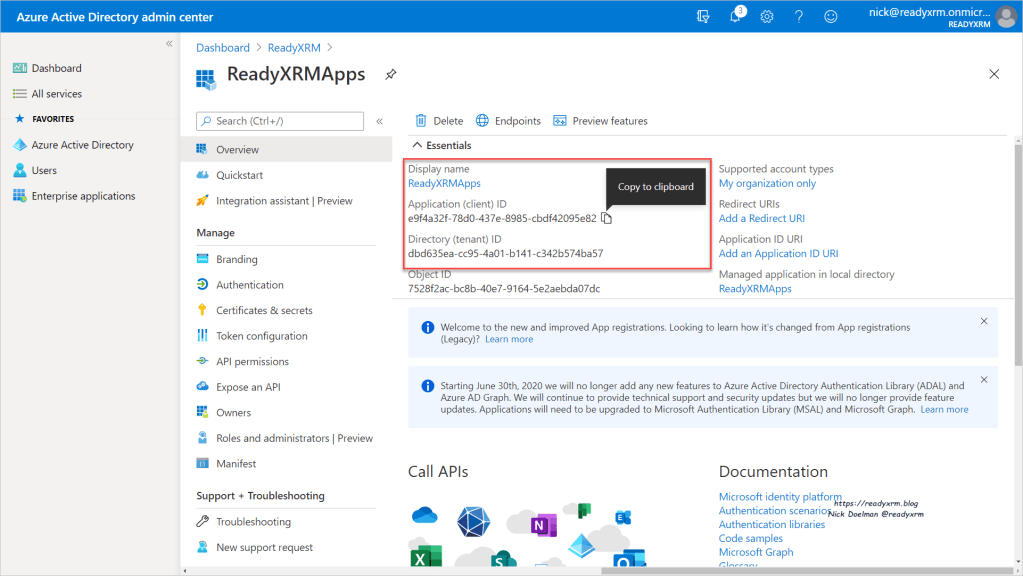
Now that the API request has been setup, we need to capture the name, application ID and the Tenant ID and save these values for later on.
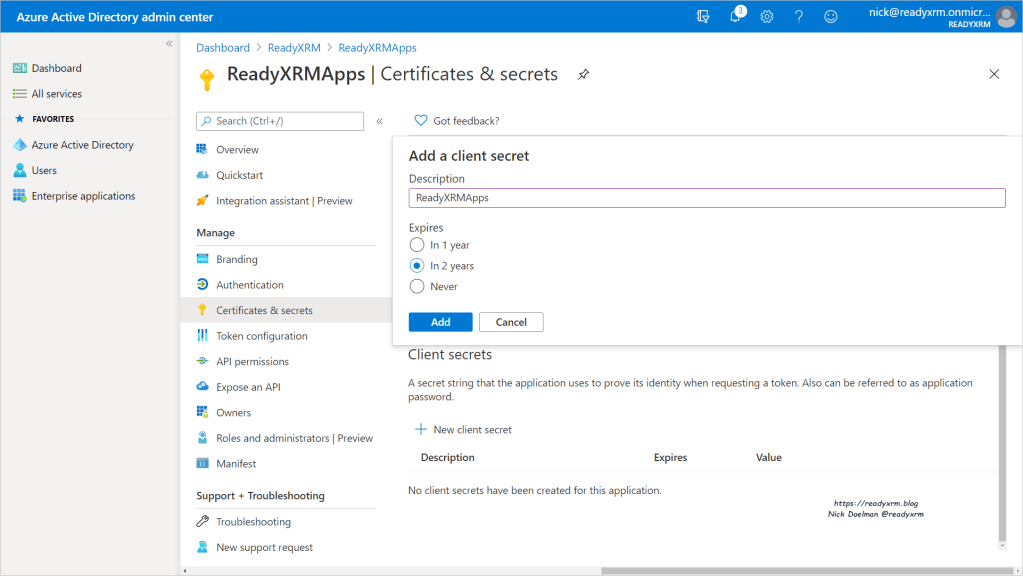
We now need to create the client secret so the application will have the secret handshake to access the Common Data Service. Click on Certificates & secrets and then create a new client secret.

You can then set when this secret expires, 1 or 2 years or Never. If you set an expiry date you will need to generate a new secret at that time.
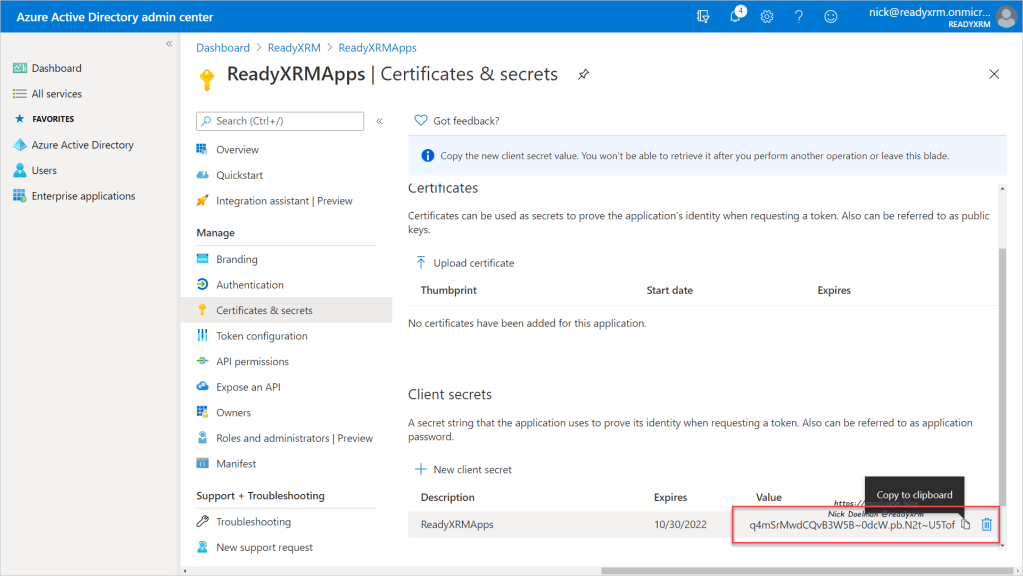
When the secret is created, copy it. Once you close this window you will no longer have access to this particular secret. If you do, you will need to generate a new secret.
Setting up the App User in the Common Data Service
Navigate to the Power Platform Admin Center (a handy shortcut URL is https://aka.ms/ppac)
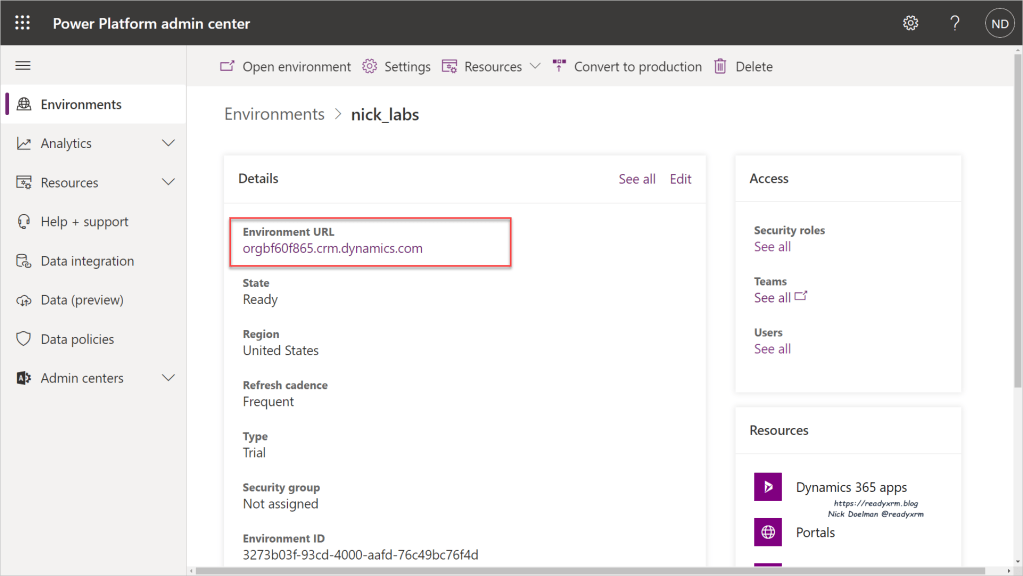
Select the particular environment that you want to provide access to.

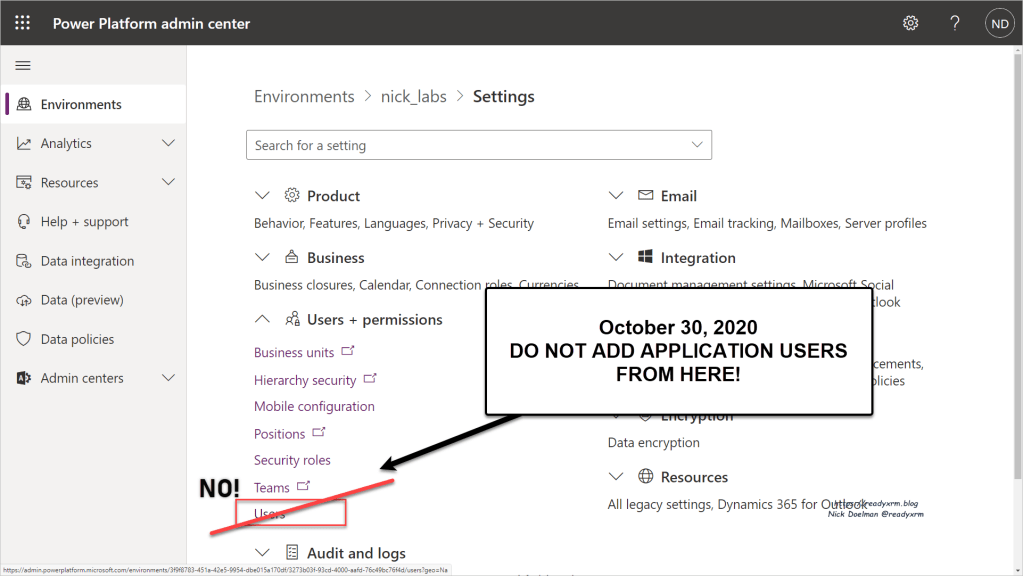
We are going to setup a new application user. To do this (as of October 30, 2020) we need to do this from the “legacy” interface. Click on the Environment URL link to go to the default model driven app.

NOTE: You might be tempted (I know I was) to add a user by going to the Settings and then User + permissions. There are a couple of issue with this method. The first roadblock is that there is no interface to create application users (only regular users). The second roadblock is that there is a link to “Dynamics 365 Users” (which is really Common Data Service users in this context… again, history, legacy, blah, blah, blah) However you will get errors using that interface setting up Application users.
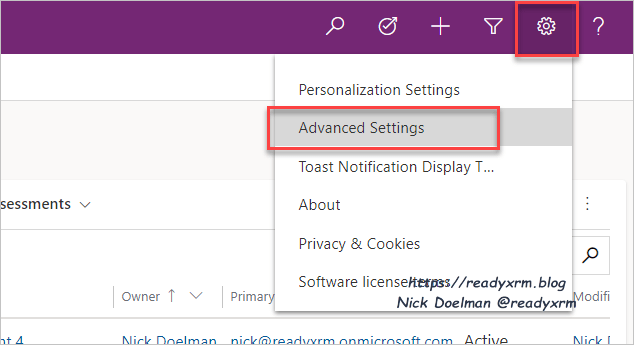
As I mentioned above, navigate to the default (or any) model-driven app in this environment. Easy was is to just click on the link.
Once you are in the app, click on the Gear Icon and then Advanced Settings.
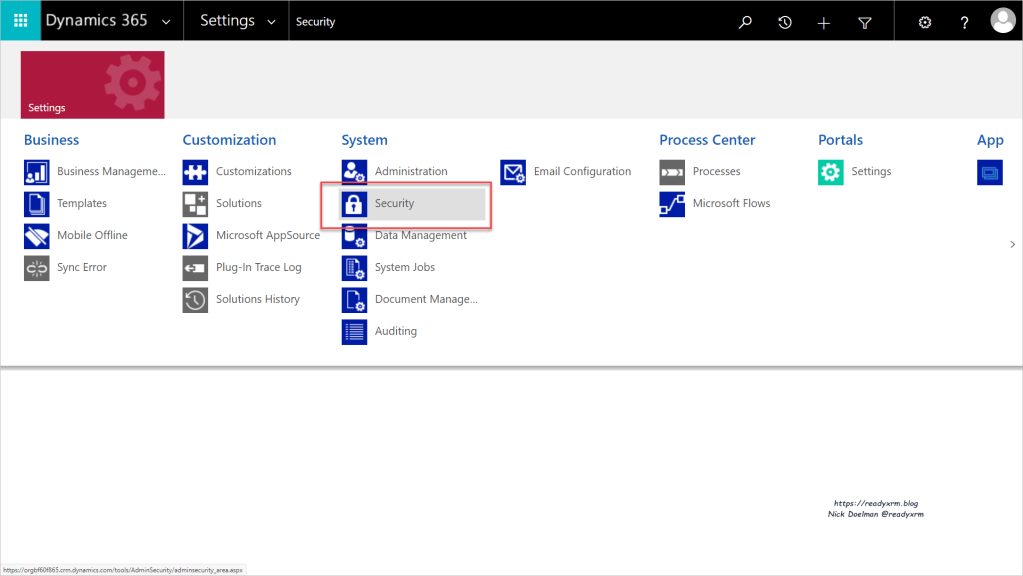
You will then be taken to the wonderful Dynamics CRM 2016 user interface. (Don’t get me started…) Choose Settings and the Security.
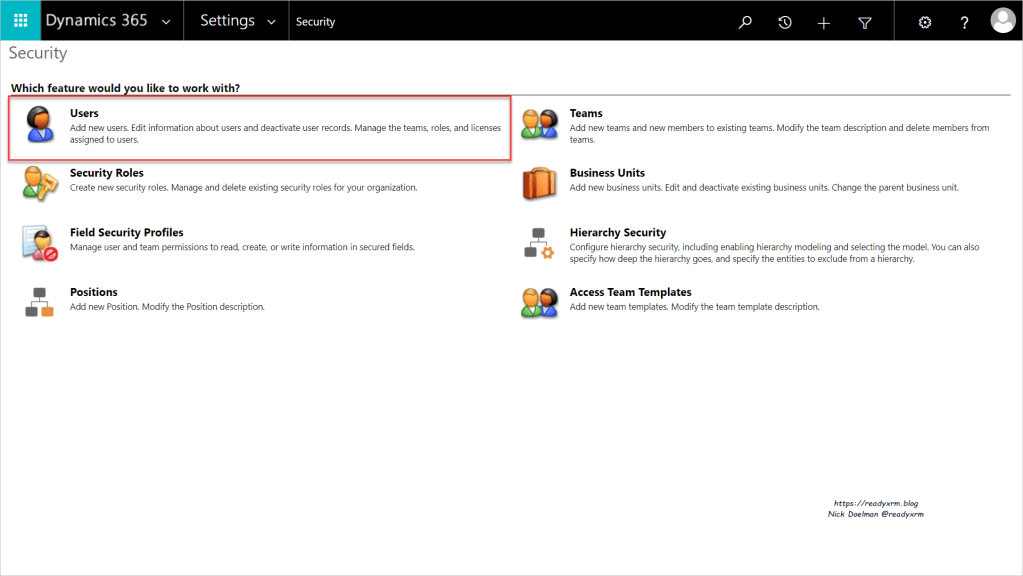
Then choose Users.
You will see a list of users, change the view from Enabled Users to Application Users.
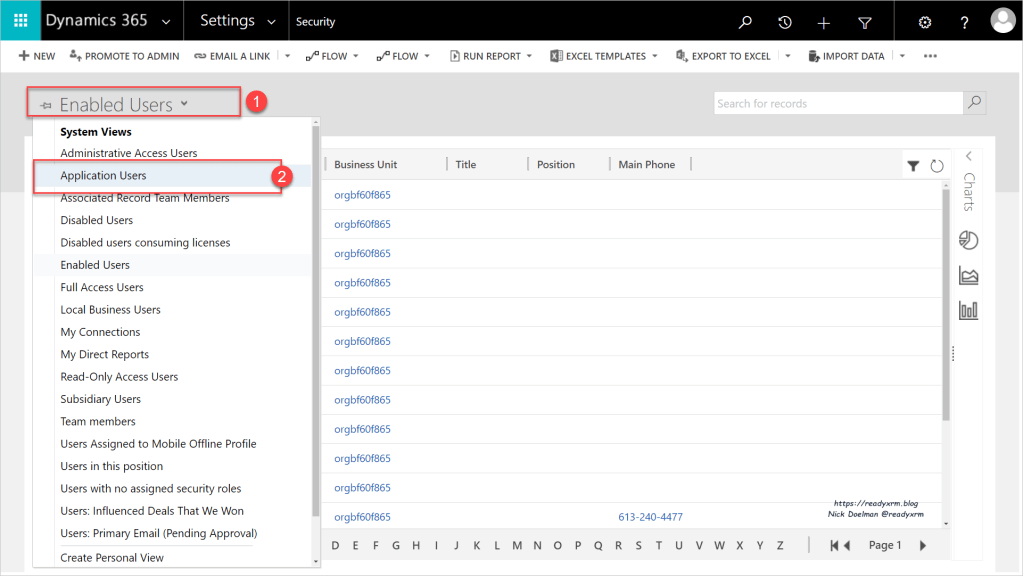
In the Application Users list, click New to add a new user.
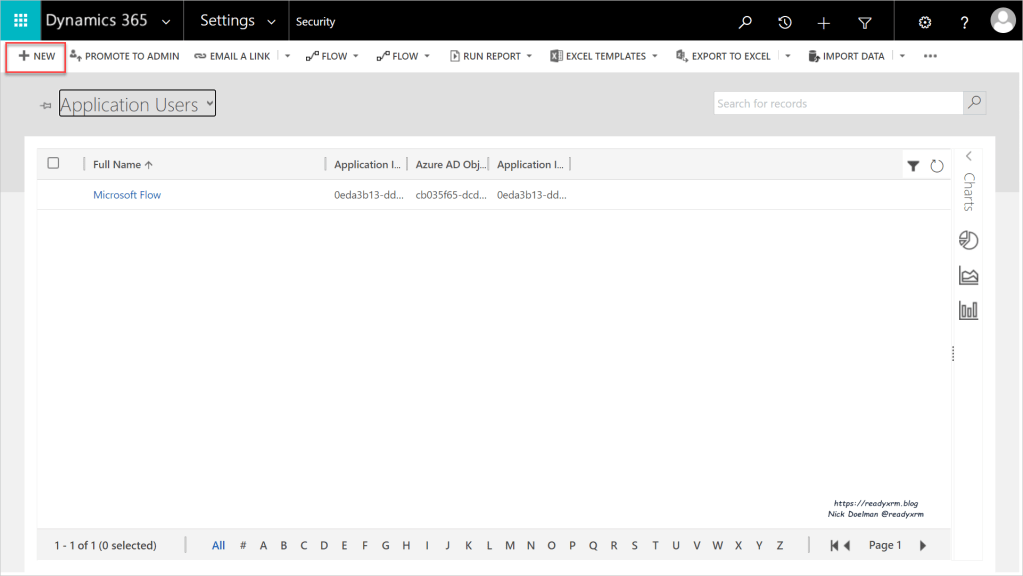
The default User form will appear, change the form to Application User.
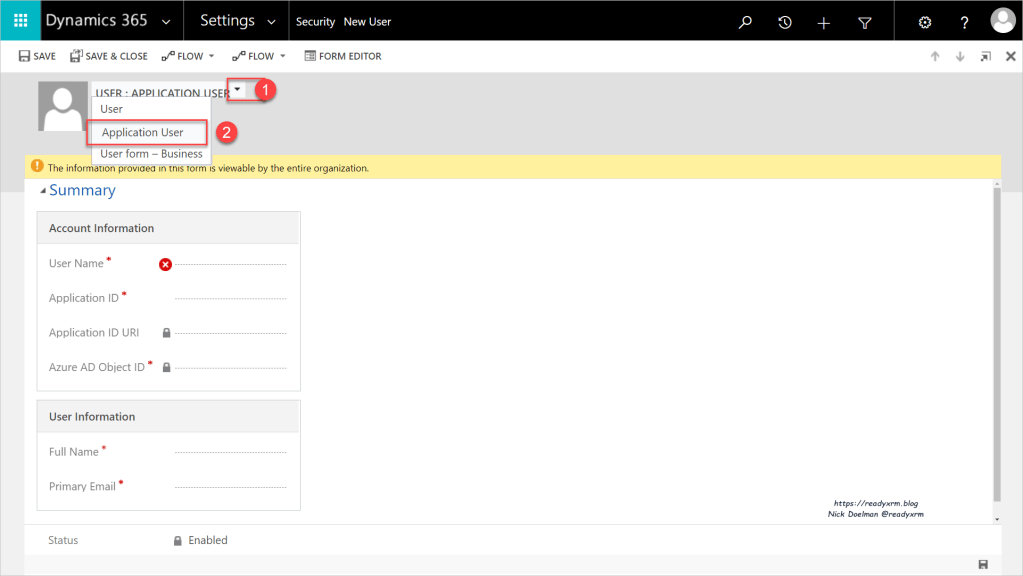
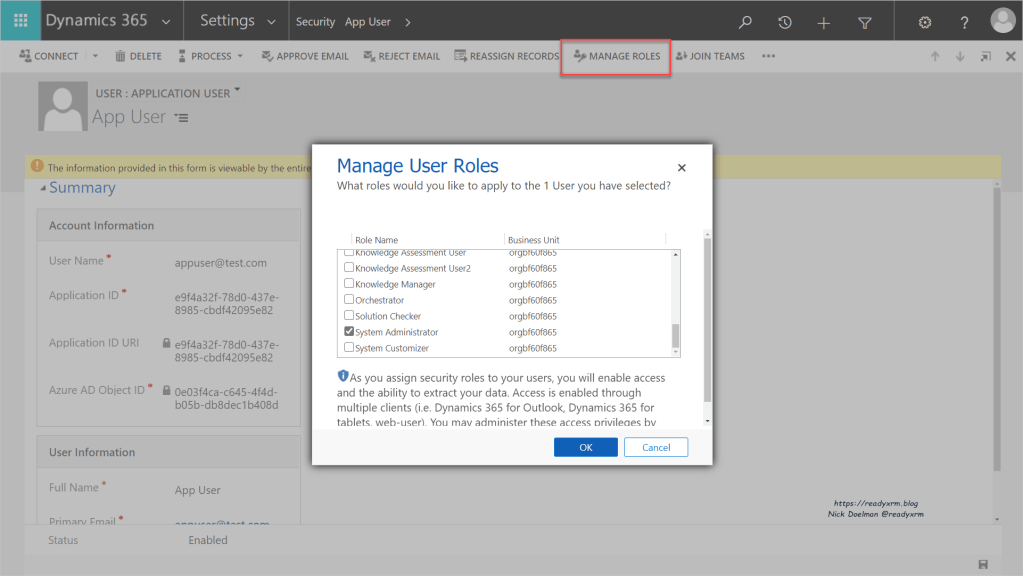
Paste in the Application ID you copied earlier from Azure Active Directory. You will also need to specify a name and an email address (it can be anything and linked to an actual email address). Press Save.
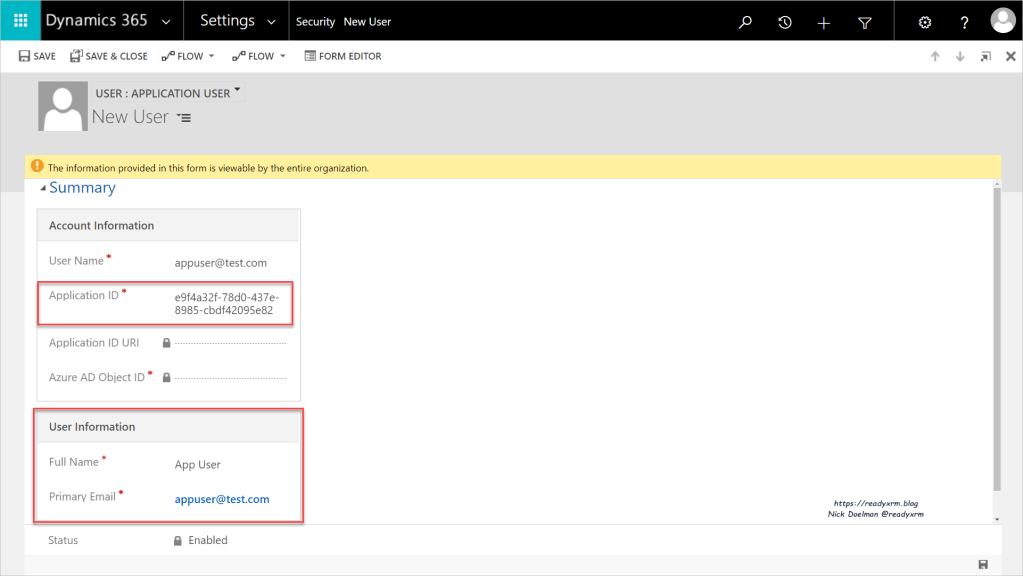
The Application ID URI and the Azure AD Object ID should populate.

The next step you will need to assign the new Application User a specific security role based on what you plan for it to do. Click on Manage Roles and select the appropriate security roles. Click OK when done.
Using an Application User in Power Automate
An example of using the Service Principal is in Power Automate. If you have an automated process, you might want to show the record being created or updated from an automated process as opposed to the user that owns the particular flow.
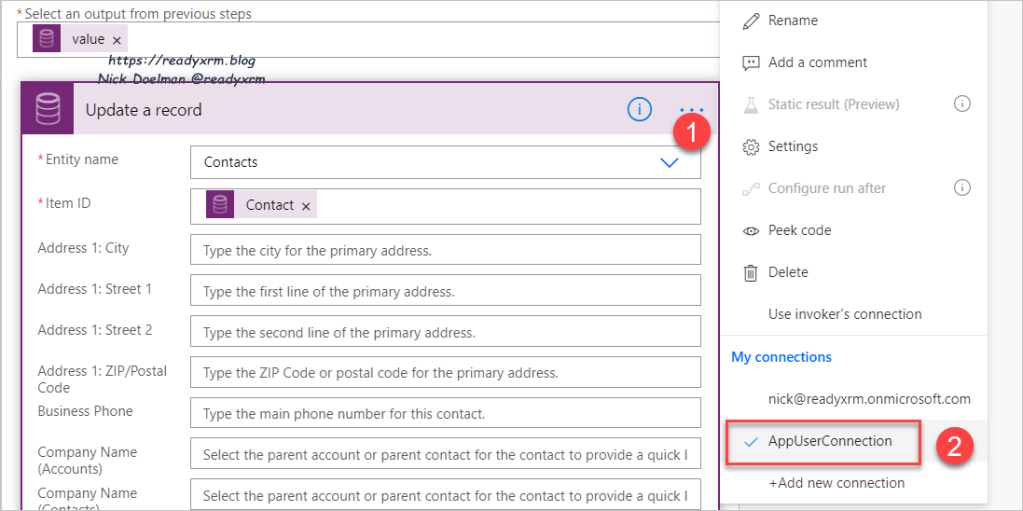
When you create a Power Automate flow using the Common Data Service (current environment) connector, click on the ellipse and then choose to add a new connection.
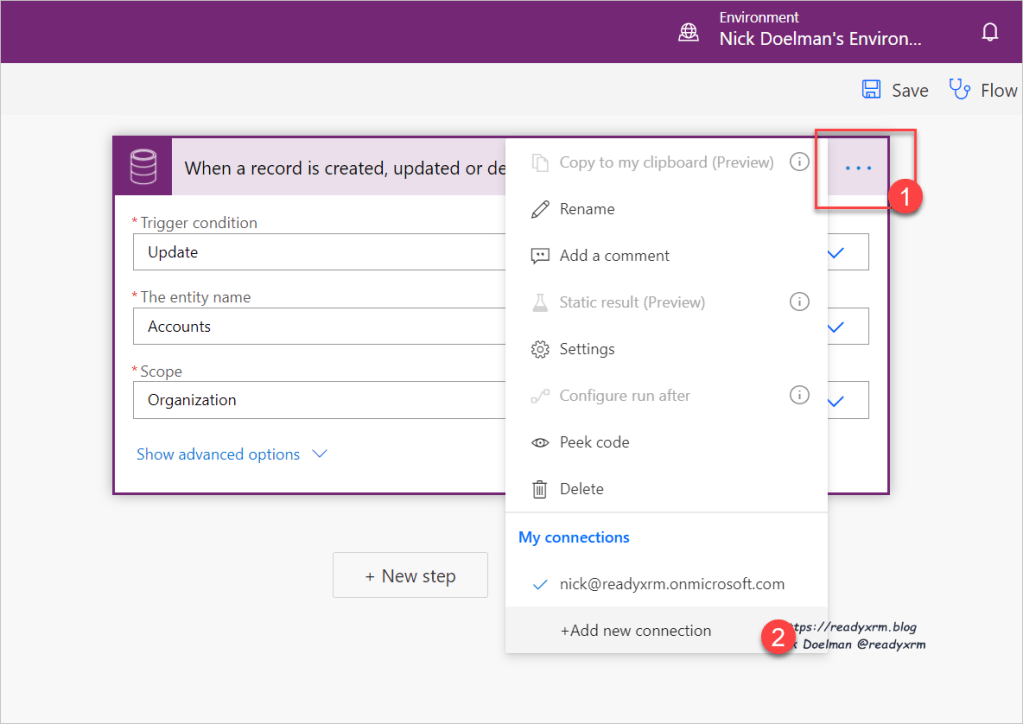
You will then be prompted to add a new connection, choose “Connect with Service Principal” to choose your new Application User.
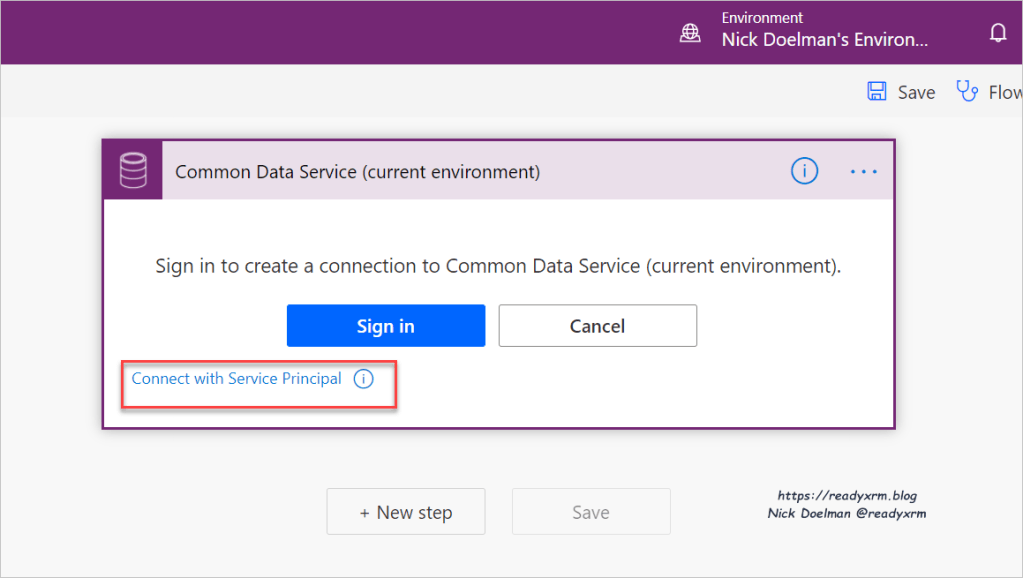
You can now give your connection a name, along with entering the App ID (client ID) the client secret (you did copy that, right?) and the Tenant ID. We effectively have setup a connection that is going to access the Common Data Service environment using the API connection we setup in Azure Active Directory.
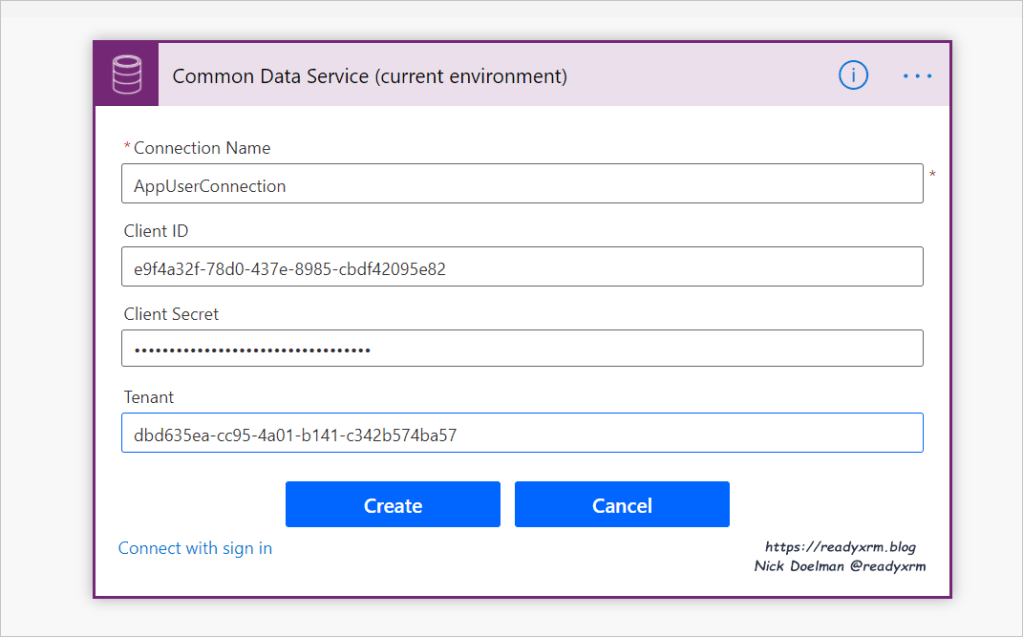
Note that you will need to setup both the trigger and the action steps using Common Data Services to use the AppUserConnection.
Now when a flow is run, depending on the action, the owner, modified by or created by should reflect the application user as opposed to a regular user.

Using an Application User in Azure Dev Ops Power Platform tasks
Another example of where a Application User/Service Principal would be used is in Azure DevOps with the Power Platform Build Tasks. Instead of using user credentials, you can setup a Service Connection to your environment for the tasks that need to access the environment to export solutions, import solutions, etc.

Summary
Service Principals and Application Users may take a few extra steps to configure, but become a powerful and secure way to allow applications such as Power Automate and Azure DevOps (and others) the ability to access your Common Data Service environment.
Cover Photo by Cytonn Photography on Unsplash
Computer Photo by David Rangel on Unsplash
Nick Doelman is a Microsoft MVP, a Microsoft Certified Trainer and in his spare time is a competitive Powerlifter. Follow Nick on Twitter at @ReadyXRM and check out some of his and other MVP’s online classes at https://365.Training


Thank you for a nice post! Previously, I read that Application Users does not have the right to run Power Automate flows, but has that changed since Microsoft added the 100k API Request / 24 hours for non-interactive / application user accounts? It makes a lot of sense to run the power automate flows with application user context, but the licensing part is a bit confusing. It would be a great addition to clarify that in this post!
LikeLike
Great post and thanks! A lot of the other online articles regarding this topic were horrible. 😉
LikeLike
Thanks MarkW! I agree, I find some other articles sometimes are too technical or don’t explain the “why” properly. I blog about these things so my future self doesn’t have to figure it all out again. 🙂
LikeLike
Fantastic article. How do entitlement limits affect these application accounts? We are performing a data integration into CDS and need to overcome limits. I am hopeful that these application service accounts are only impacted by service protection limits and not the entitlement lmits.
LikeLike
Hi Jon, I think I replied to your other question, but here is that docs link: https://docs.microsoft.com/en-us/power-platform/admin/api-request-limits-allocations#requests-limits-not-based-on-licensed-users-or-flows You might also want to read my friend Gustaf’s blog as he has some good insights on the topic as well: https://powerplatform.se/
LikeLike
Great article. Do you know how these accounts are impacted by CDS/dataverse request entitlement limits?
LikeLike
These would depend on the subscriptions in place. There is this docs article that hopefully can answer your question: https://docs.microsoft.com/power-platform/admin/api-request-limits-allocations#requests-limits-not-based-on-licensed-users-or-flows
LikeLike
Hi, I’m new to this, but can App Users be used across other environments? With the new Connection References, Can I re-create my app user in Dev, Test and Prod?
LikeLike
Yes, just repeat the steps under the section “Setting up the App User in the Common Data Service” to give that same app user access to different environments or create unique app users for each environment.
LikeLike
Nice article. Helped me to save a lot of time
LikeLike