

If you read the Microsoft documenation for PowerApps Portals (and you do read it, right?) it states that the preferred method for user authentication for the PowerApps Portals is Azure AD B2C (Business to Consumer).
The big benefits is that it takes a lot of the administration of handling passwords and authentication out of the hands of portal managers and also provides some options when building portal companion apps.
Microsoft documentation describes the steps to configure Azure AD B2C for portals and there are also a lot of great blog posts (see below) that describe and talk about the process from a Dynamics 365 for Portals perspective.
It had been a while since I went through the process. I decided today to specifically setup Azure AD B2C on the new PowerApps Portals preview and I ended up taking a lot of screenshots and notes. So this post is really just meant for me (or rather my future self) on how to setup Azure AD B2C for Portals.
Thanks to other community folks for their excellent posts on this topic, which helped me put my own notes together:
Setup Azure AD B2C
You will require an Azure subscription. You can setup a free account and Azure AD B2C should not cost you anything if you have a reasonable number of logins.
Sign into the Azure Portal on which there is a subscription attached.
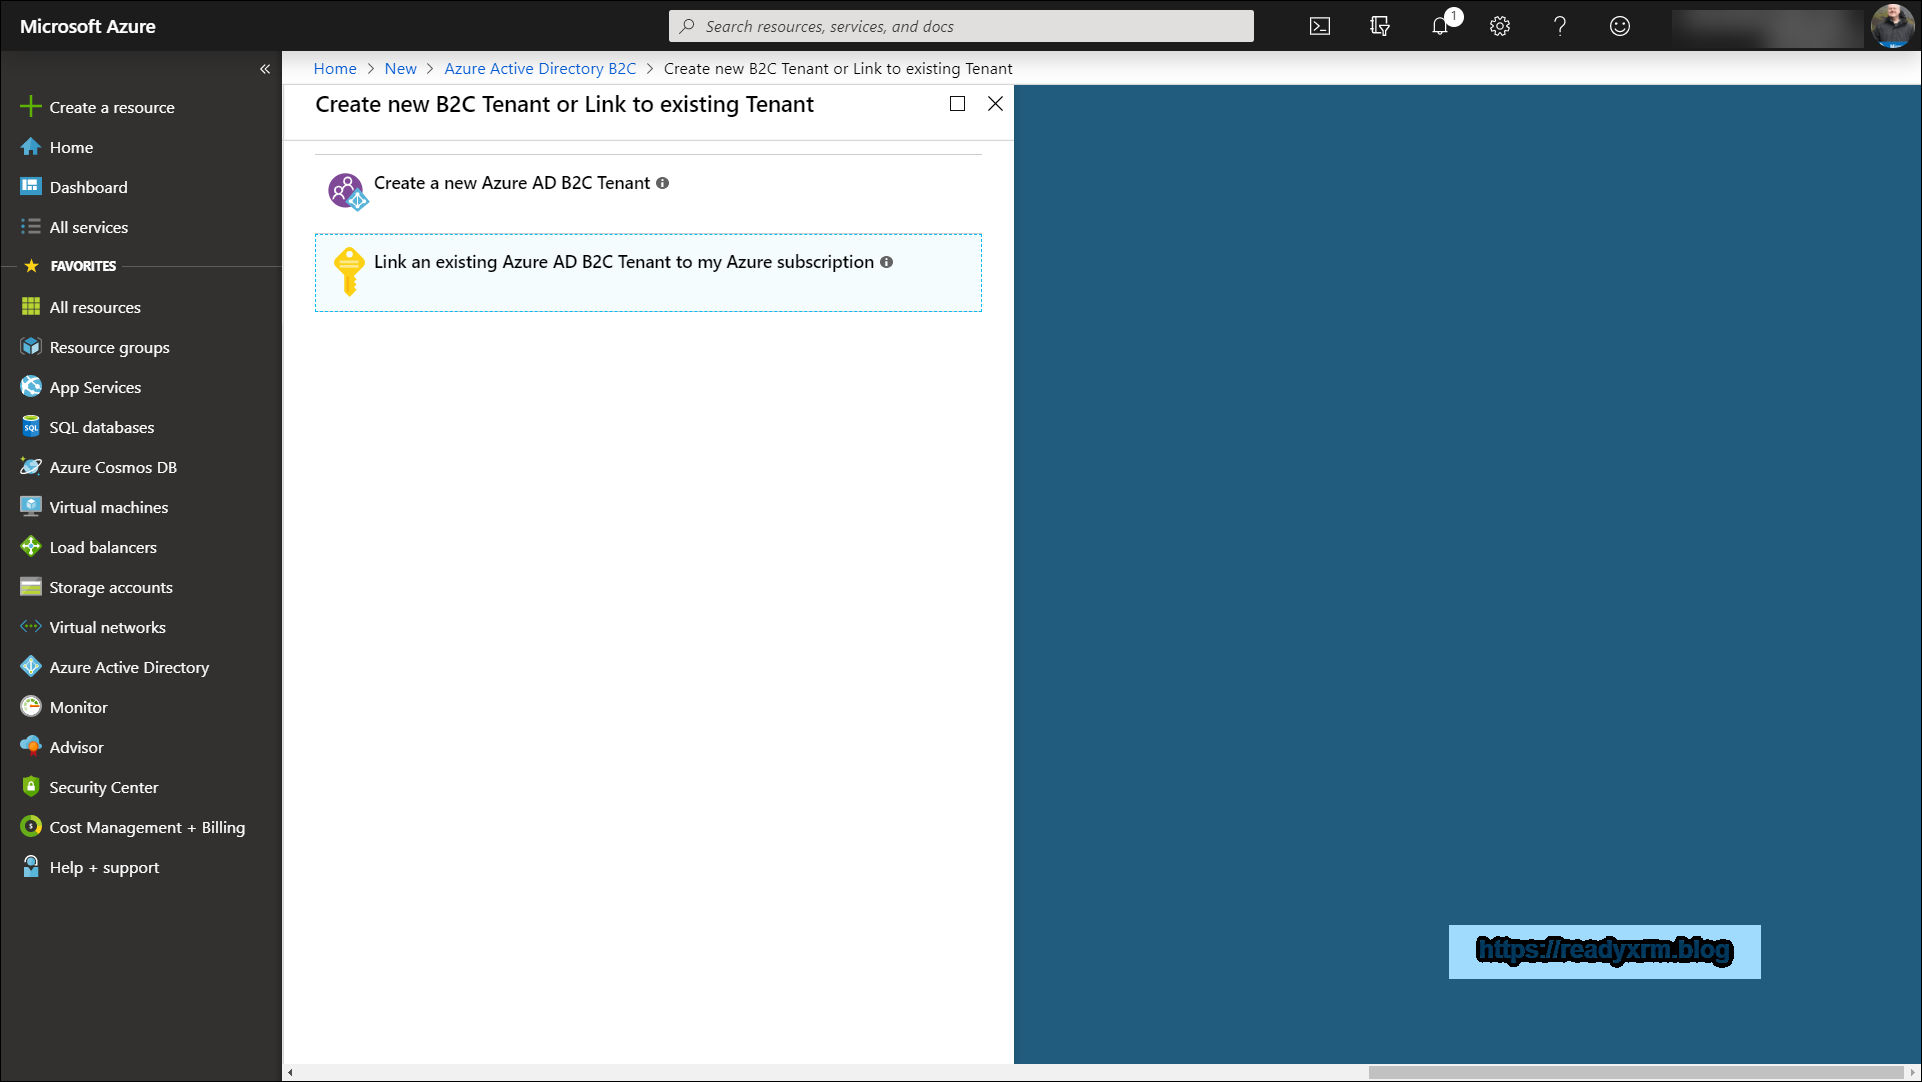
Click to Create a resource (upper left corner) and search for “Azure AD B2C”
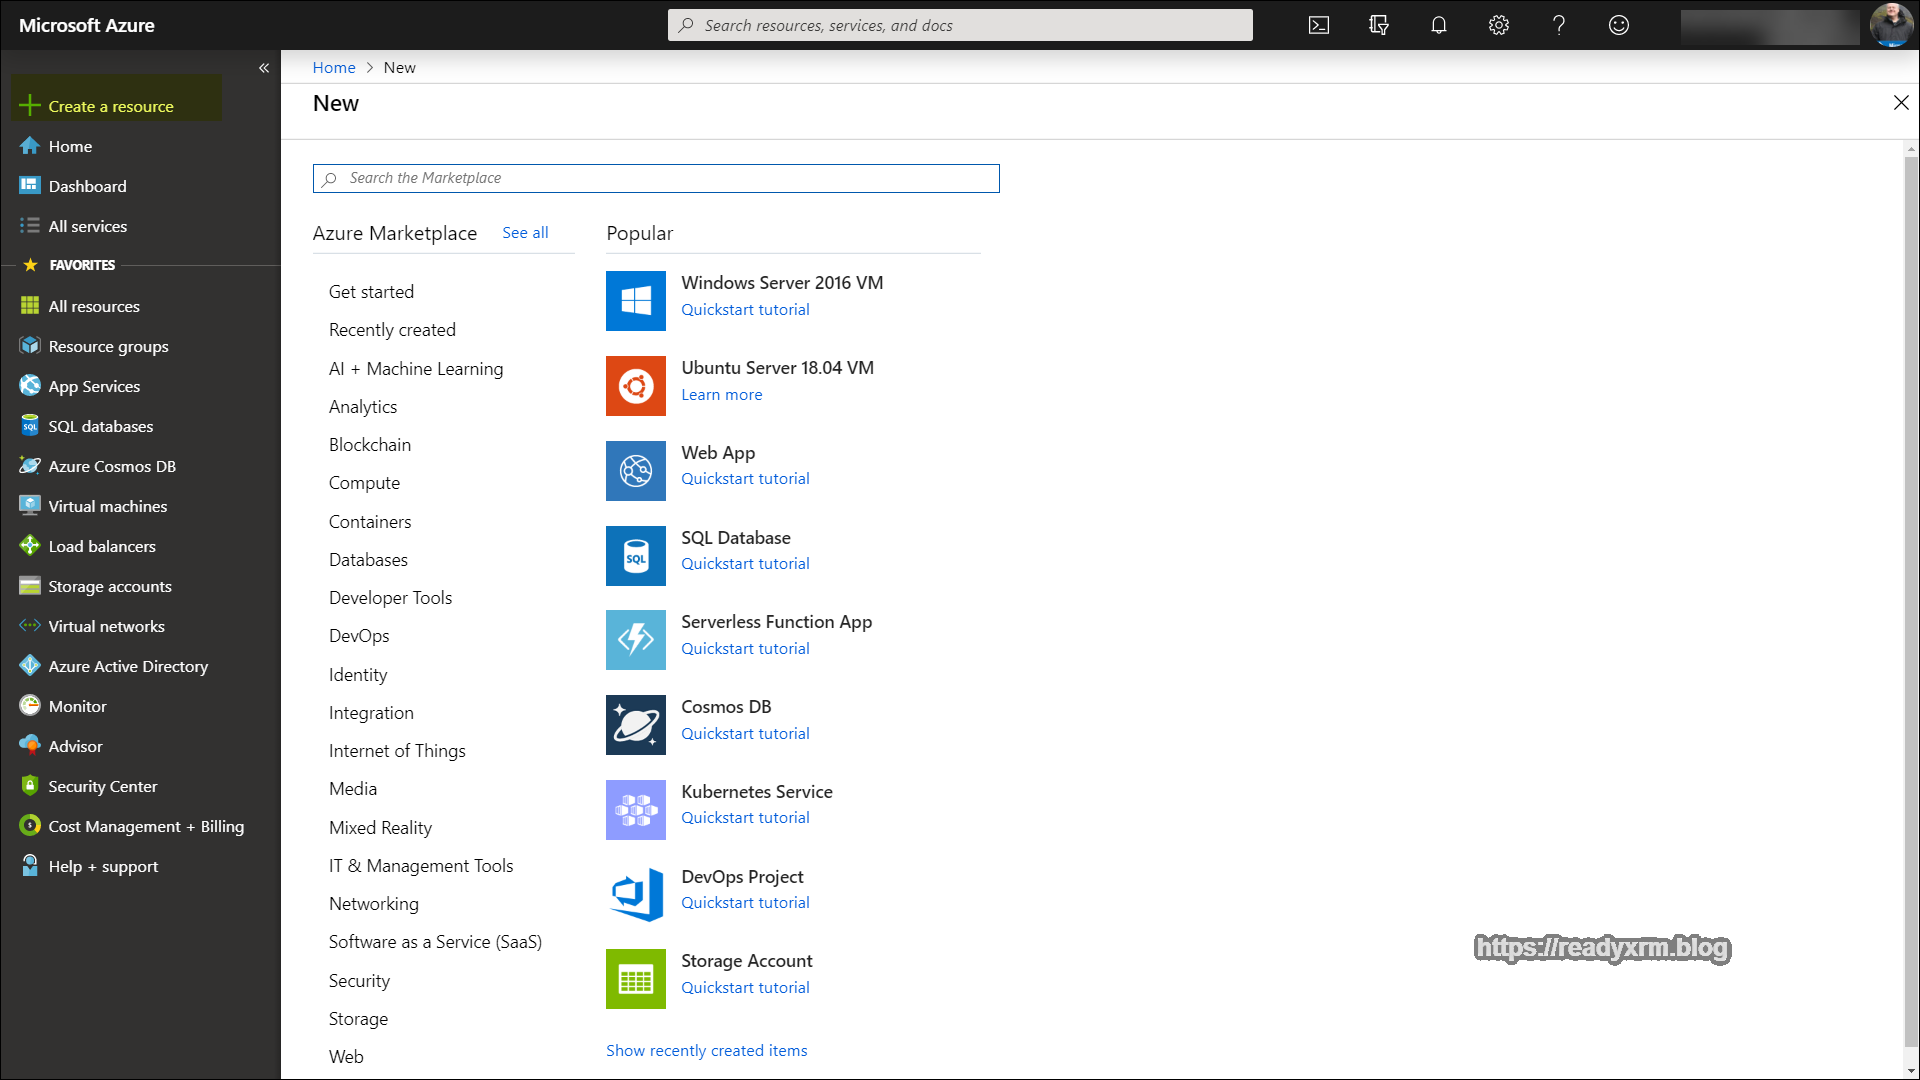
Click “Create” to create the Azure AD B2C resource.

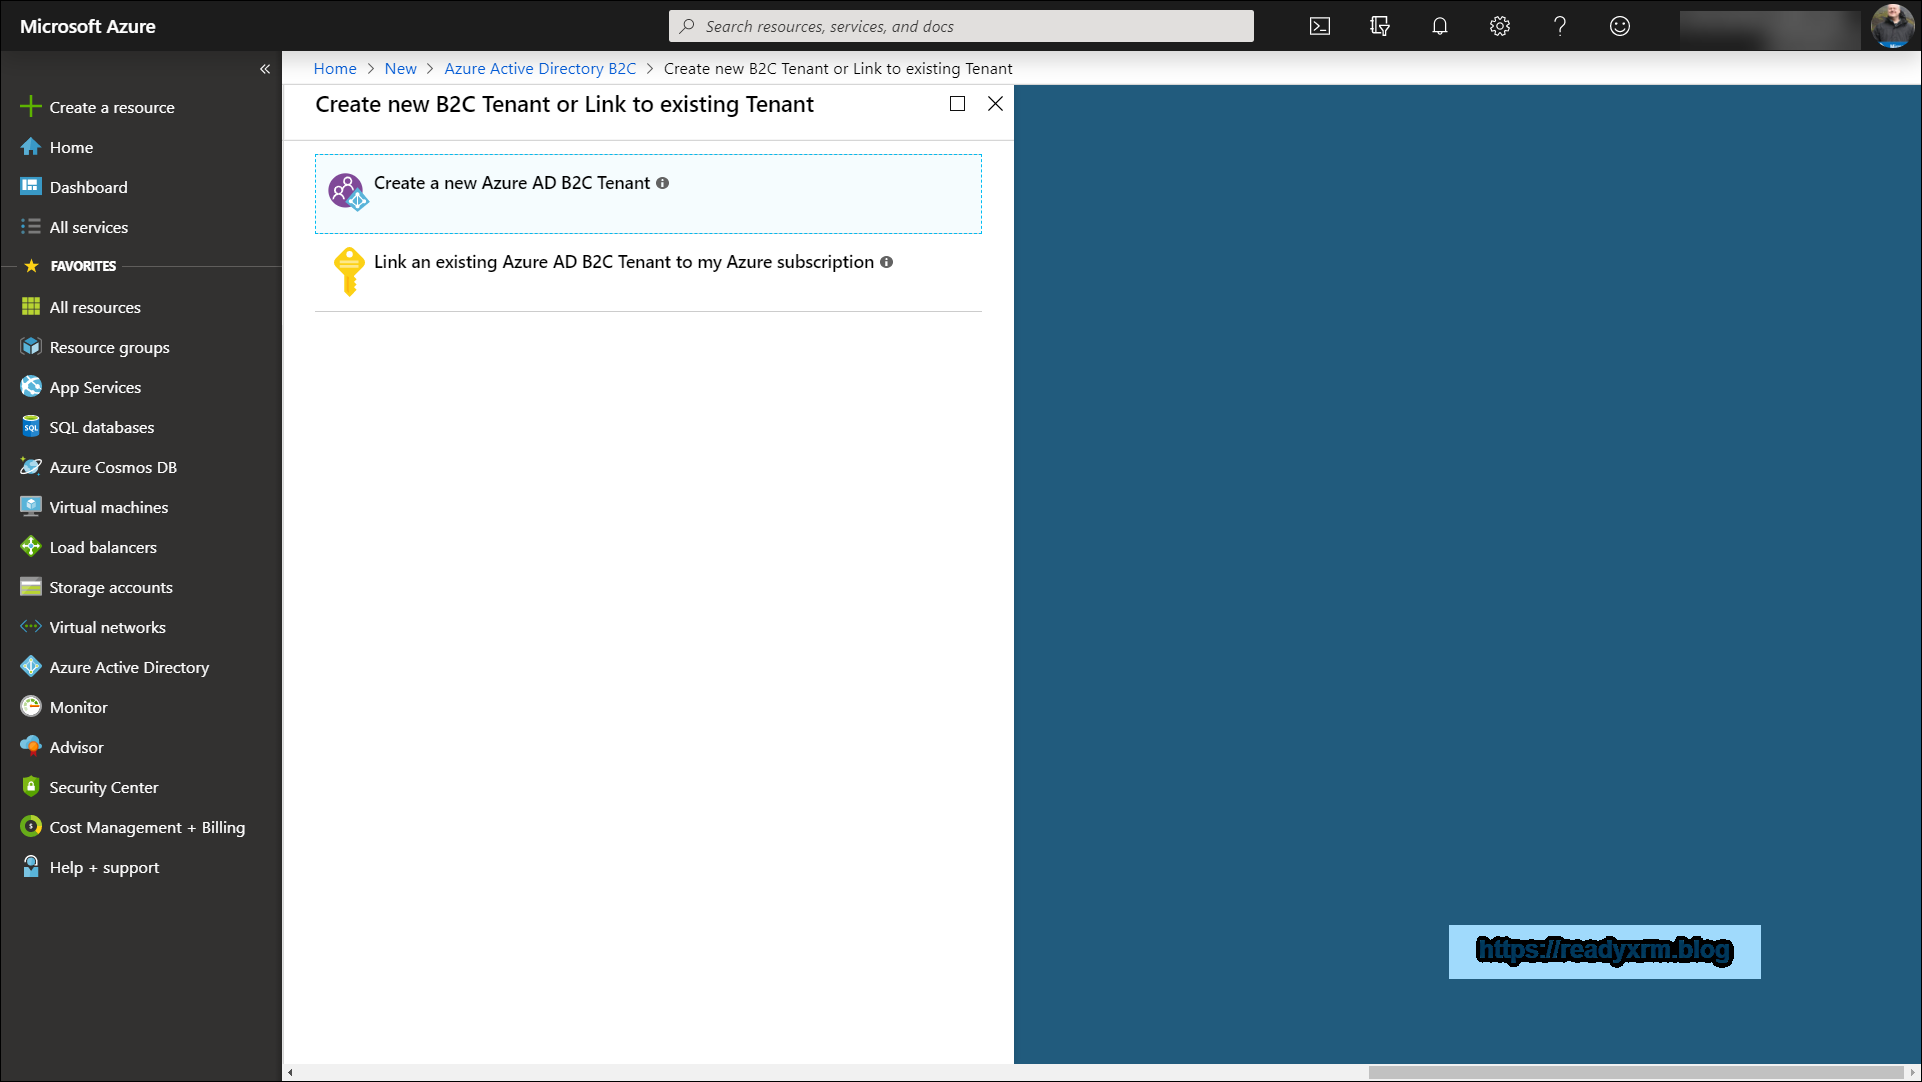
There will be two options, one to create a new Azure AD B2C Tenant and another to link the tenant to your Azure subscription. The first step is to create the tenant.
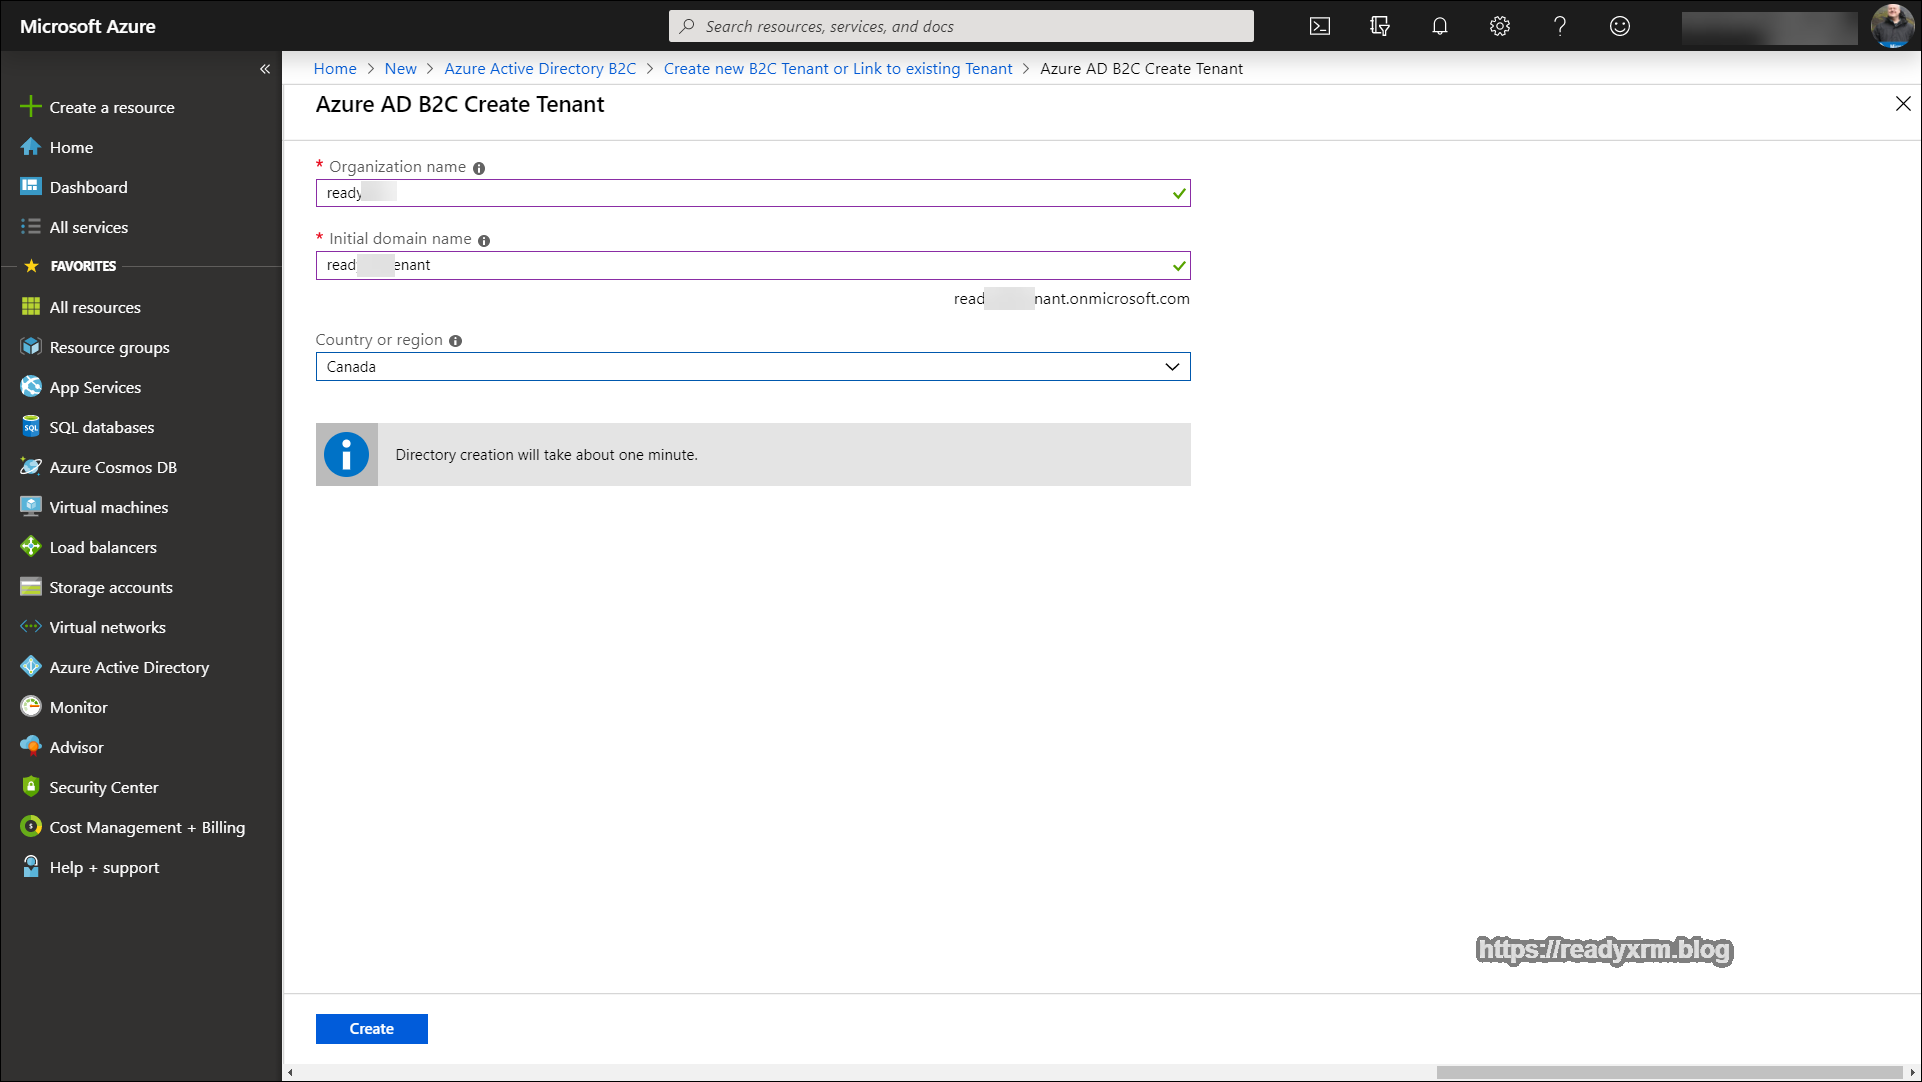
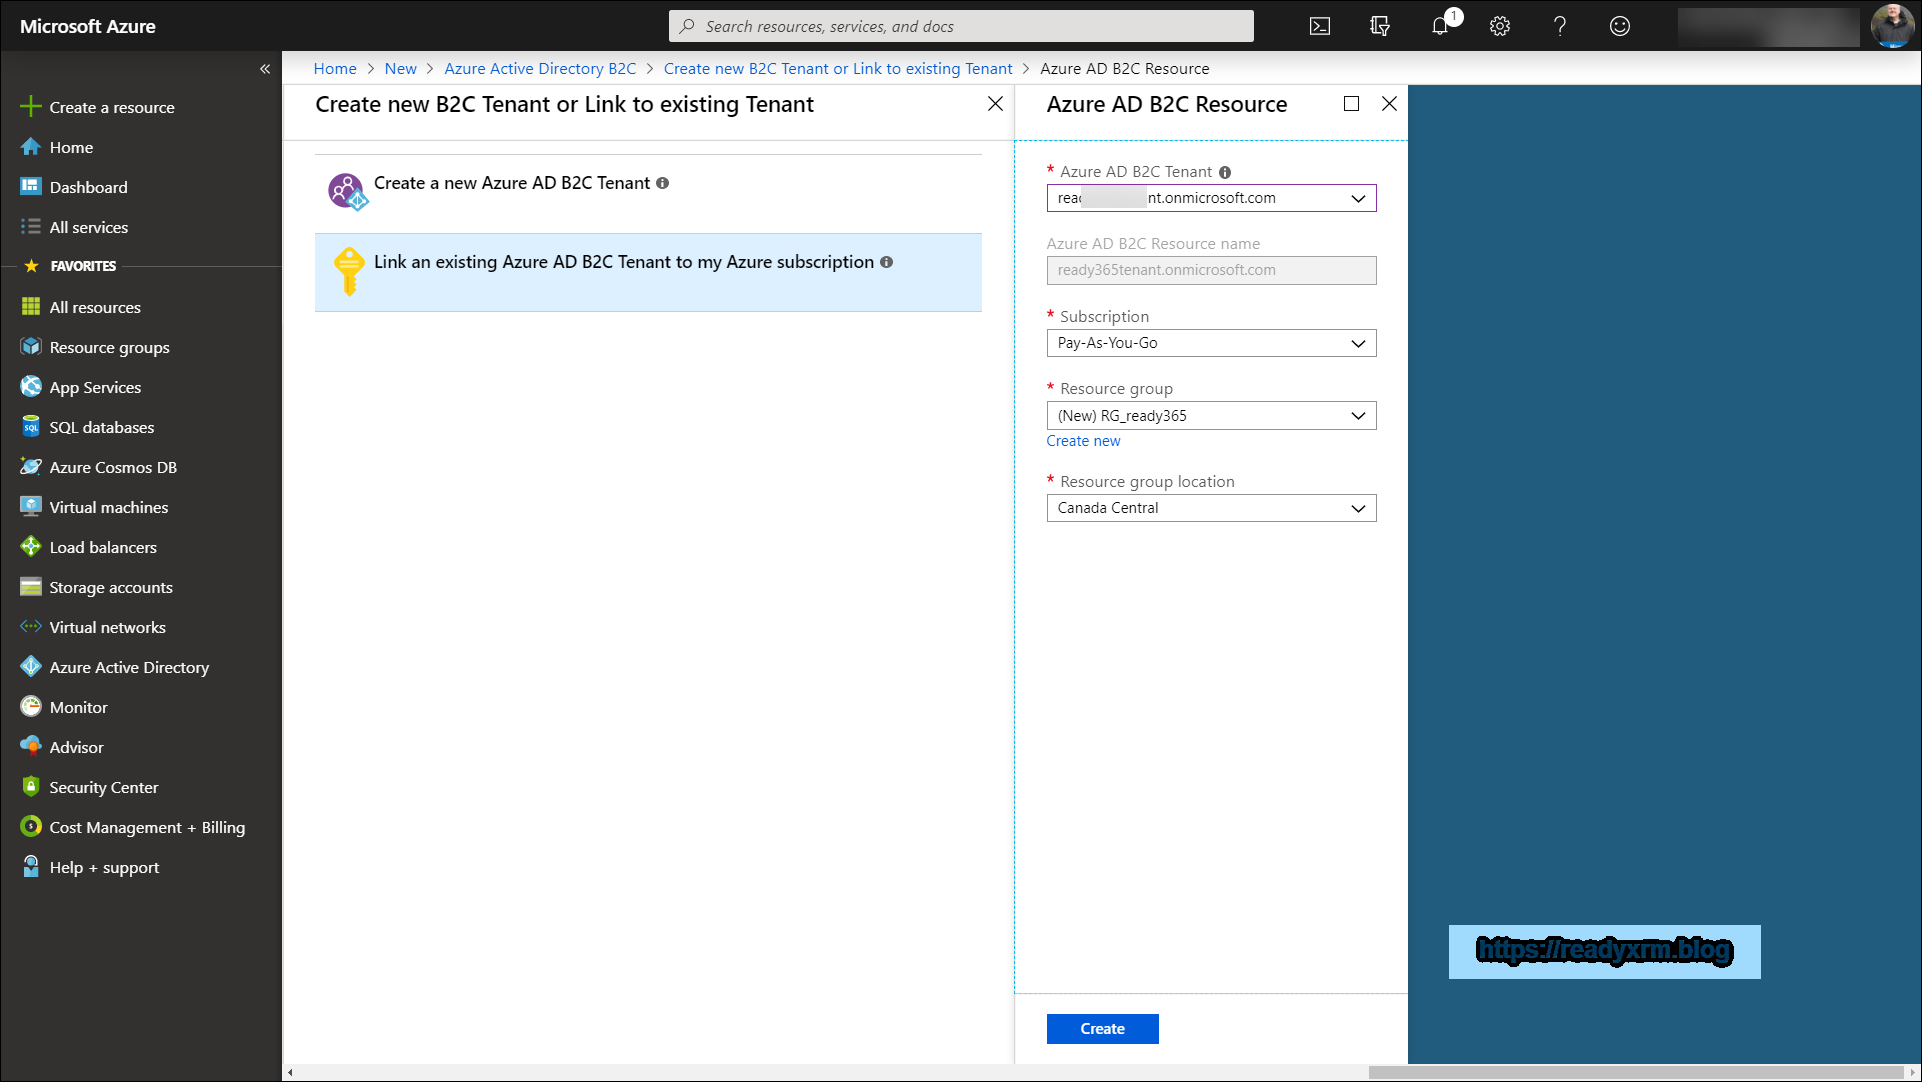
Create an organization name and a domain name. I followed a pattern of <<orgname>> and <<orgname>>tenant, but ideally put in something descriptive.
Ideally, place the Azure AD B2C resource in the same geography as your PowerApps Portal and CDS environments to reduce any potential latency issues.
After these items are setup, the Azure AD B2C tenant needs to be linked to the Azure Subscription. Click on the “Link an existing Azure AD B2C Tenant”
The Azure AD B2C Tenant should appear in the drop down list, as well as the available subscriptions. Choose to create a new resource group, and again, choose the same region as your Portal/CDS environments.
Setup Azure AD B2C Application
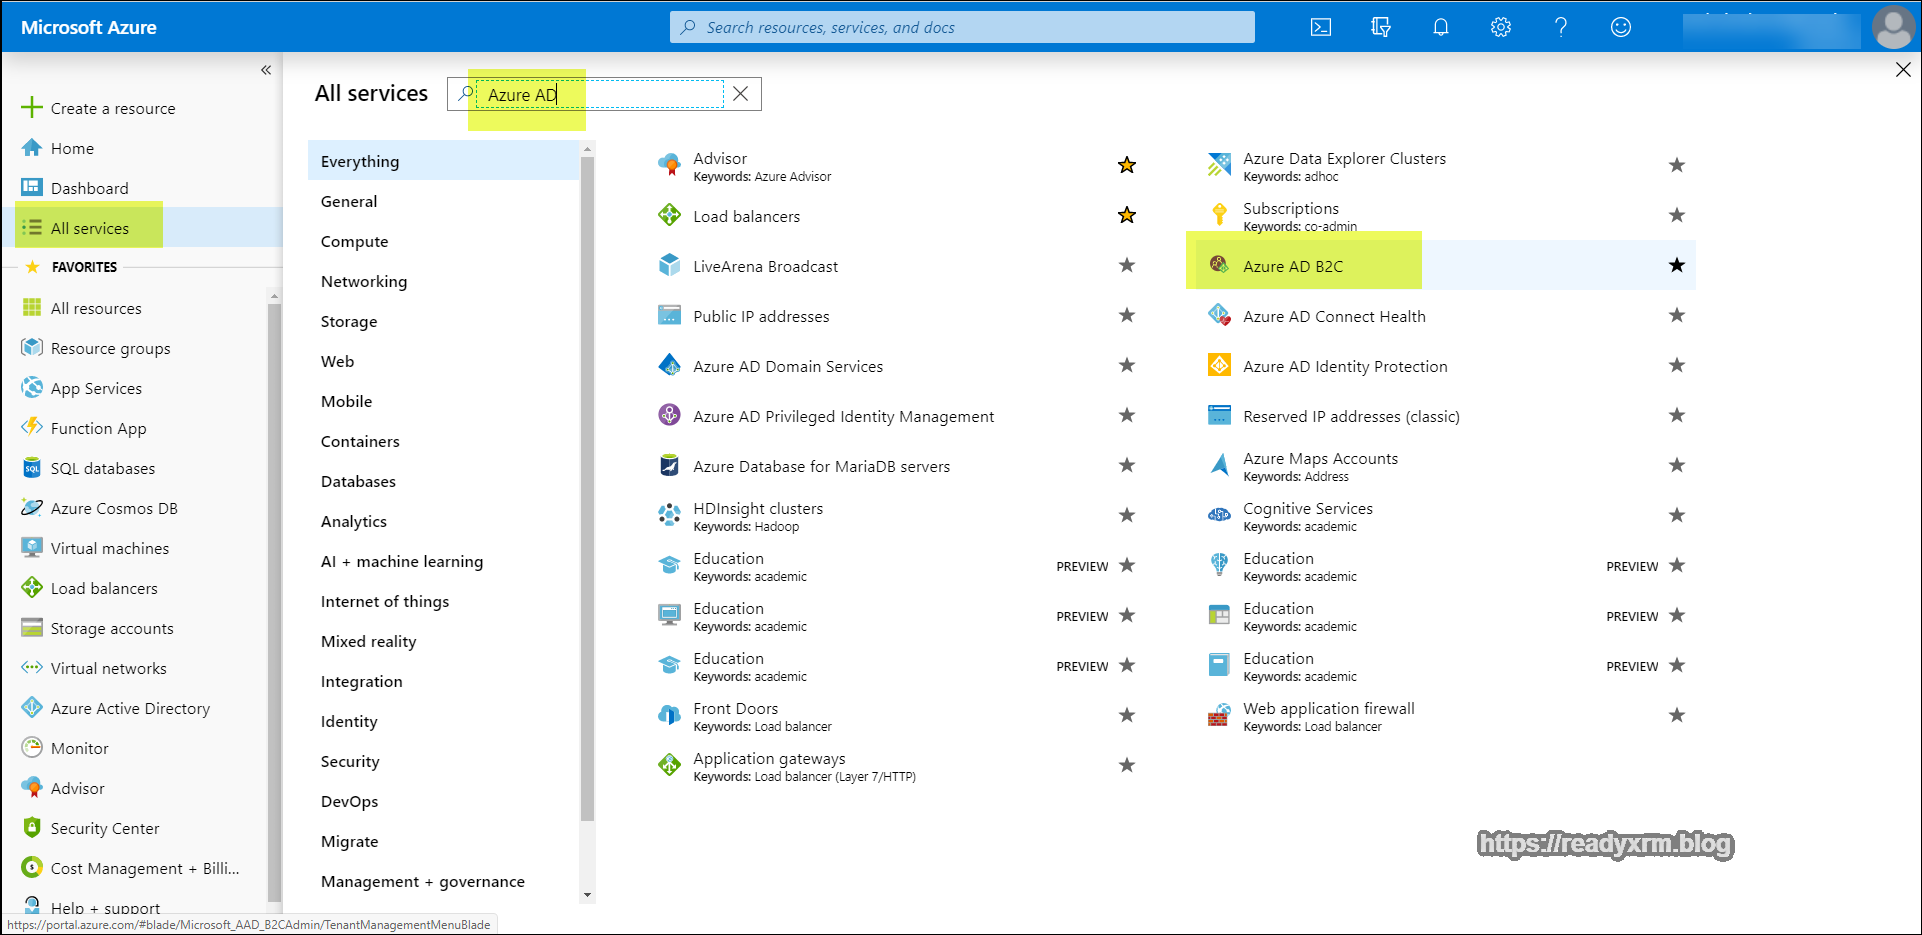
The next step will be to setup the Azure AD B2C Application for our portal. The first thing is to change the directory to ensure that you are logged into the Azure AD B2C tenant that you created earlier. Click on the upper right corner on your account to switch directories.

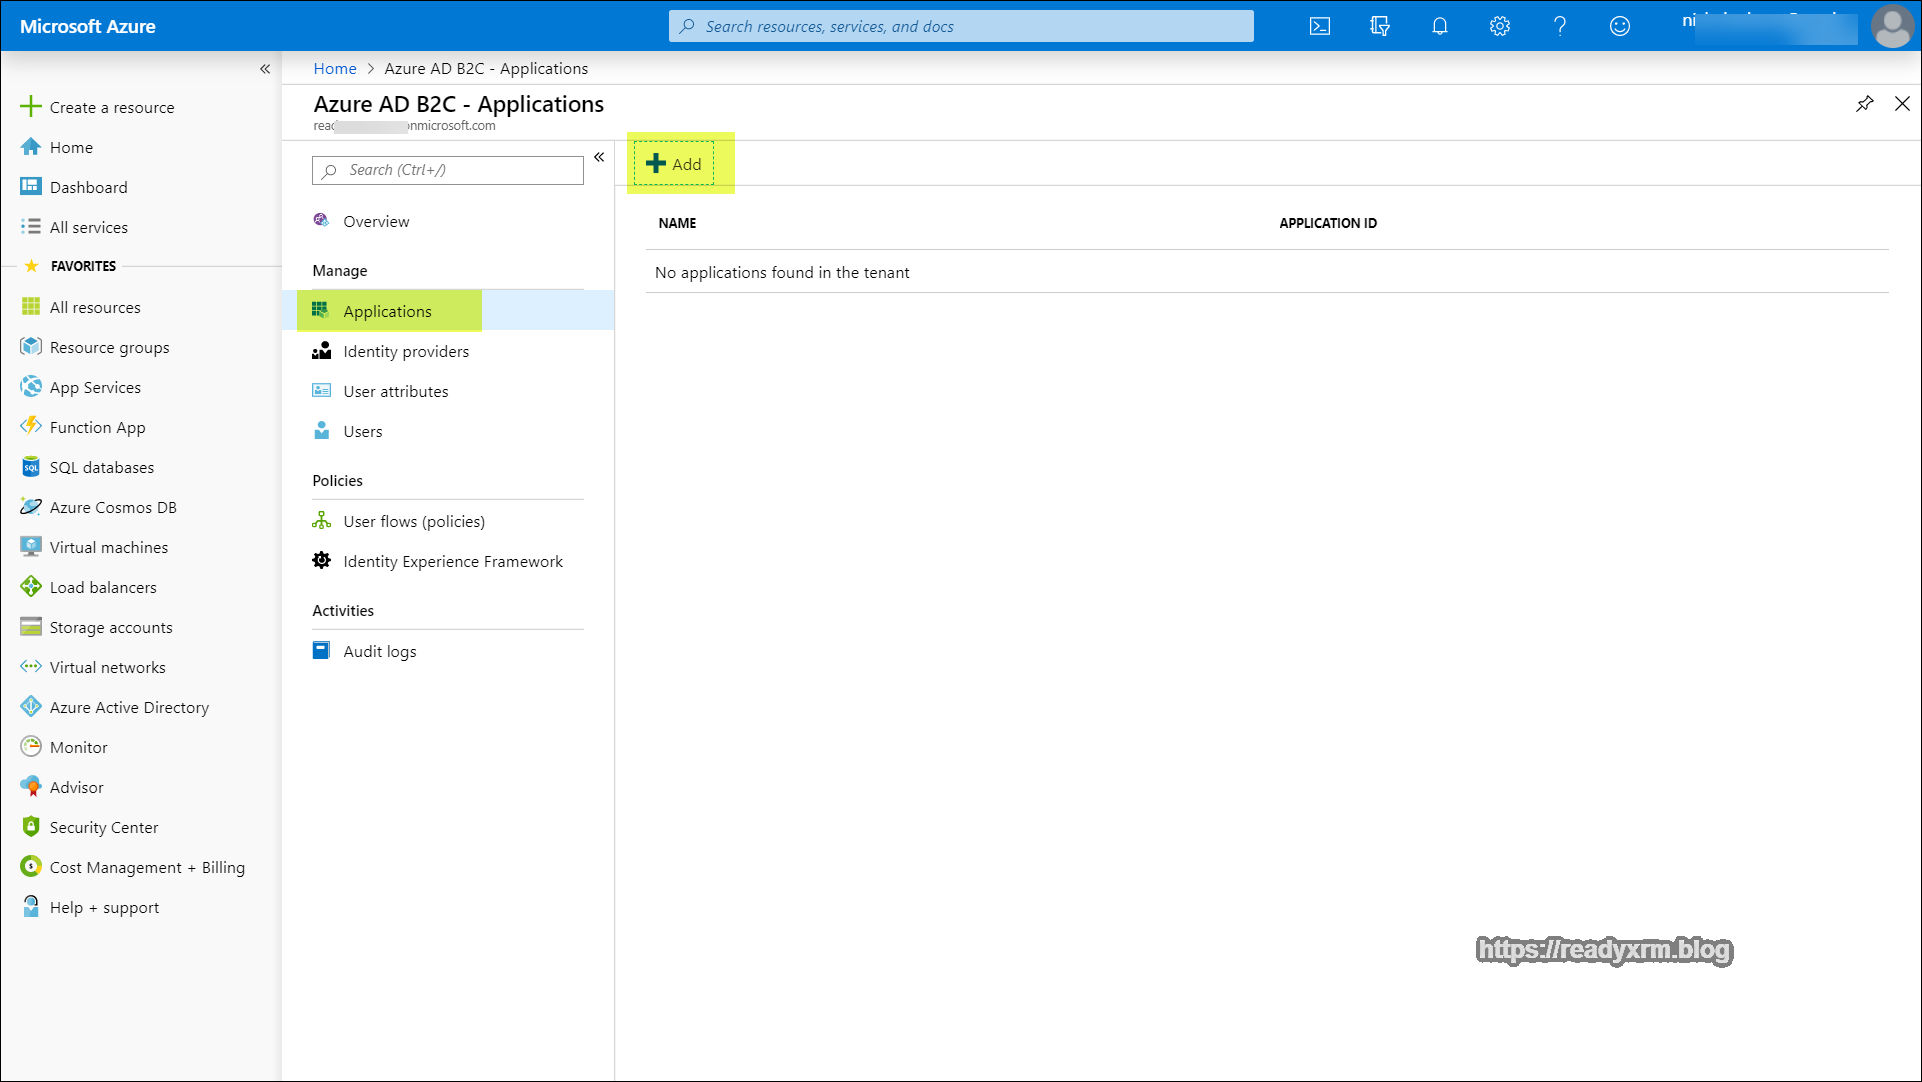
On the left panel, choose “All Services” and then search for “Azure AD B2C”. Select it from the list of services that appear.
The Azure AD B2C service page will appear with the various options.
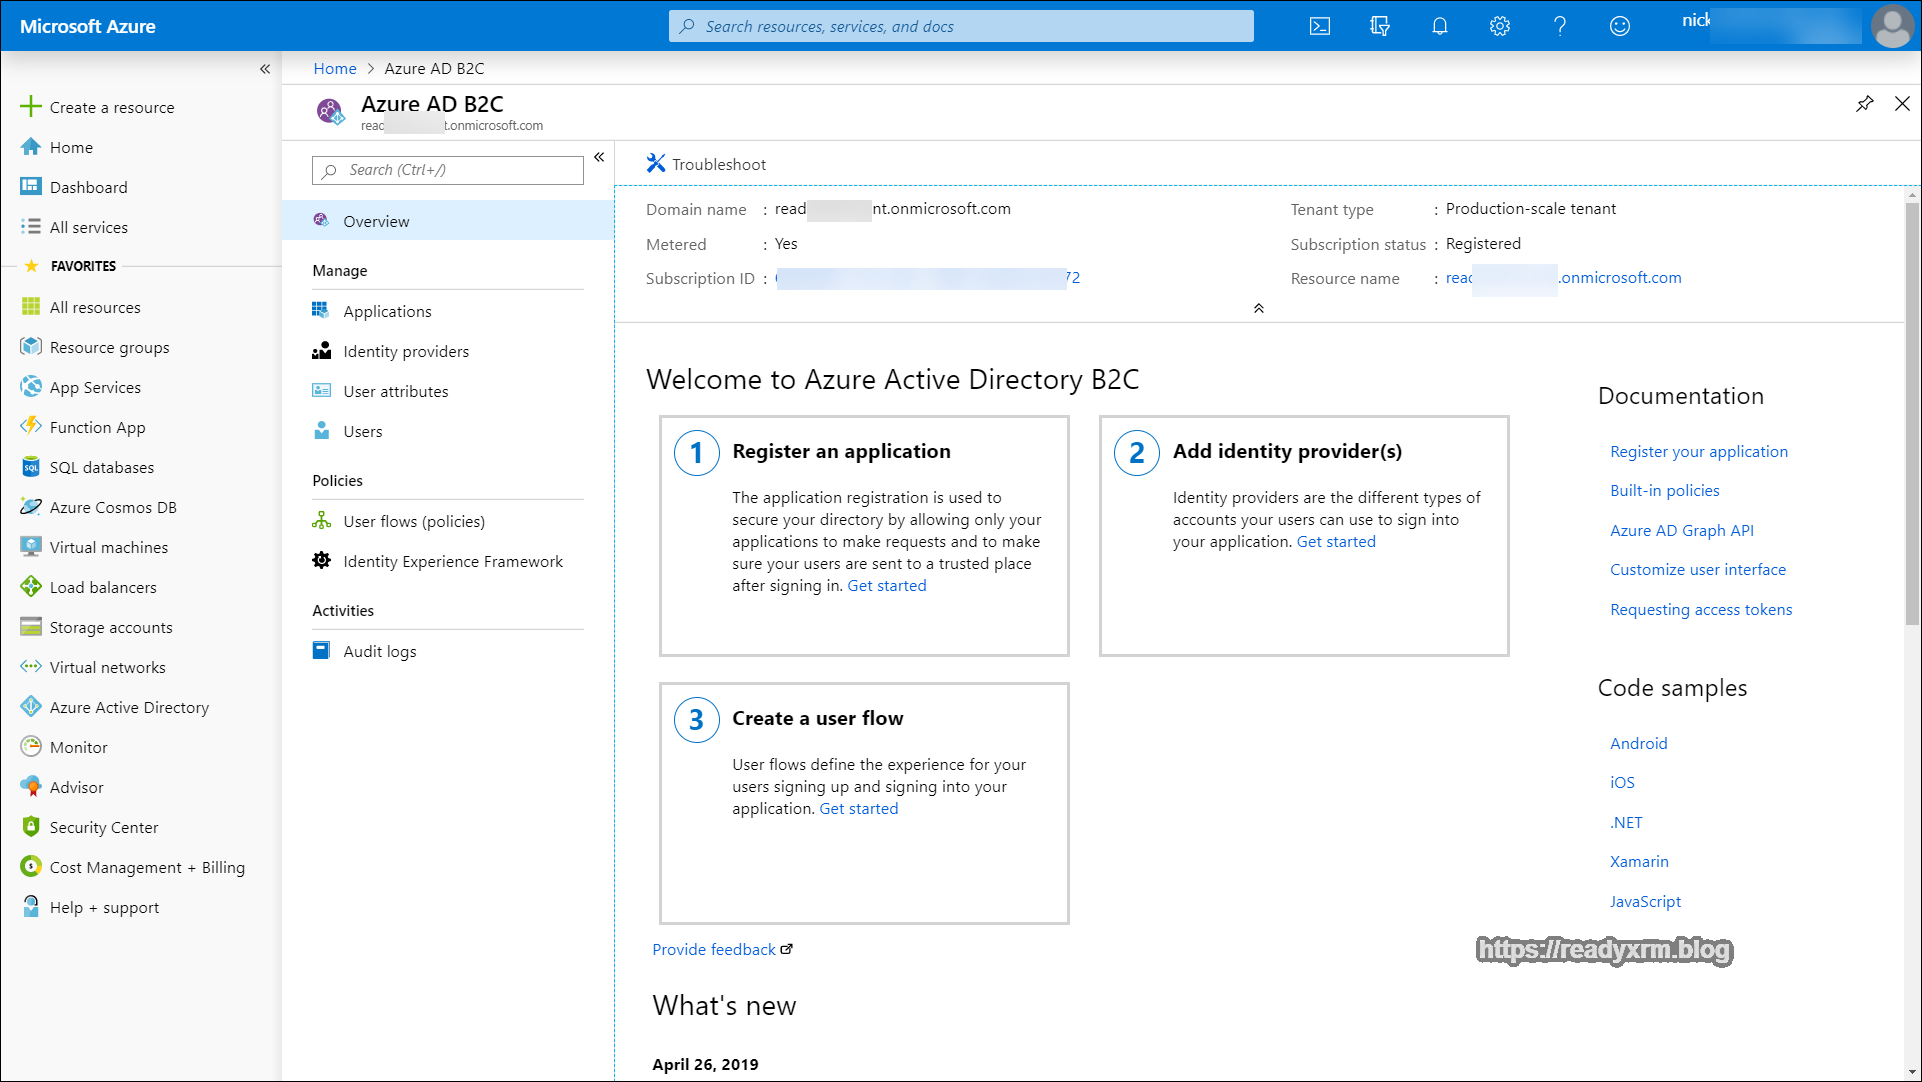
Click on “Applications” in the Manage section and then choose “Add” to add the new application.
When setting up the application, you can pick any name but ideally it should be something descriptive. Make sure that web api and allow implicit flow are turned to “yes”. The reply URL will be your portal URL, appended with a signin-<<unique federation name>>. For my purposes, the <<unique federation name>> is “B2C” and we will need to be consistent with this in other areas of the configuration (more below).
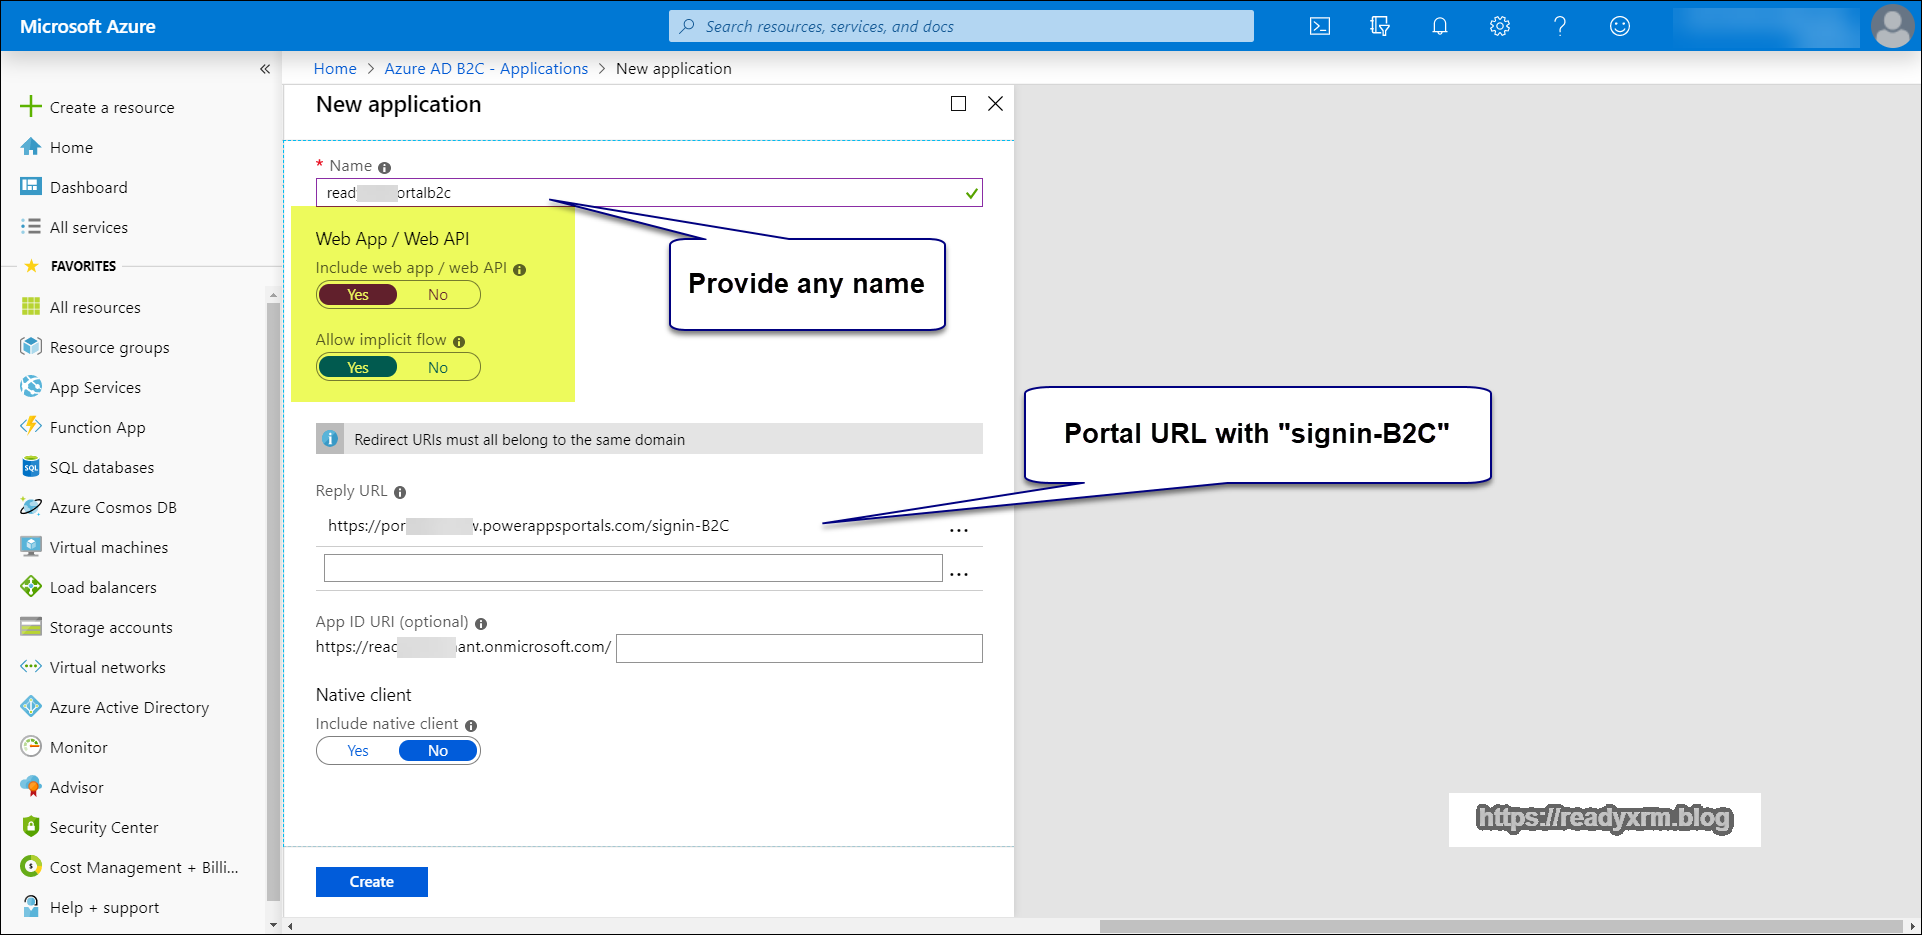
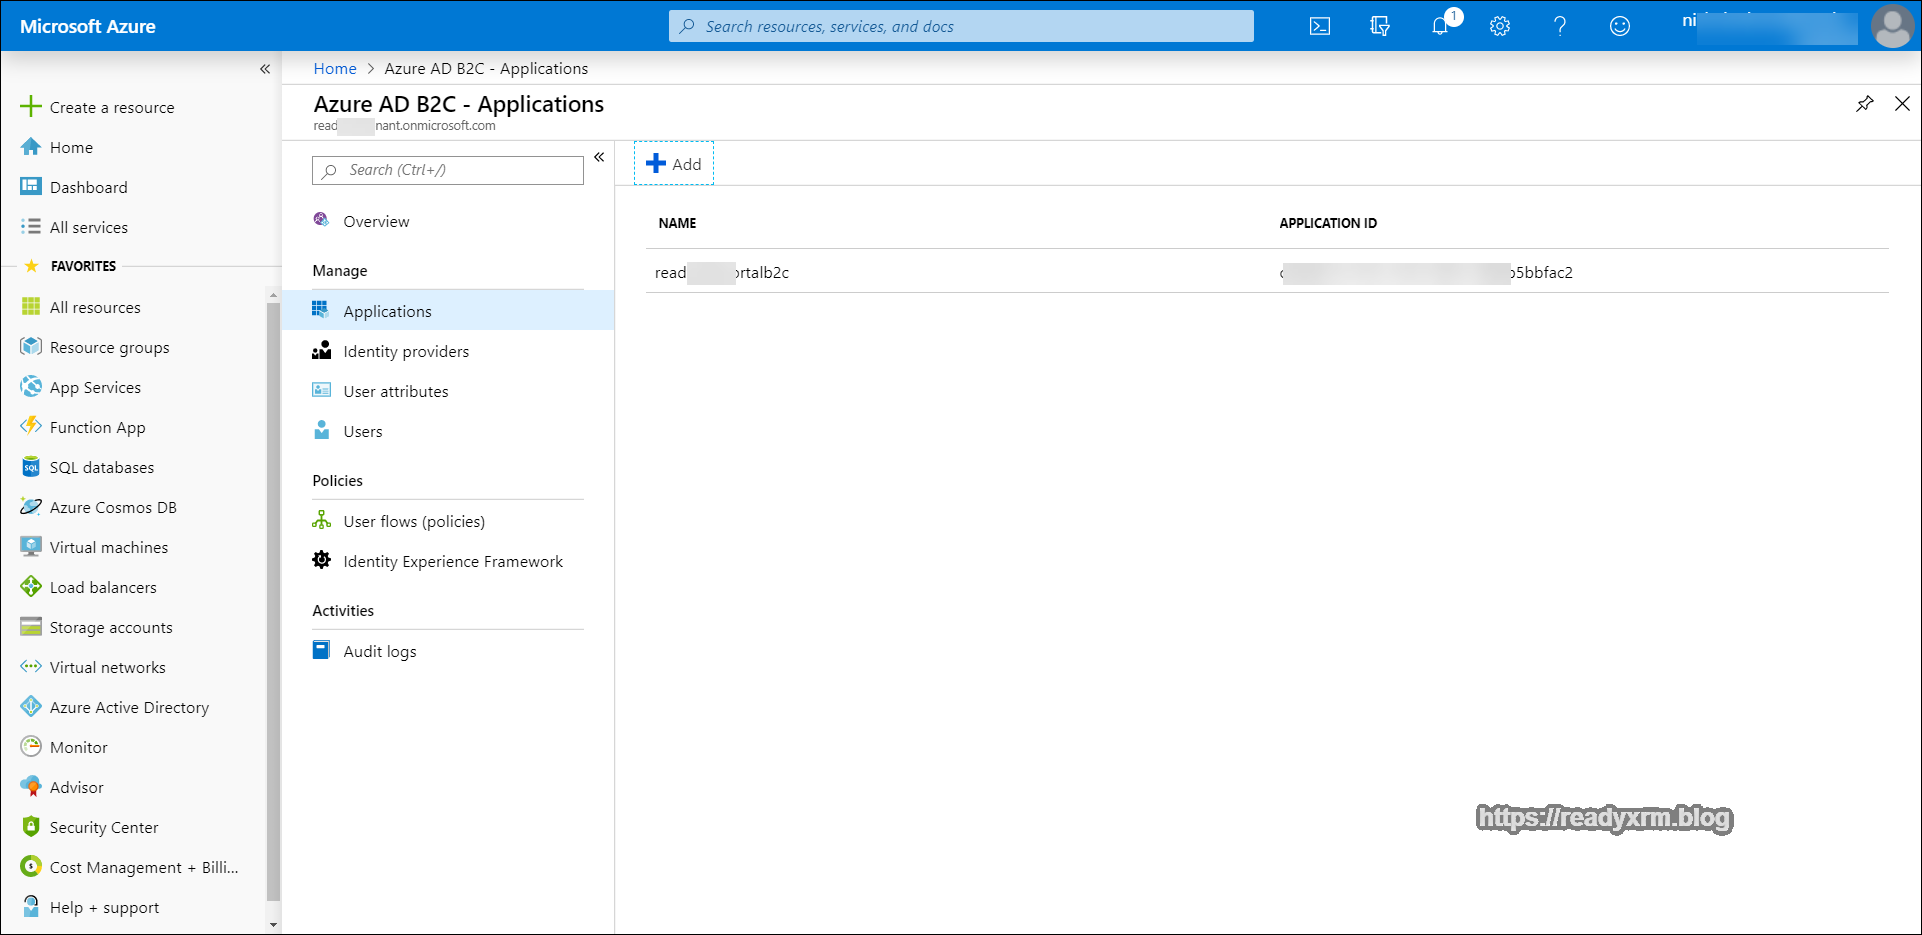
Click Create and then the application should be setup.
Setup Policies
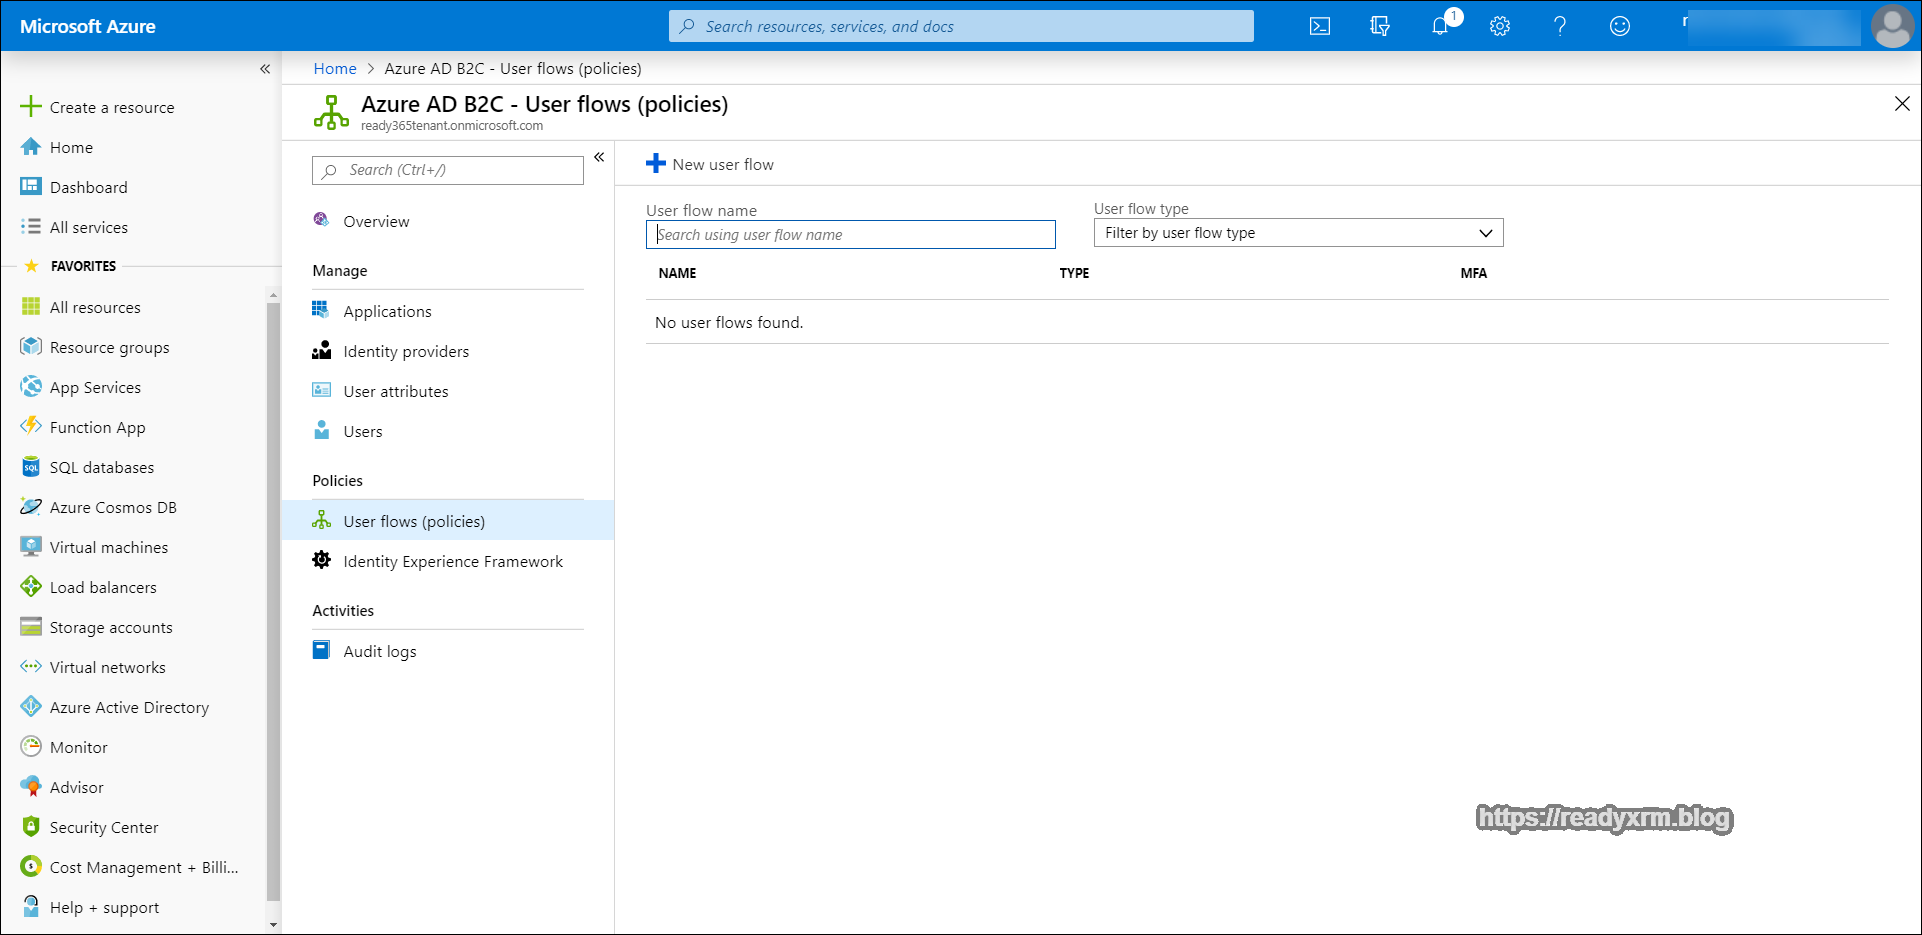
The next step is to create user flows (policies). These are configurable options that will drive the user sign-up and sign-on experiences while accessing the portal as well as how the password reset will work.
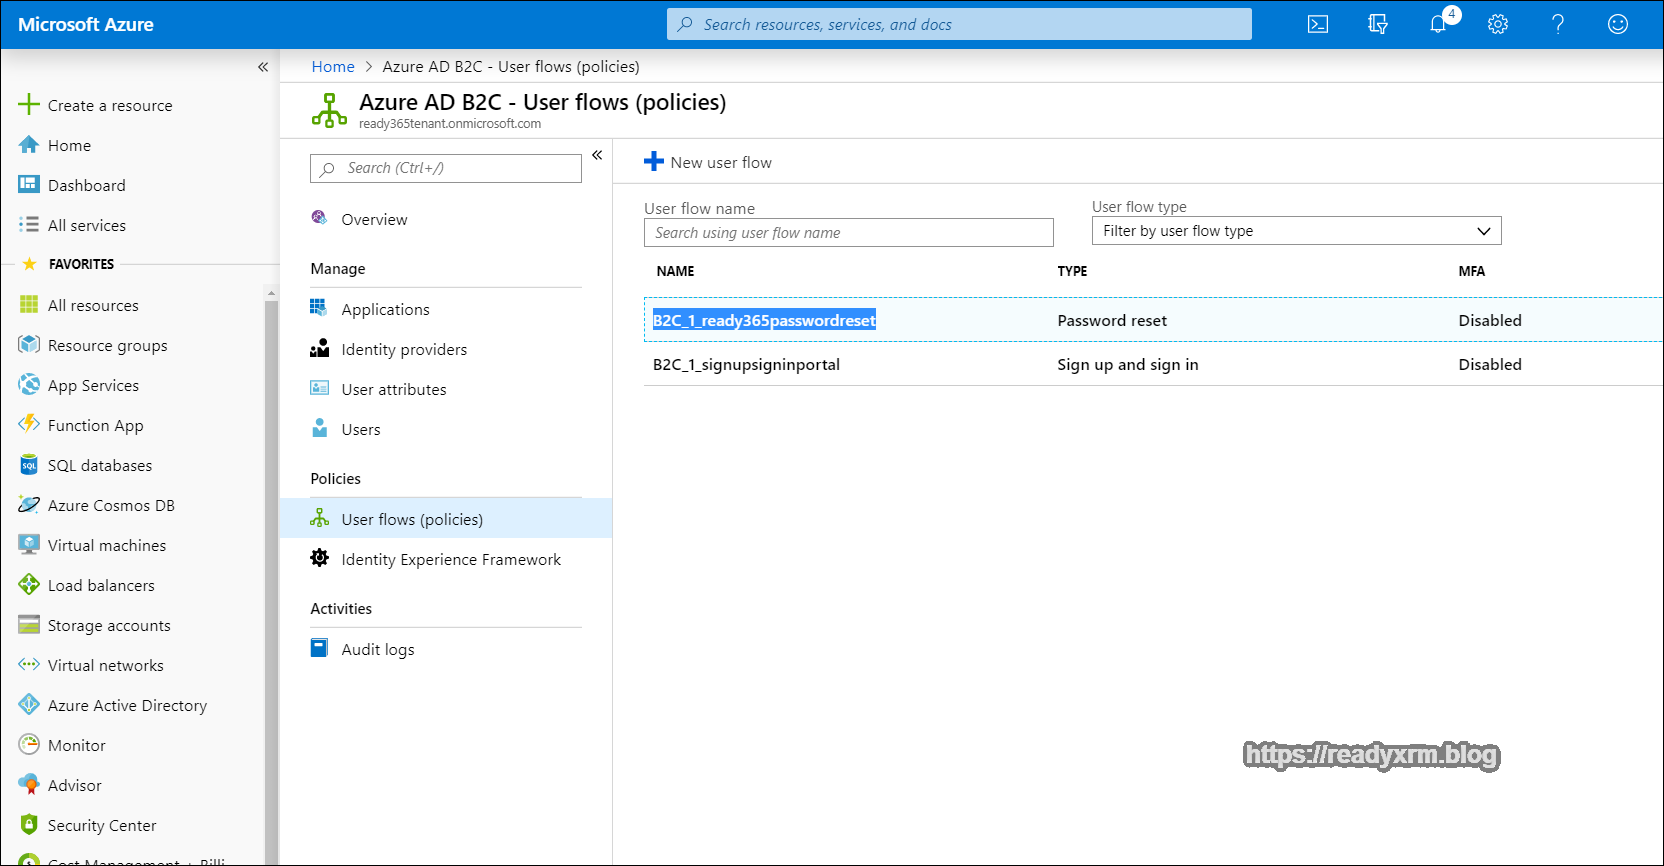
On the left panel, choose “User flows (policies)” from the Policies section and in the main window click on “New user flow”
We will first use the “Sign up and sign in” type. We need to define how a potential portal user will actually sign up and also sign in to the portal.
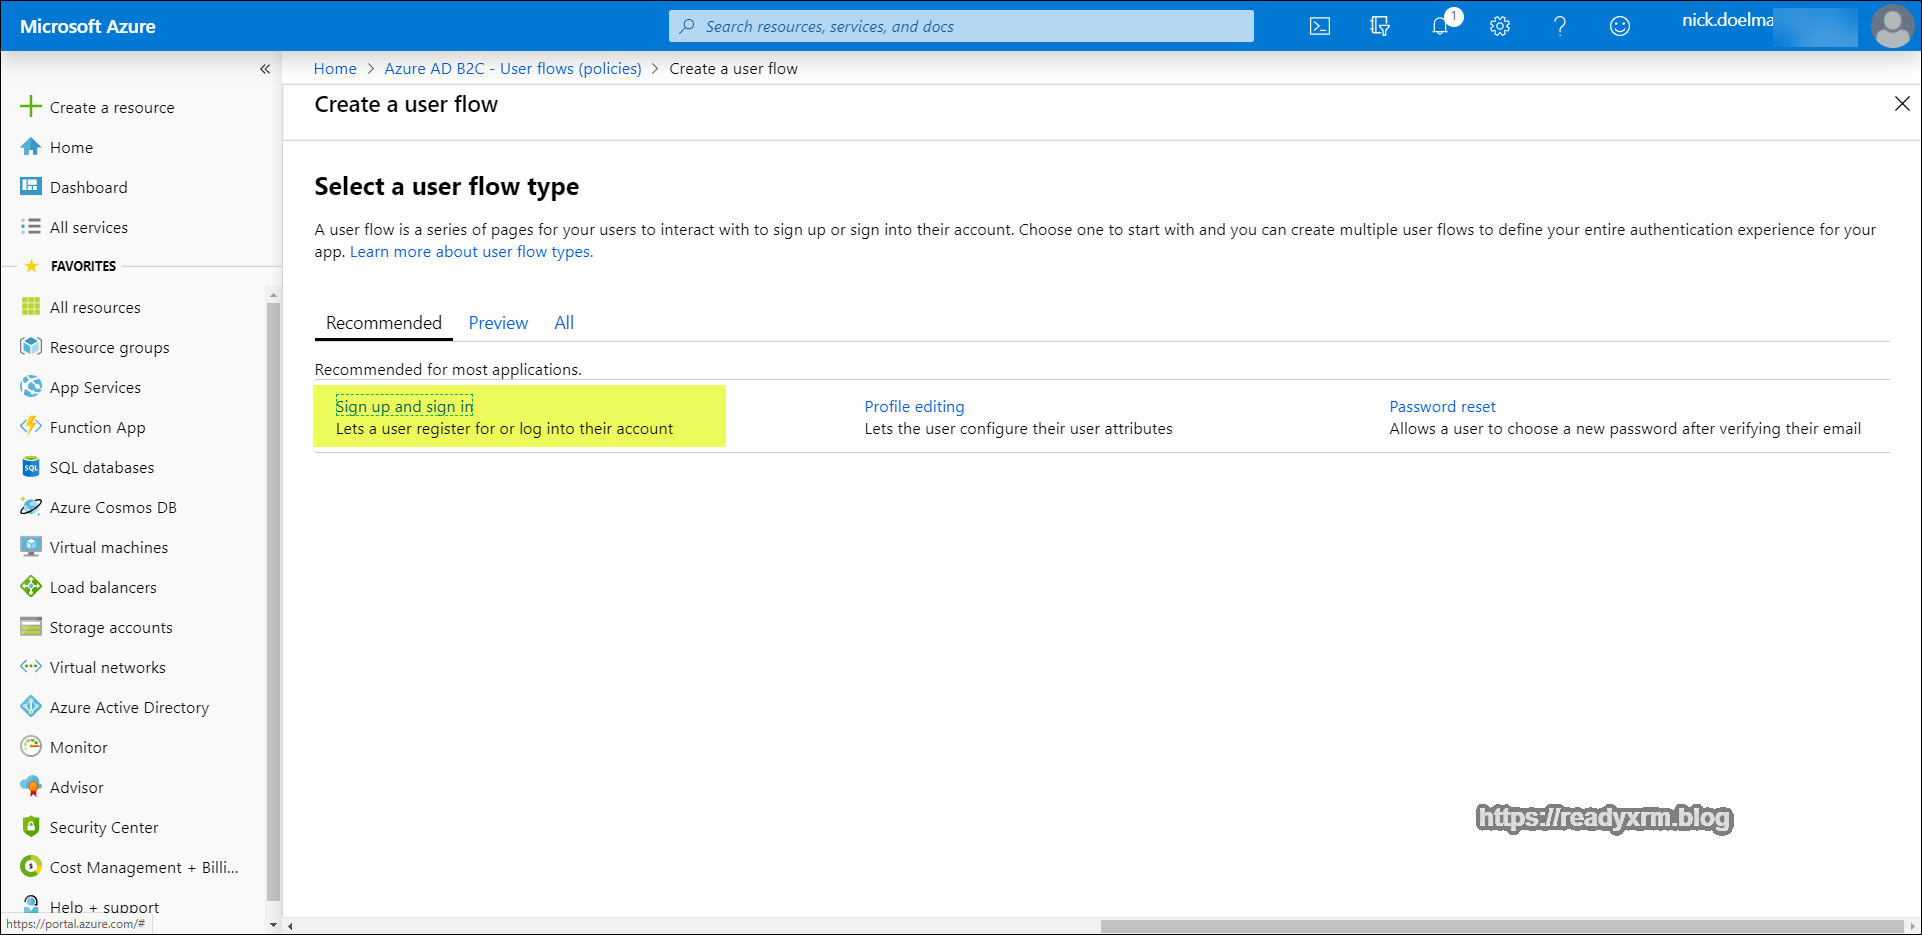
Give the policy a descriptive name. For identity providers, at this point the only option will be email signup (there are a lot of other blog posts if you want to use other identity providers). For now we will also not worry about multifactor authentication.
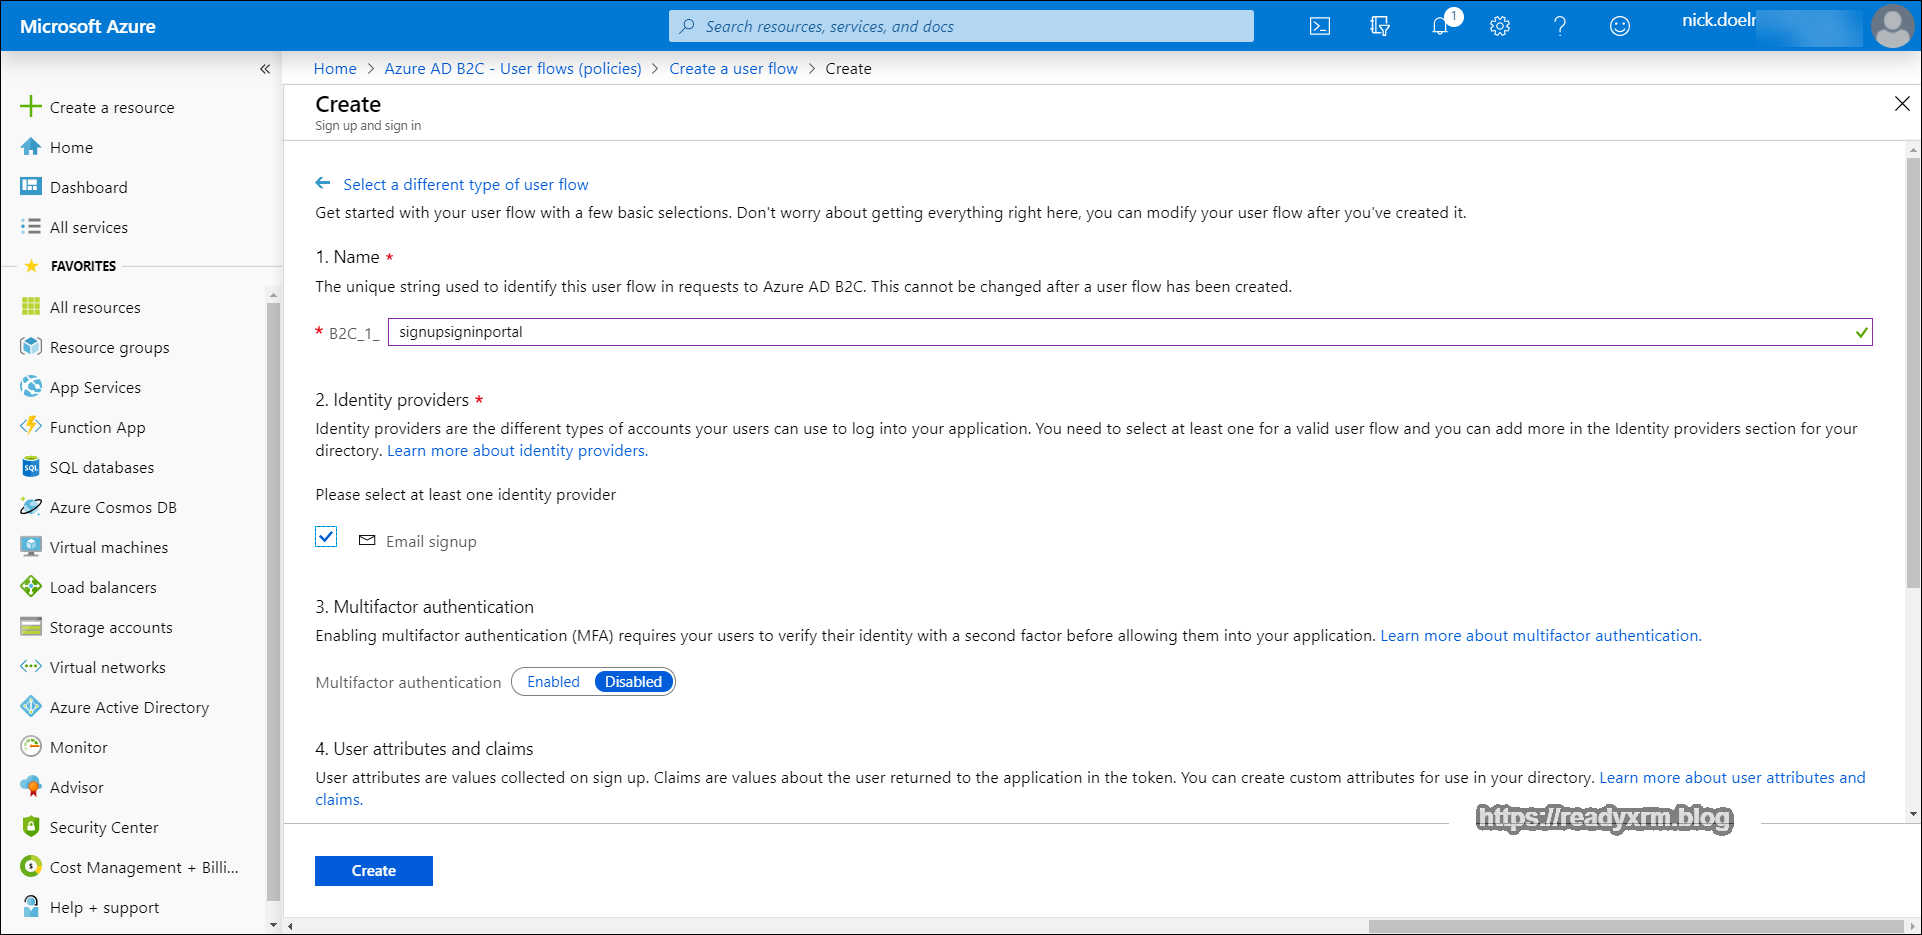
Scrolling down, under the 4. User Attributes and Claims section, choose at very least email address, but ideally pick Given name and Surname as well. Typically we will manage most of the user information on our portal itself that will be linked to the contact record in CDS. Click Create.
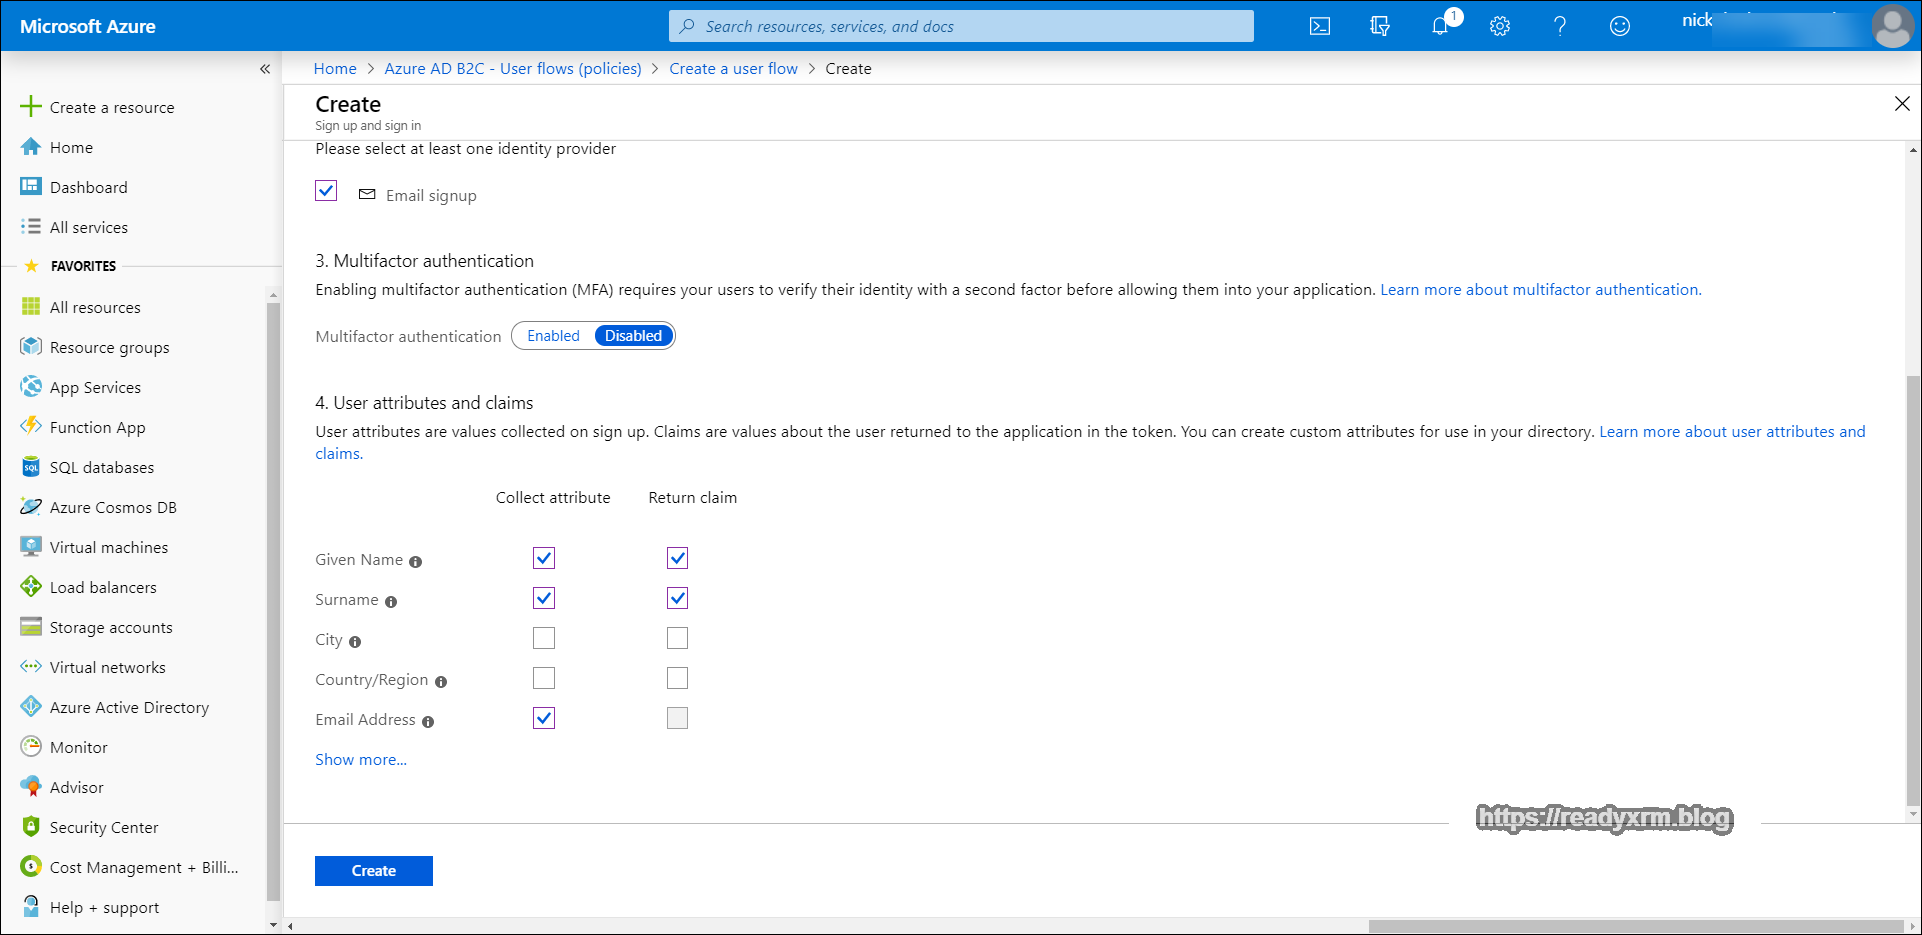
We should now have our signup and signin user flow created.
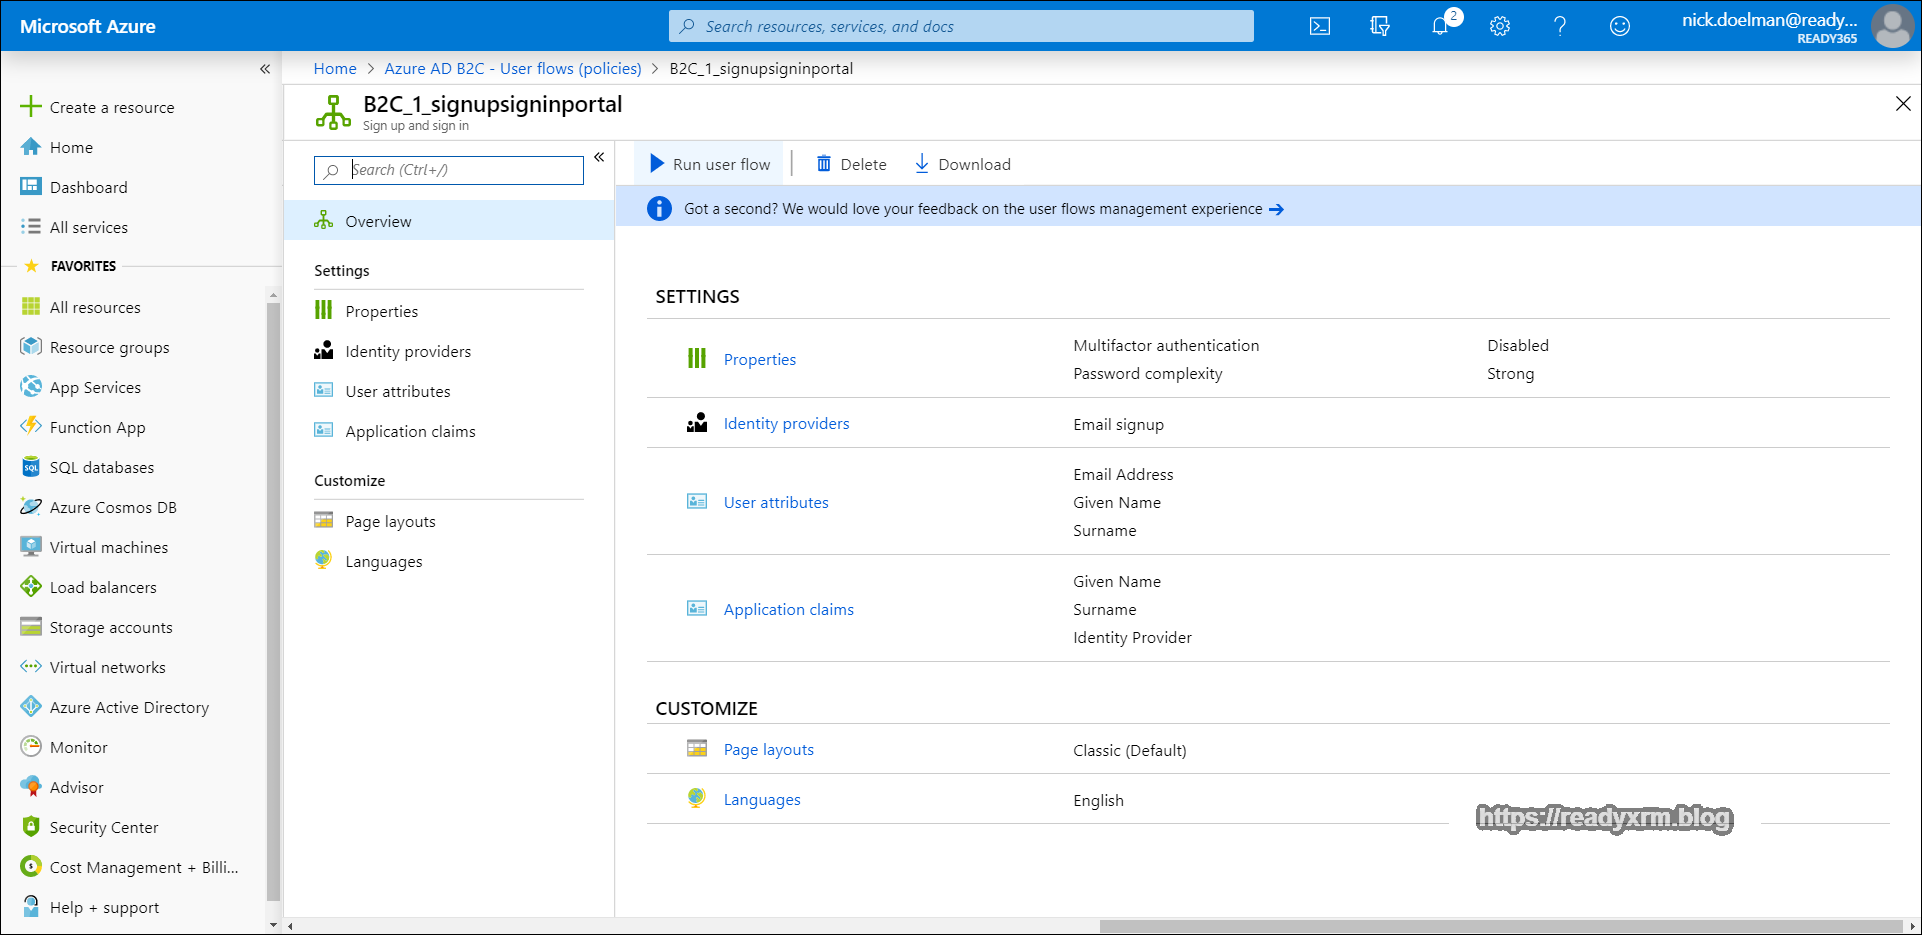
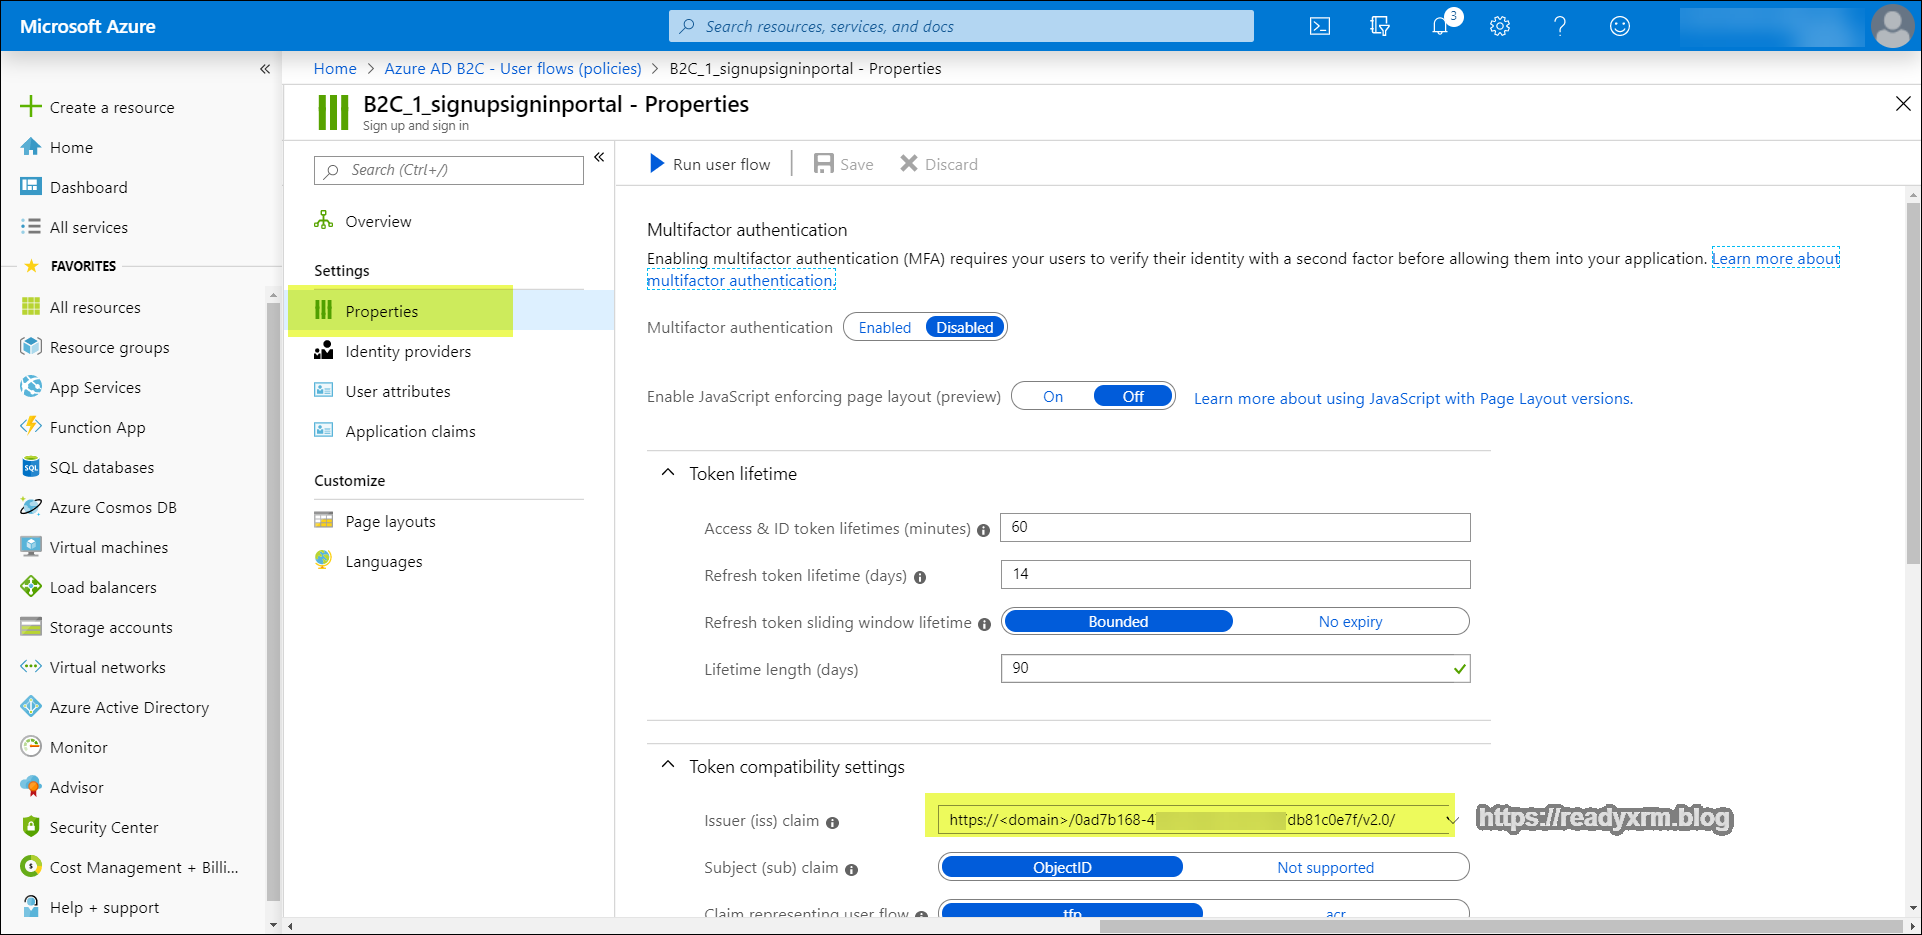
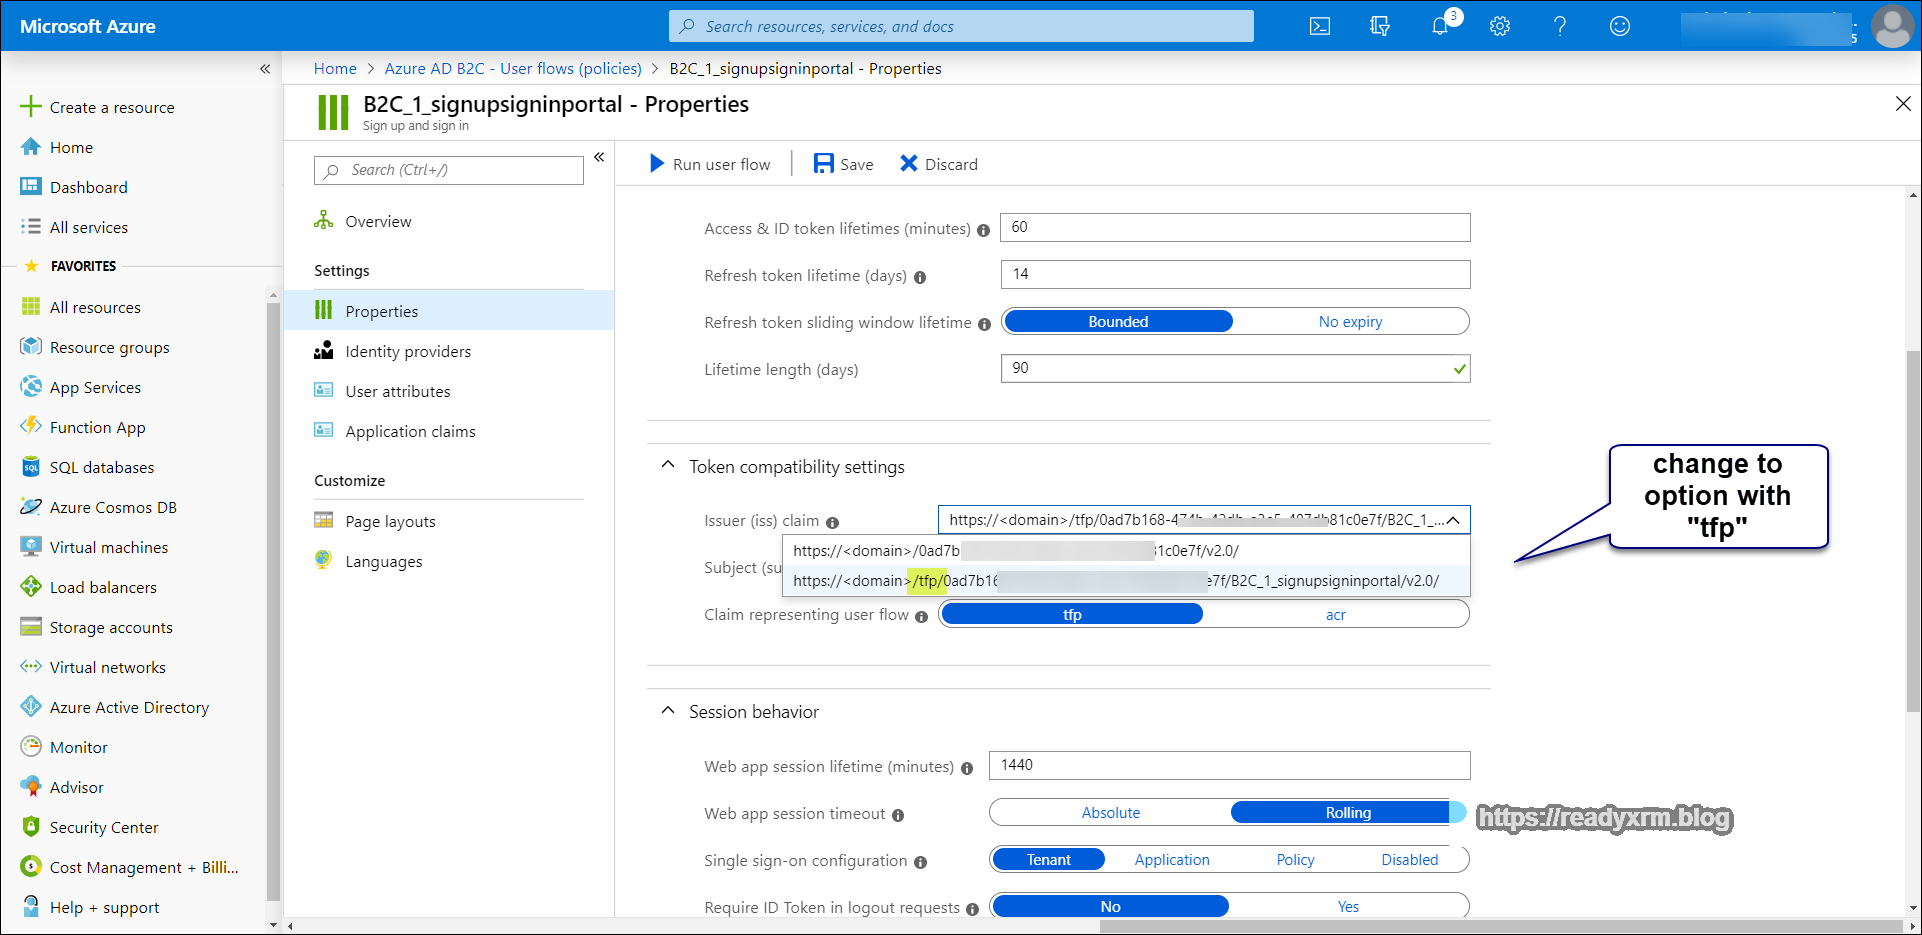
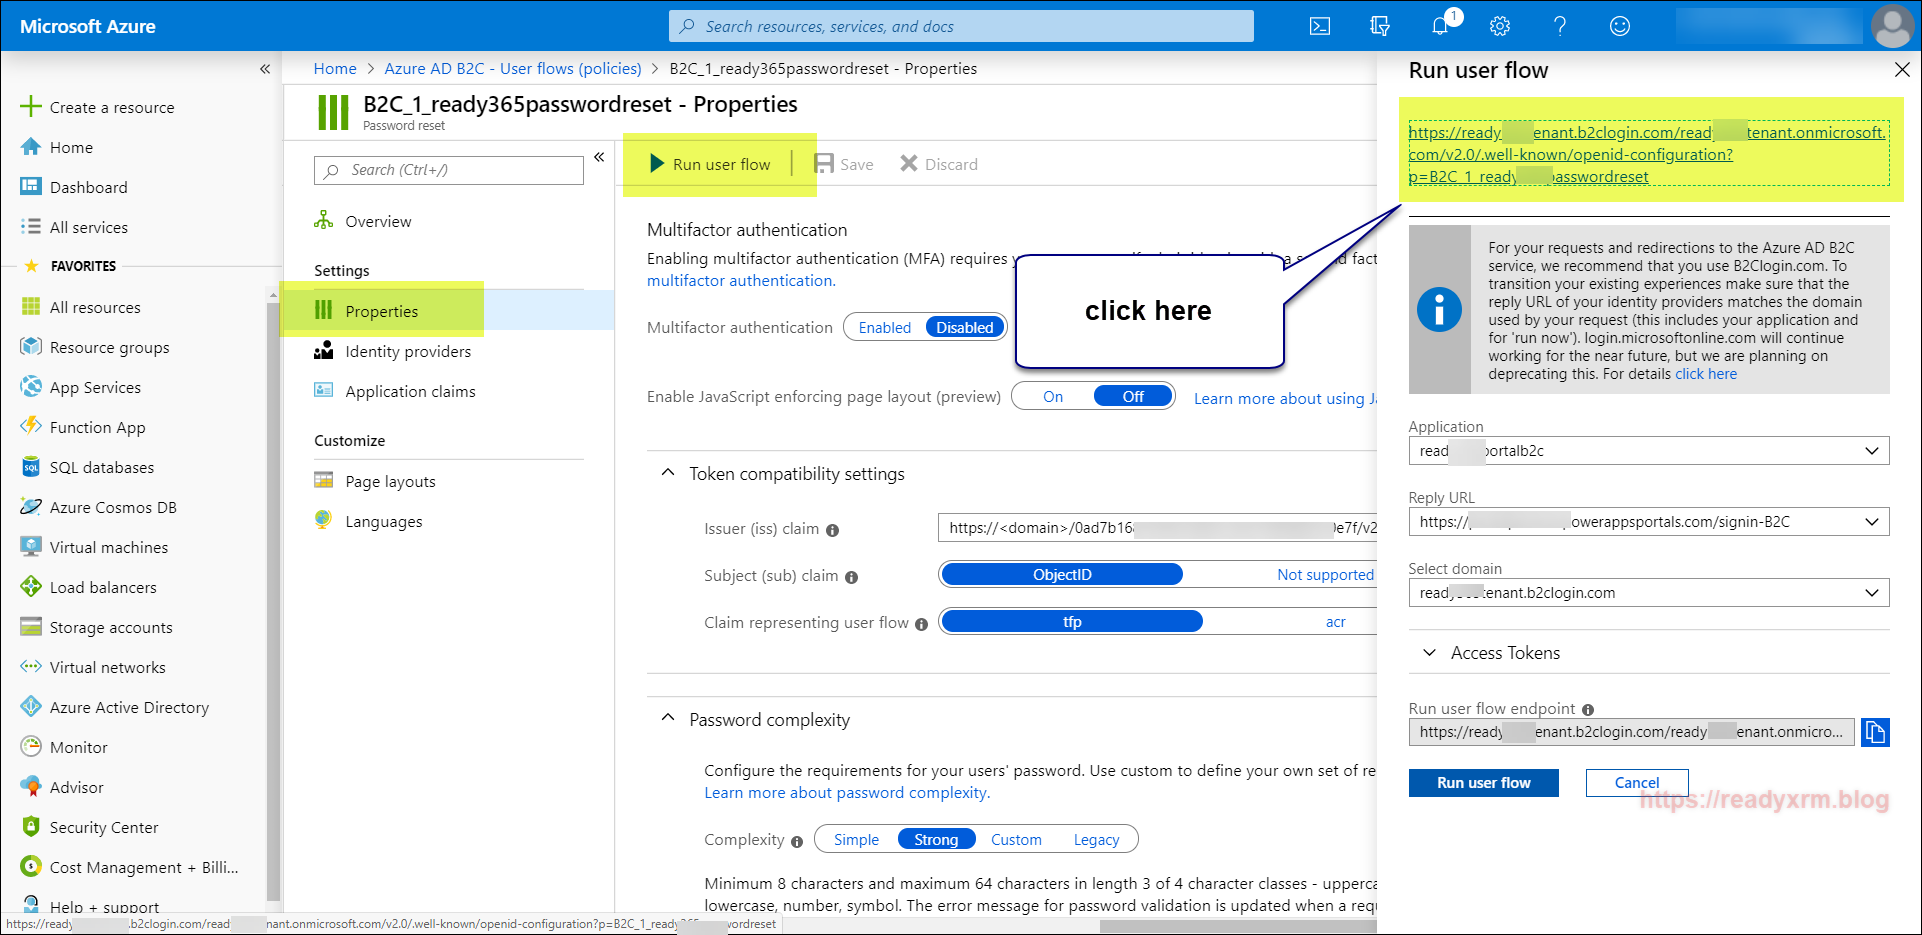
Click on Properties on the left pane, and in the main window, scroll down to the Token compatibility settings and changes the Issuer (iss) claim to option with “tfp” in the URL;
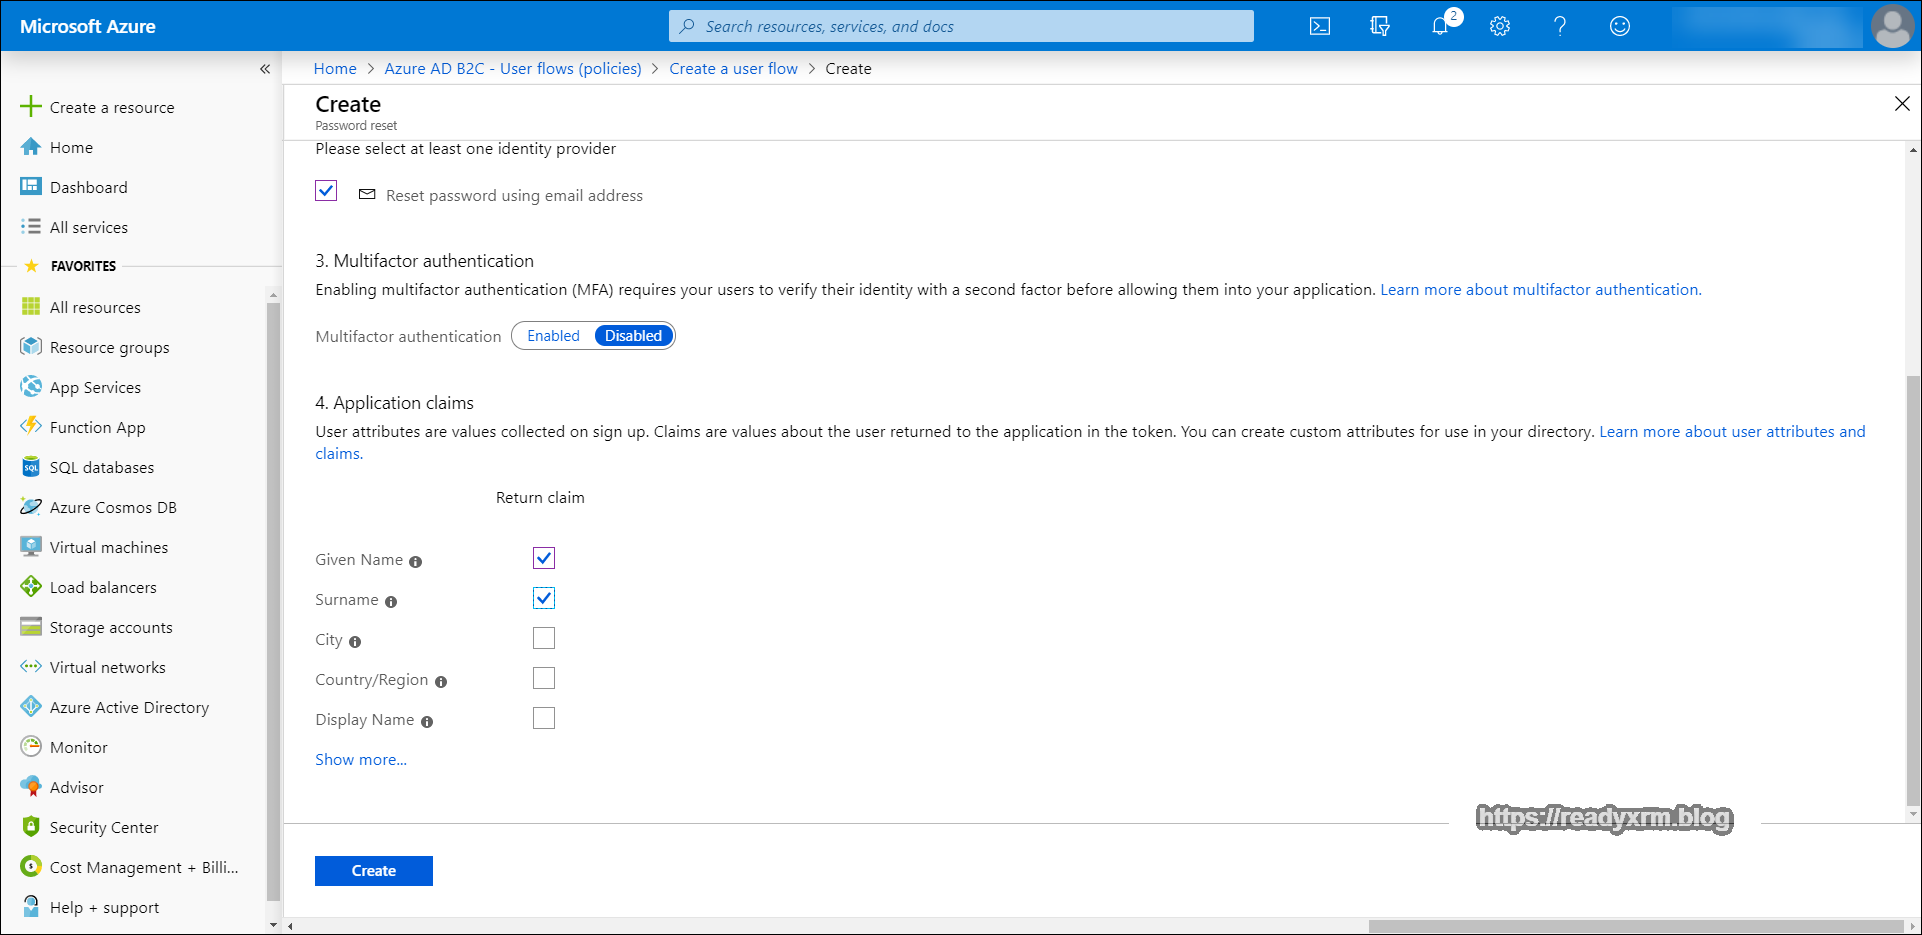
We will need to setup another user flow to configure the password reset options. This is critical if you don’t want to have spend time providing users with new passwords to the portal. This will provide a secure, self-service method for your portal users to manage passwords on their own.
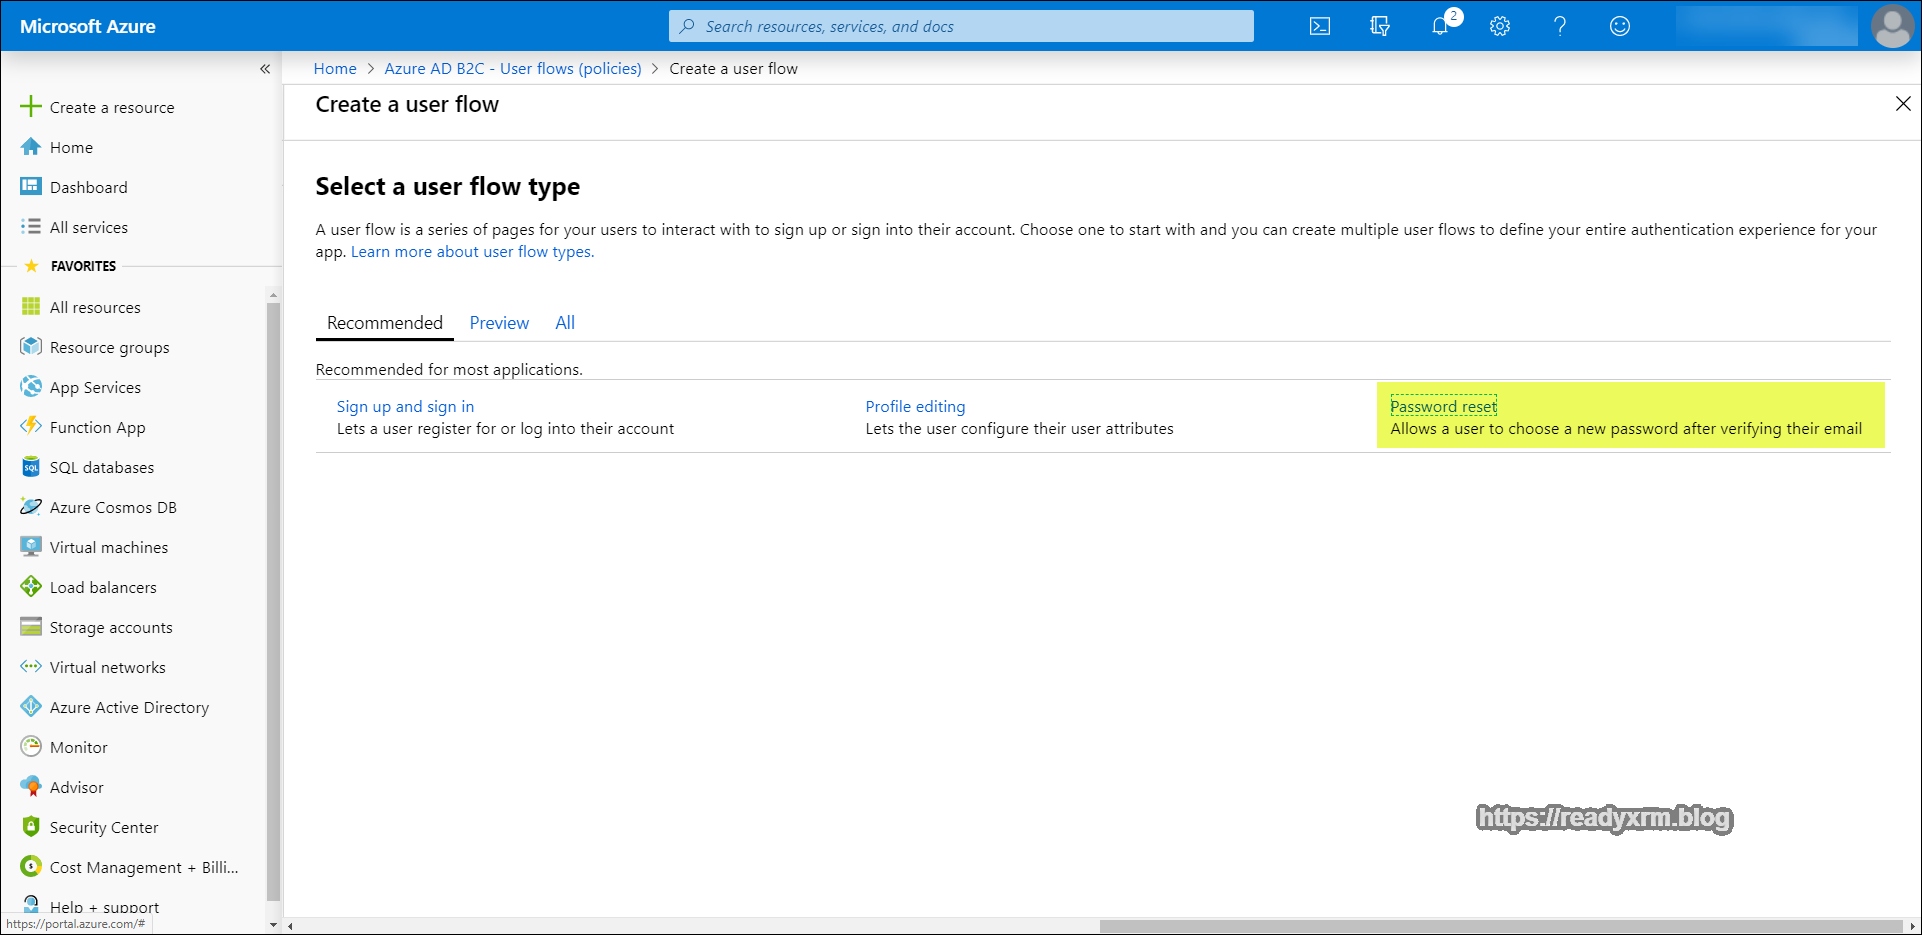
Provide a descriptive name and also choose the option to reset a password using an email address.
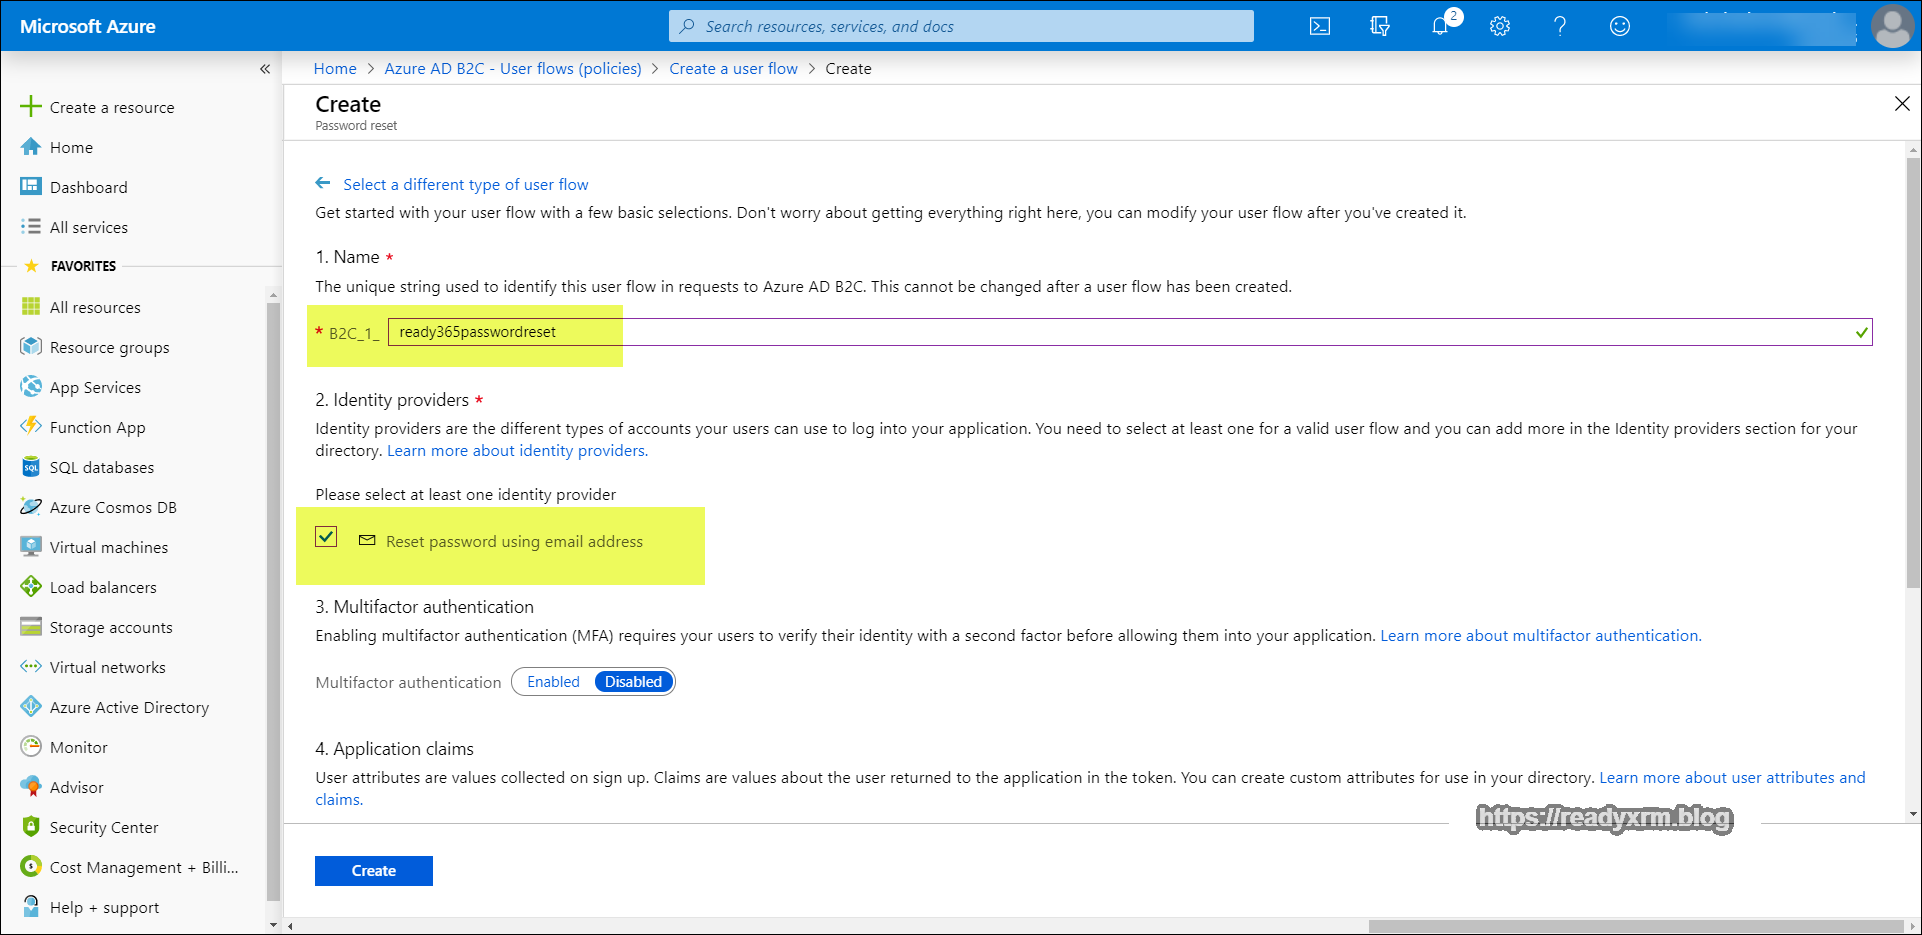
In the claims section, choose Given Name and Surname, mainly for consistency with the signon process.
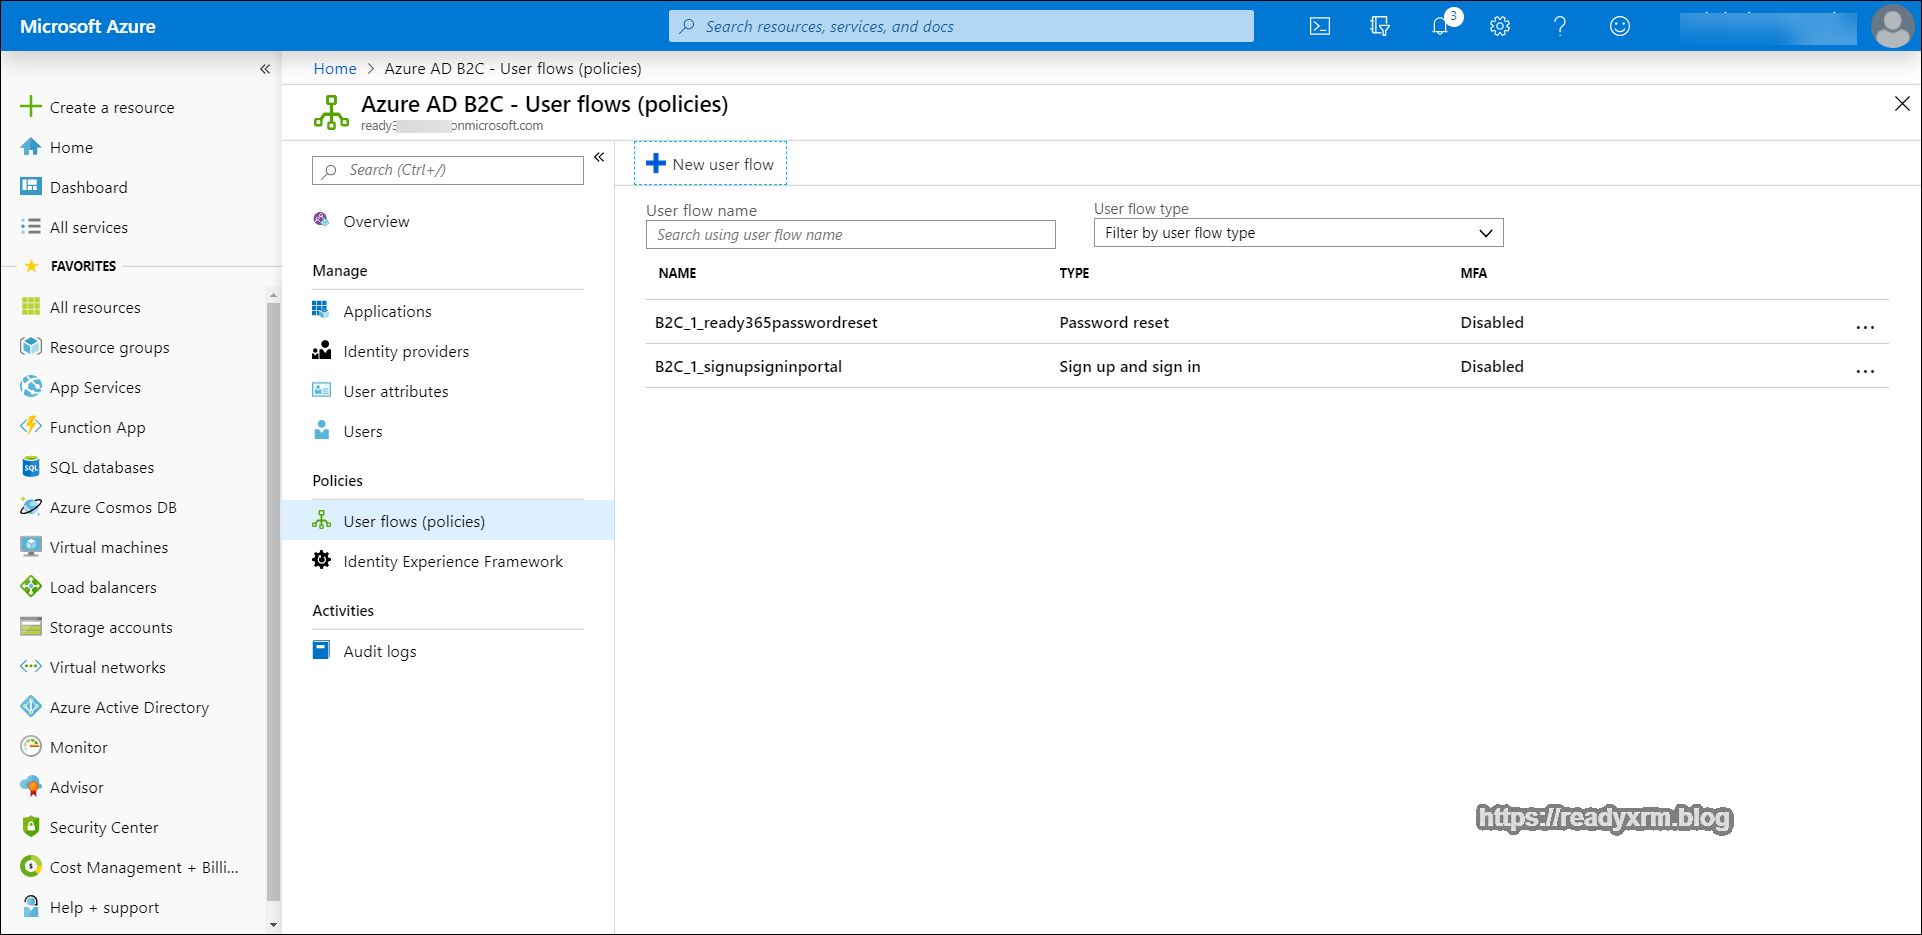
There should be two user flows listed under the application.
Keep the Azure portal open for the next steps because we will need to refer back here to grab specific settings for the portal configuration.
Settings Required for Portal Configuration
Before we can configure the portal, we need to capture some of the information.
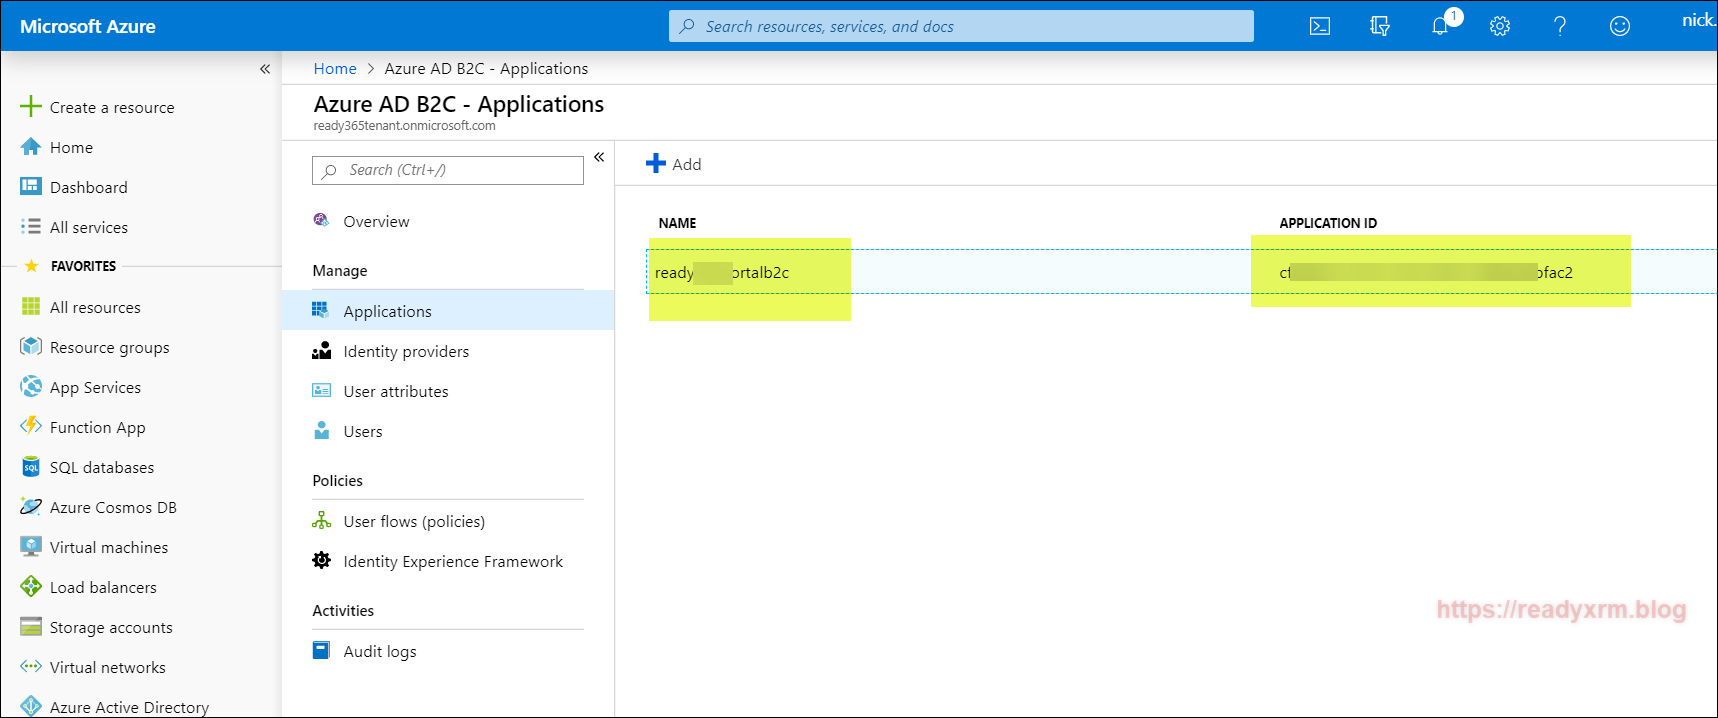
Application Name and Application ID
We need to note a series of setting such as the Azure AD B2C application name and application id, as well as issuer URLs. The name is what we defined earlier and the application id will be a generated GUID. These can be found under the applications list.
These values will be used to update the following Portal Site Settings (see section futher down on how to update site settings)
- Authentication/OpenIdConnect/[Federation-Name]/ClientId
- Authentication/OpenIdConnect/[Federation-Name]/DefaultPolicyId
- Authentication/OpenIdConnect/[Federation-Name]/Authority
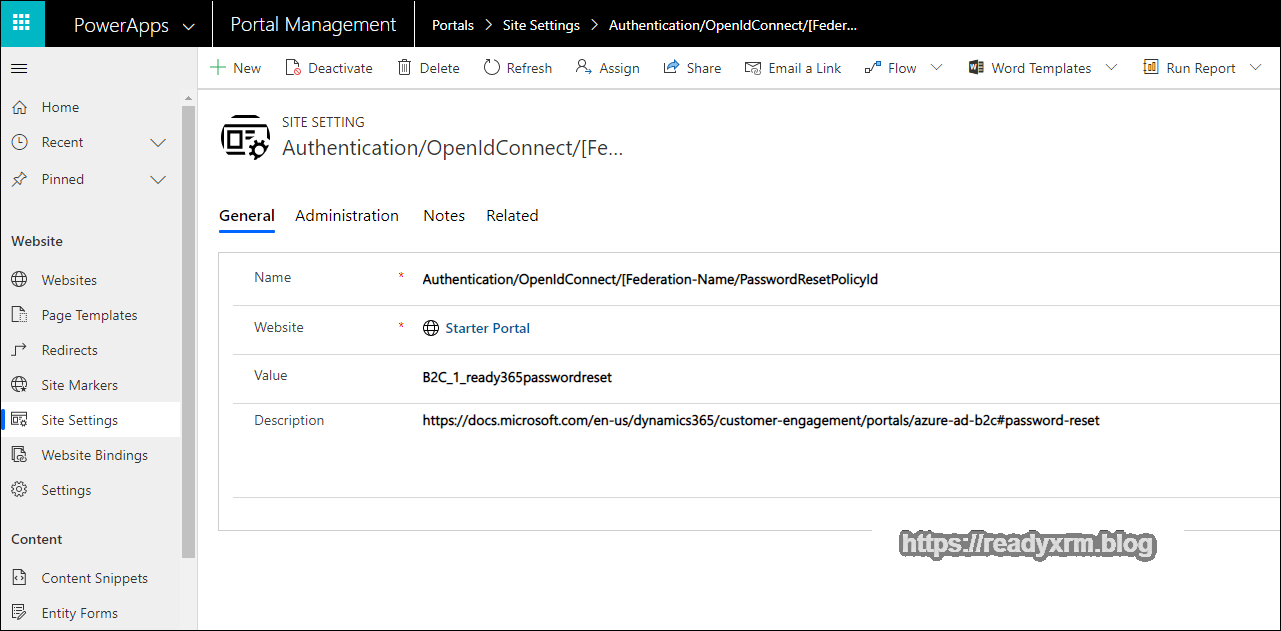
- Authentication/OpenIdConnect/[Federation-Name/PasswordResetPolicyId
- Authentication/OpenIdConnect/[Federation-Name]/ValidIssuers
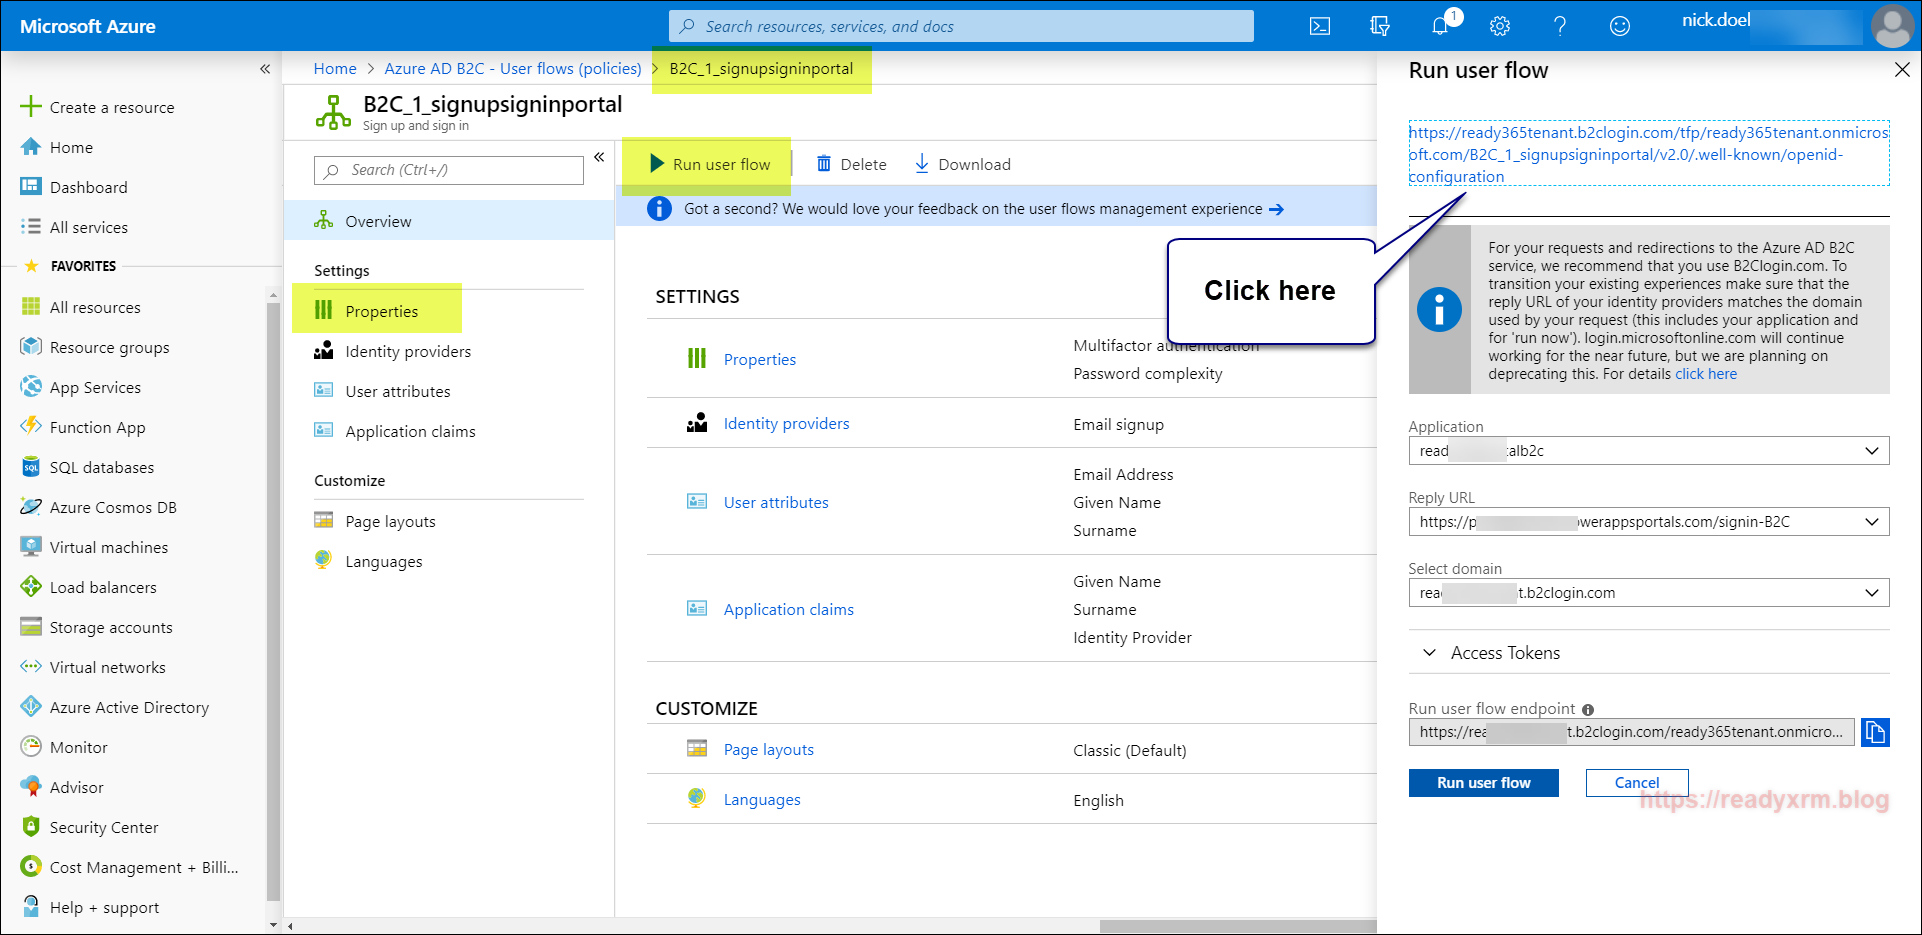
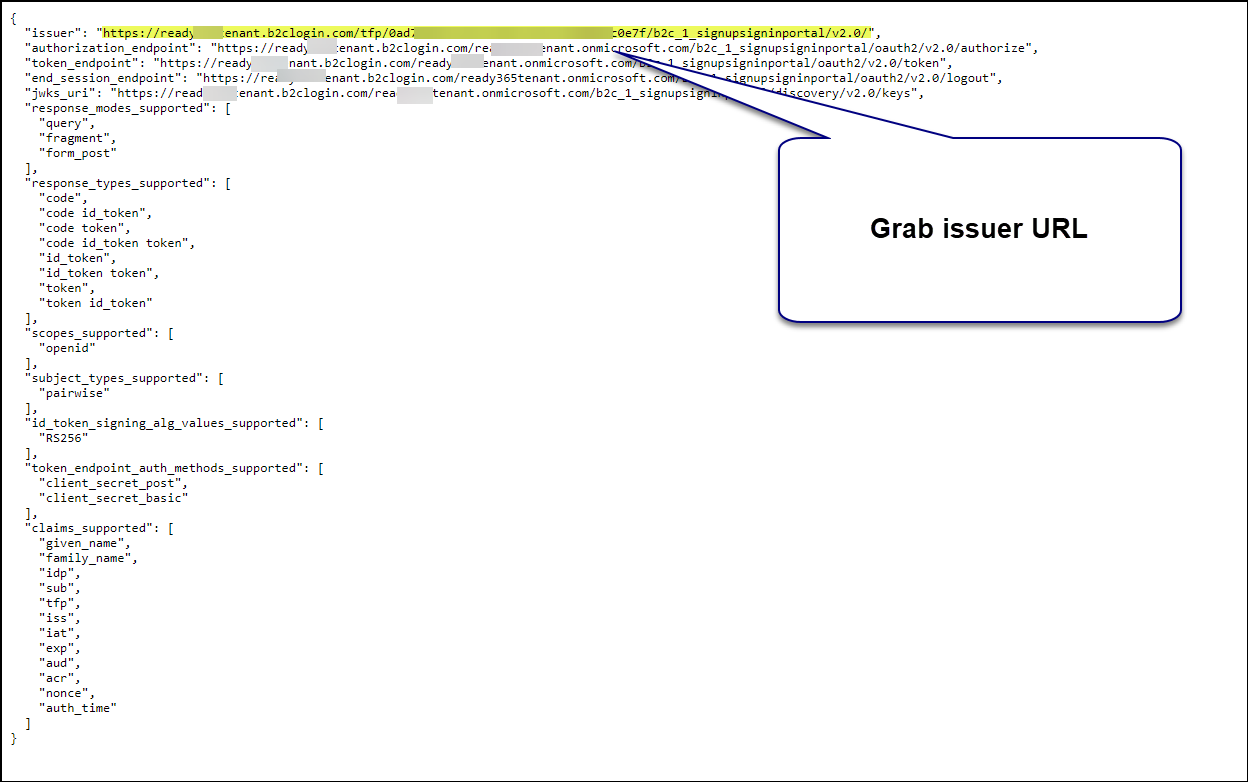
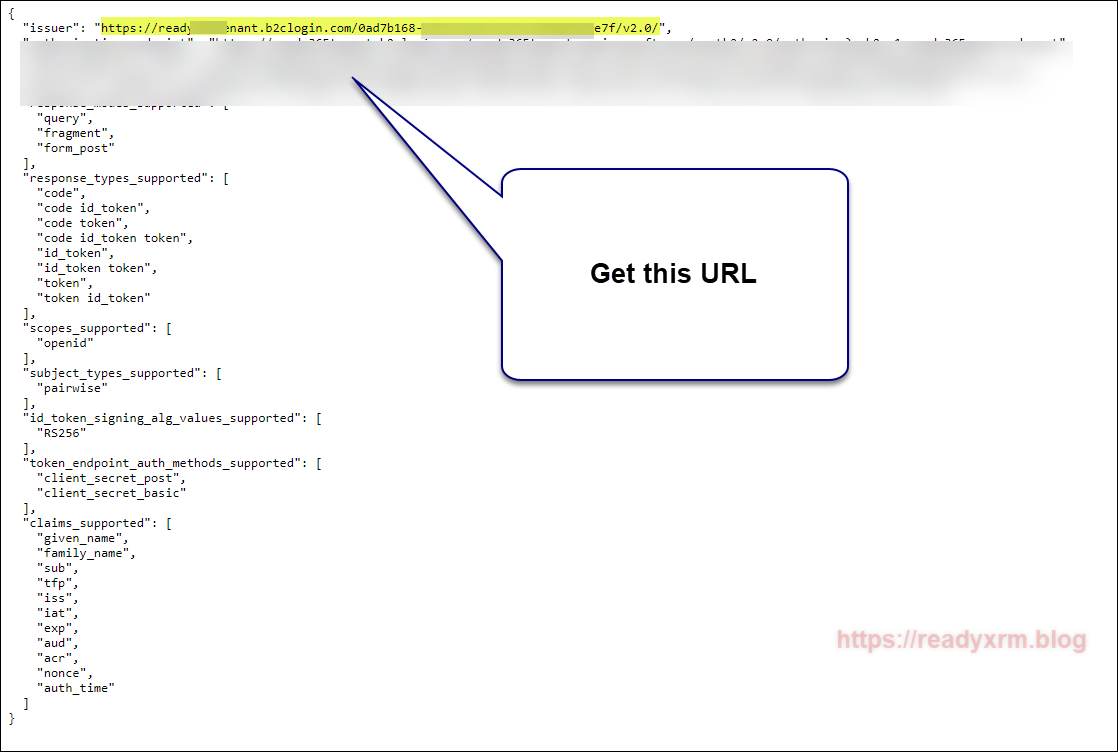
We also need the policy sign-in URL. This can be located by opening the signup and sign in user flow we created earlier and by selecting “Run user flow” to generate the URL with JSON data.
You will also need to the password reset user flow policy name.
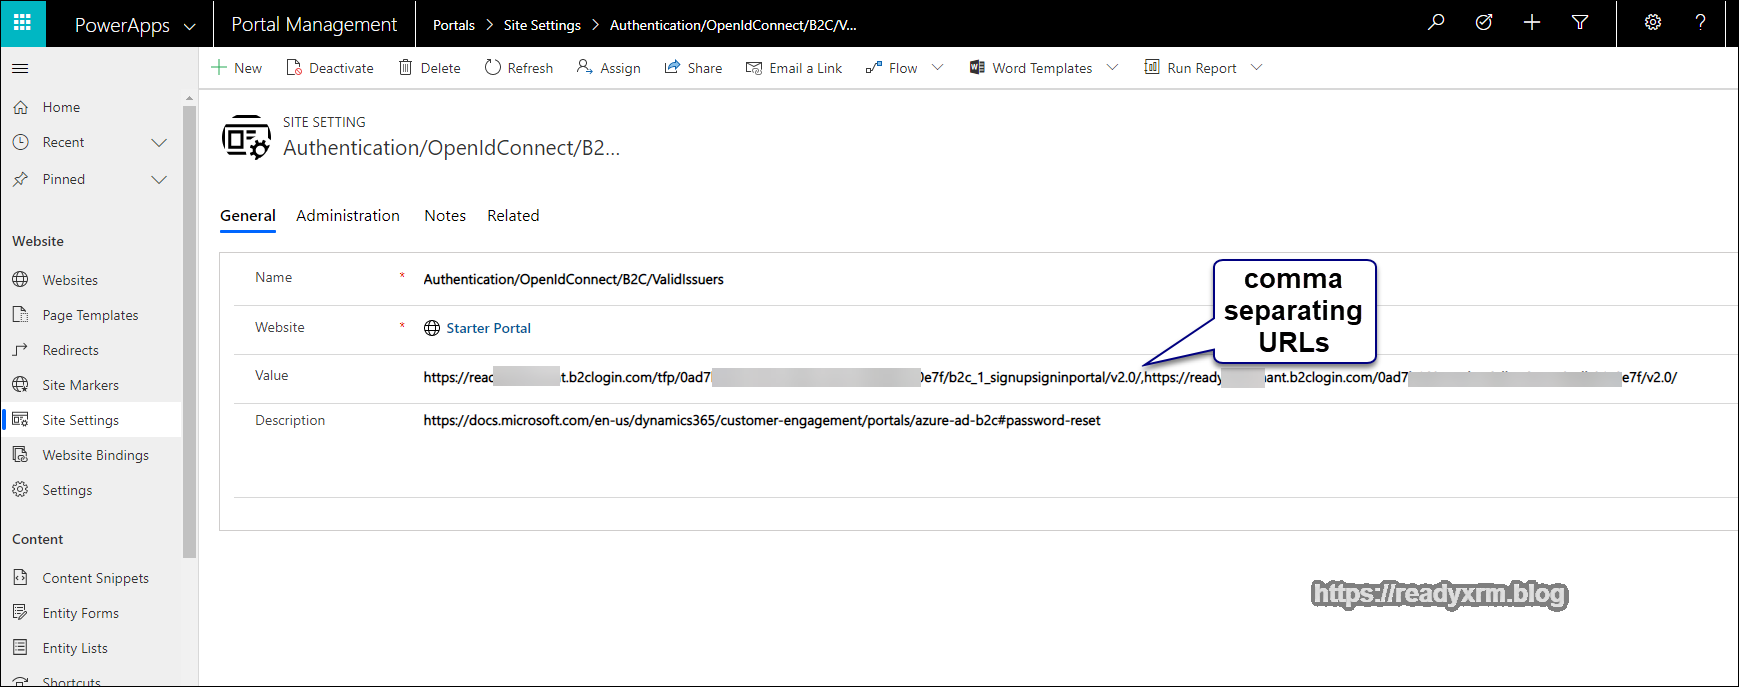
Also you will need a list of valid issuers. You will have already captured the policy sign in URL earlier. We will also need the Password reset issuer. This is found by opening the policy and choosing properties and running the user flow and clicking on the generated user flow link.
Configure Portal
Now that our Azure AD B2C has been configured, the next step is configure our PowerApps Portal to be able to interact with Azure AD B2C.
Navigate to https://make.powerapps.com and choose the Portal Management App from the list of apps. We will be configuring the Azure AD B2C integration by creating and updating Portal site settings.
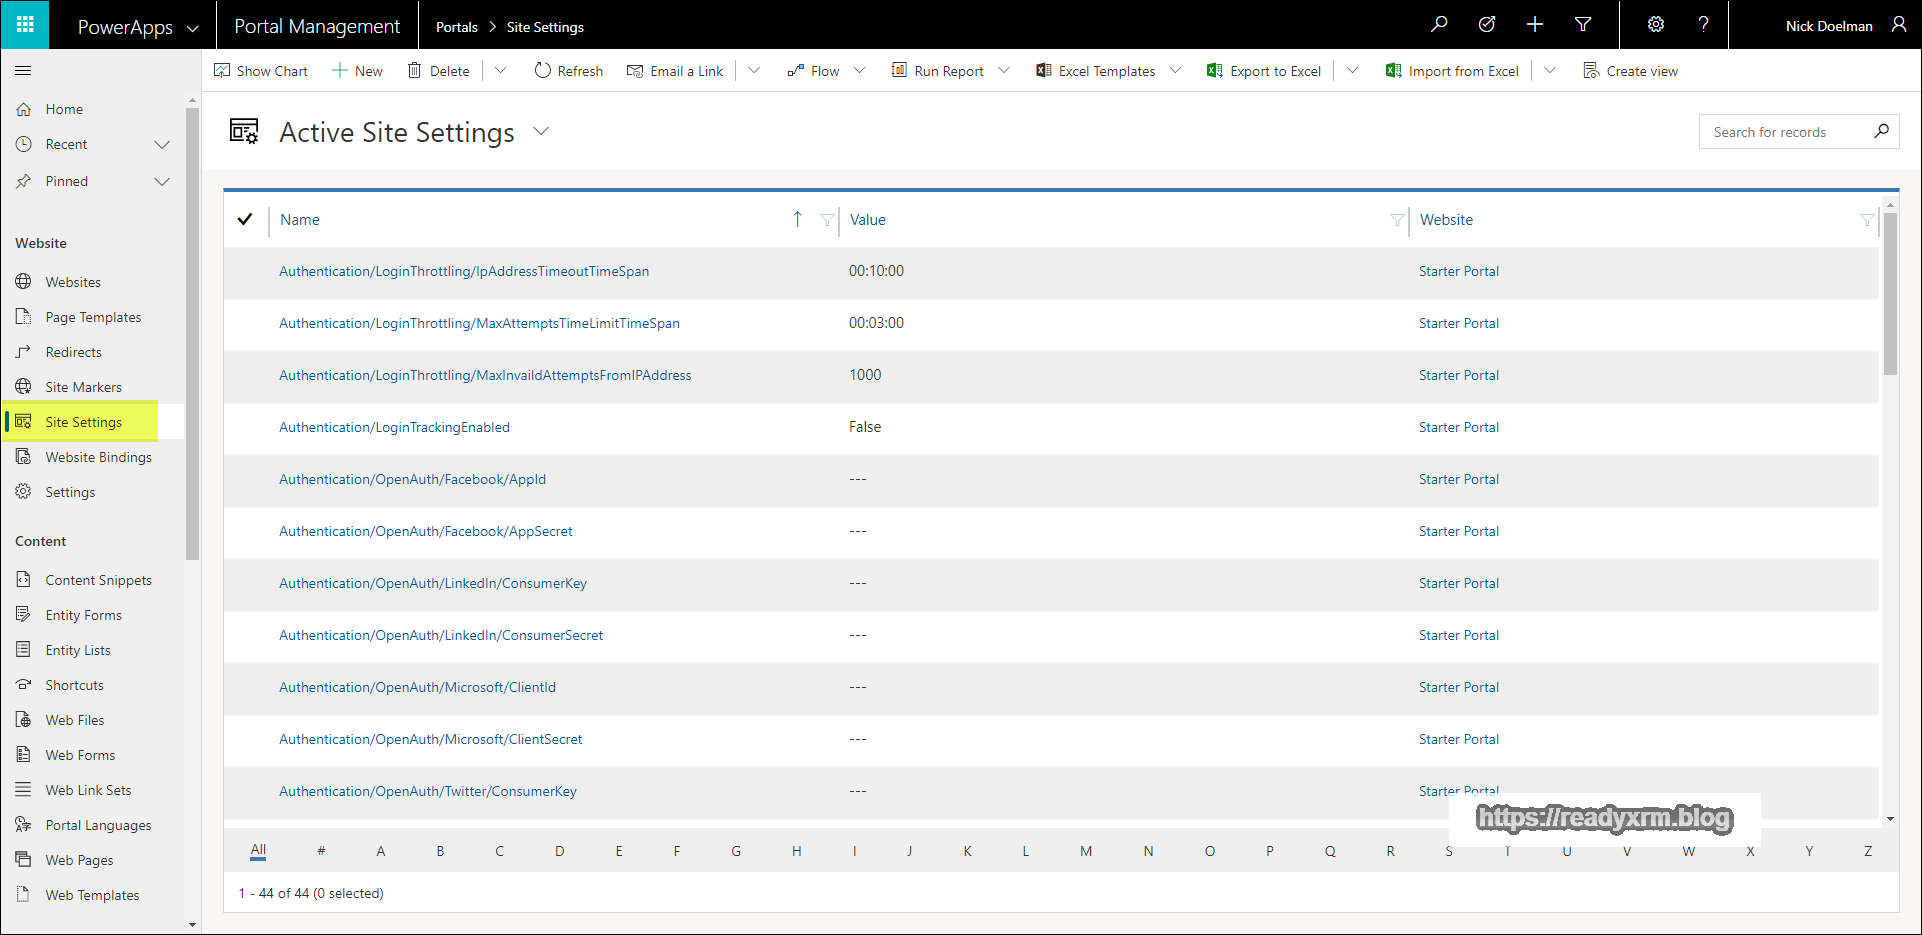
The Portal Management app is a model-driven app that allows configuration updates to the PowerApps Portal (as all portal metadata is stored in CDS). Navigate to Site Settings.
You will need to decide on an unique “Federation Name” for your portal configuration. I simply choose “B2C” and we will use this value in the following configurations.
Create a new site setting and put the following value;
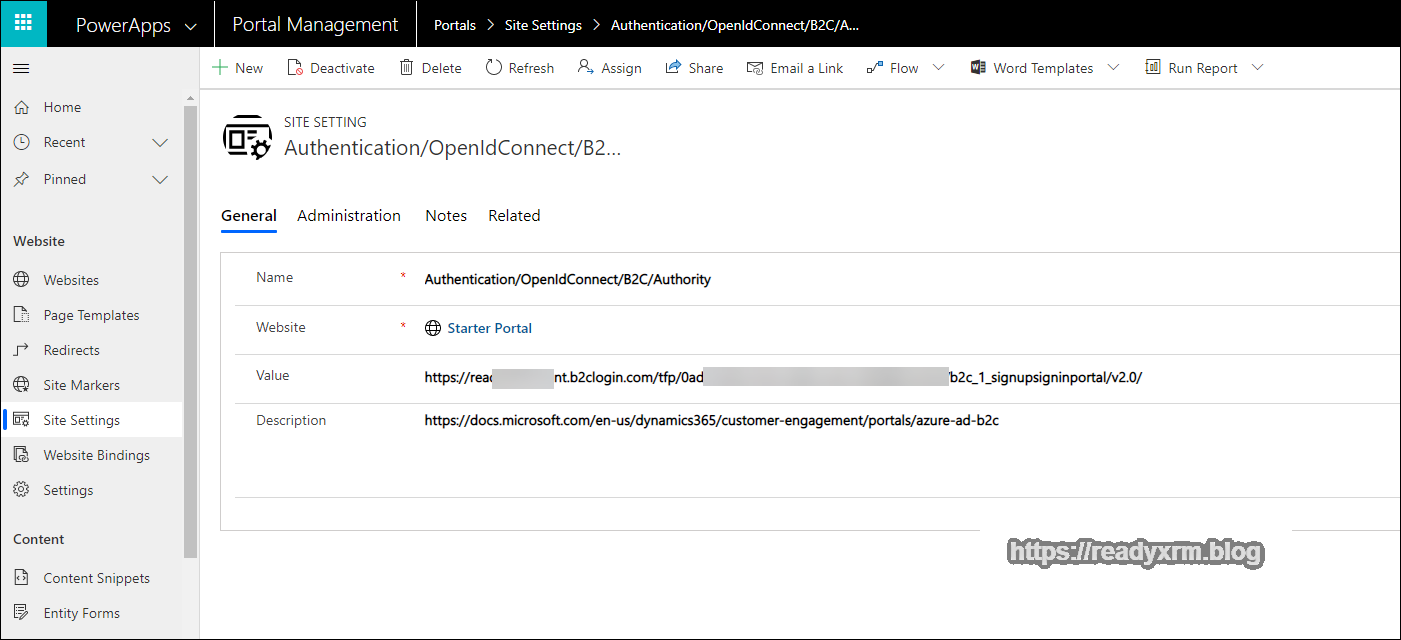
Authentication/OpenIdConnect/B2C/Authority
Enter in the policy sign-in URL you captured above from the Azure portal.
Save the site setting record and add another;
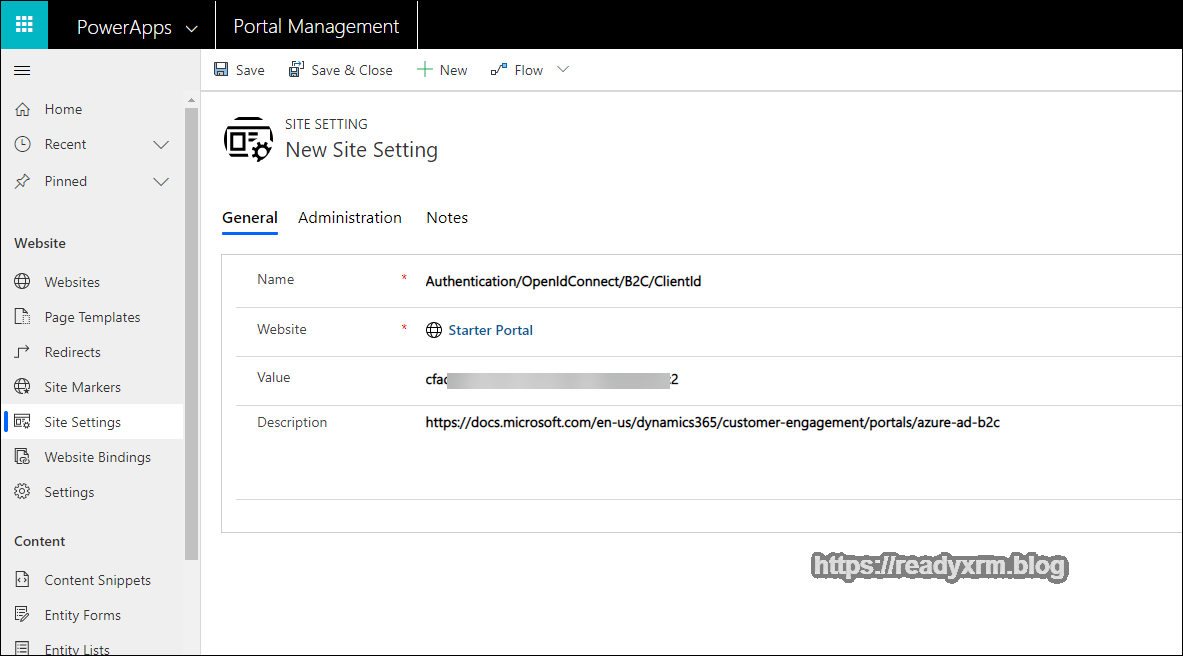
Authentication/OpenIdConnect/B2C/ClientId
Enter in the application id GUID you captured above from the Azure portal.
Save this site setting and add another;
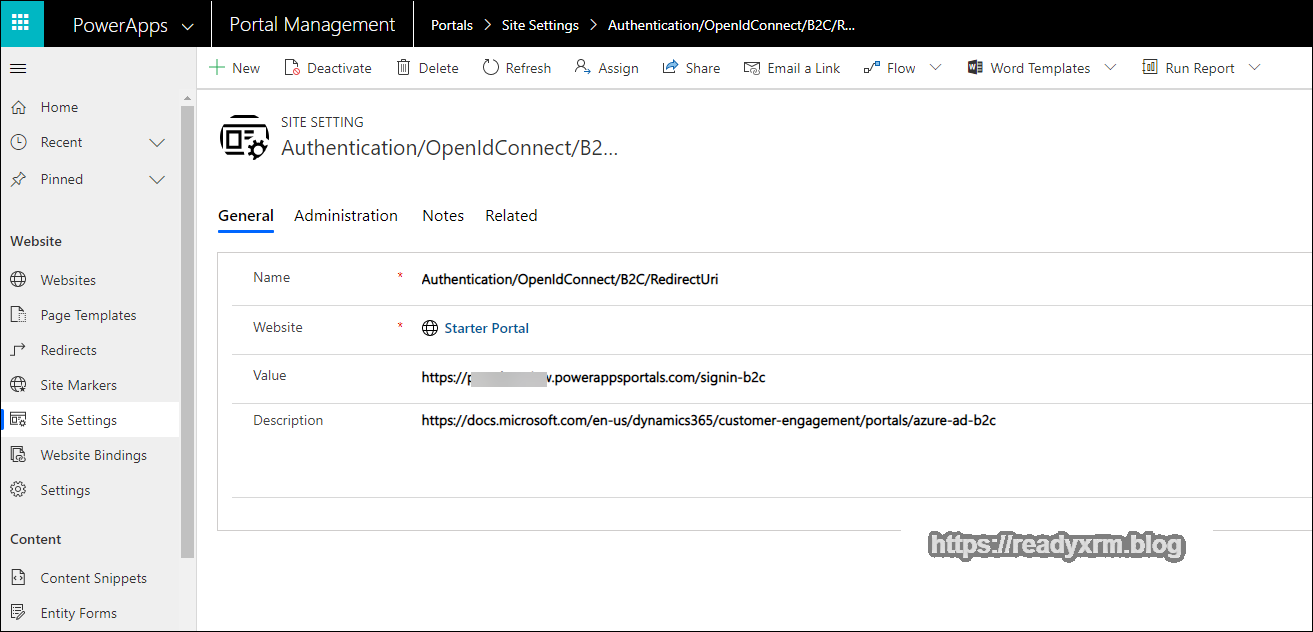
Authentication/OpenIdConnect/[Federation-Name]/RedirectUri
This time enter in the portal URL, followed by “signin-B2C” (signin- <<federation name>>)
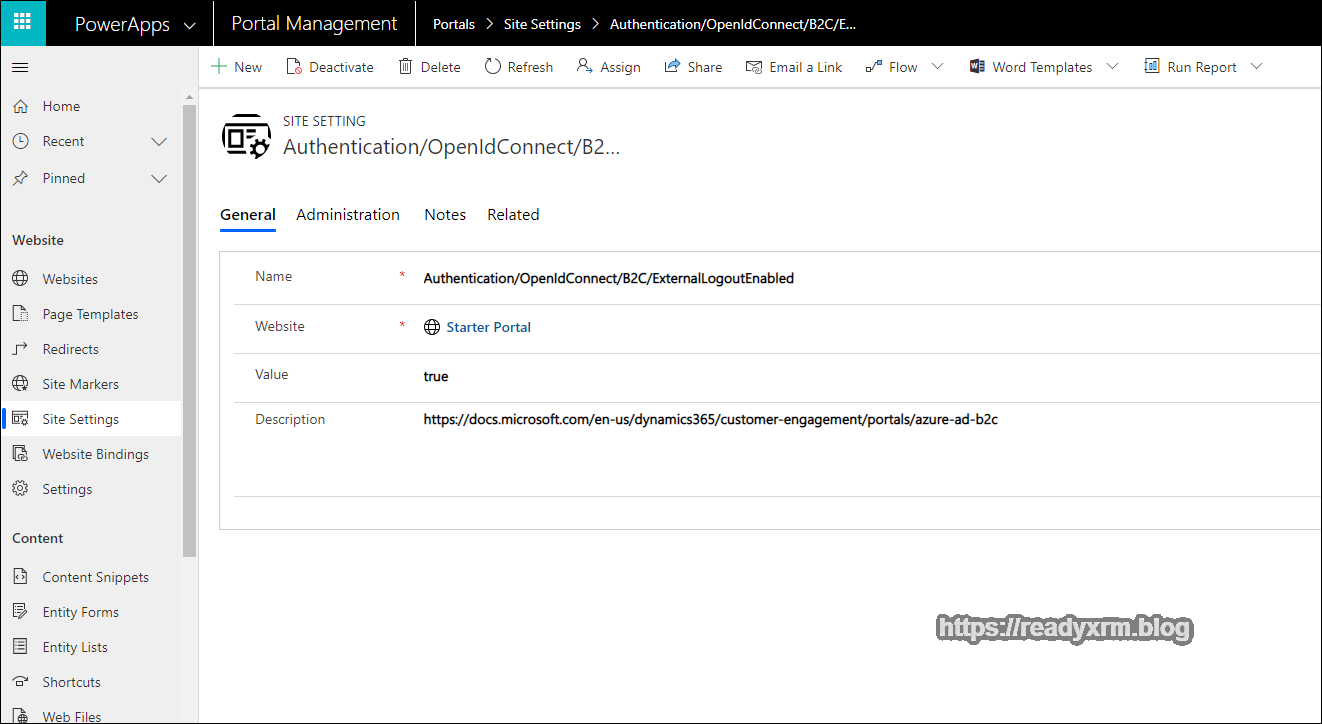
There are a couple more settings to round out this part of the configuration. To support a federated sign-out, add the following Site Setting;
Authentication/OpenIdConnect/B2C/ExternalLogoutEnabled
Set the value to “true“
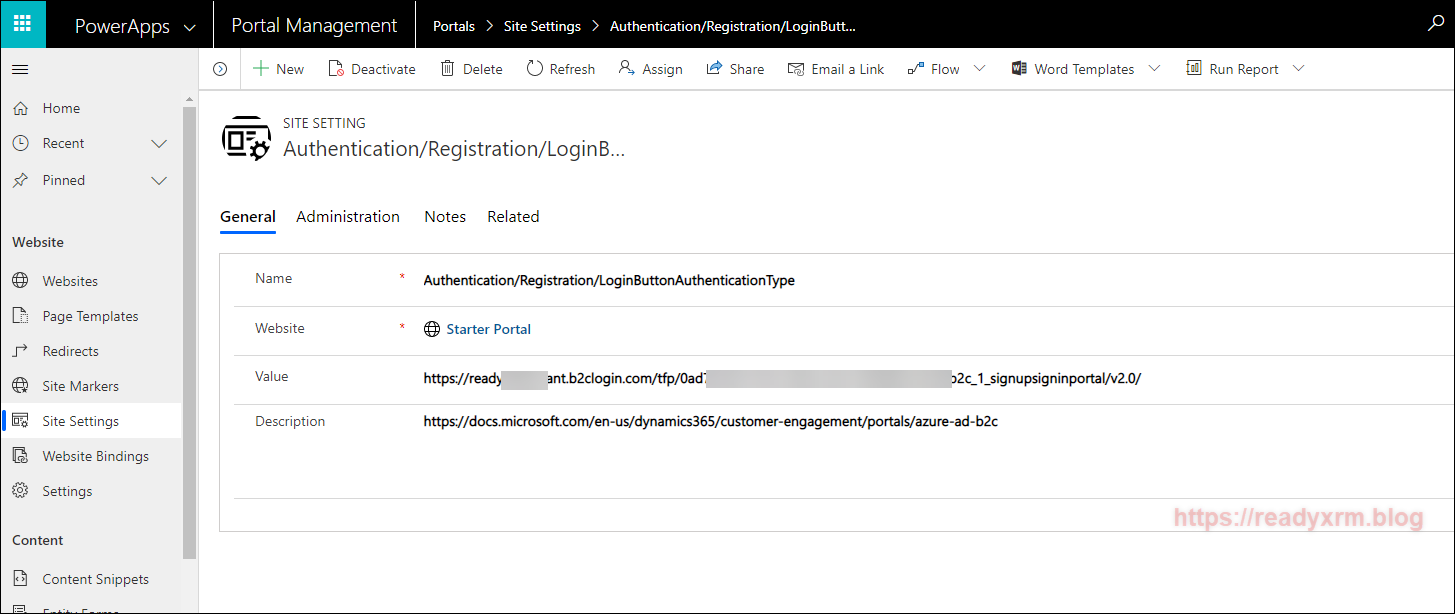
To make Azure AD B2C the *only* indentity provider, add the following:
Authentication/Registration/LoginButtonAuthenticationType
And again enter in the Policy sign in URL from above;
At this point you will have entered in enough settings for a user to be able to sign on and sign in to the PowerApps Portal using Azure AD B2C, however, we will want to enable the password reset mechanism as well.
Create another new Site Setting,
Authentication/OpenIdConnect/B2C/PasswordResetPolicyId
Enter in the password reset policy ID that you captured above.
Tired of creating Site Settings yet? Only a few more…
Create a site setting for the valid issuers;
Authentication/OpenIdConnect/B2C/ValidIssuers
For the values, enter in the issuer URLs seperated by comma’s;
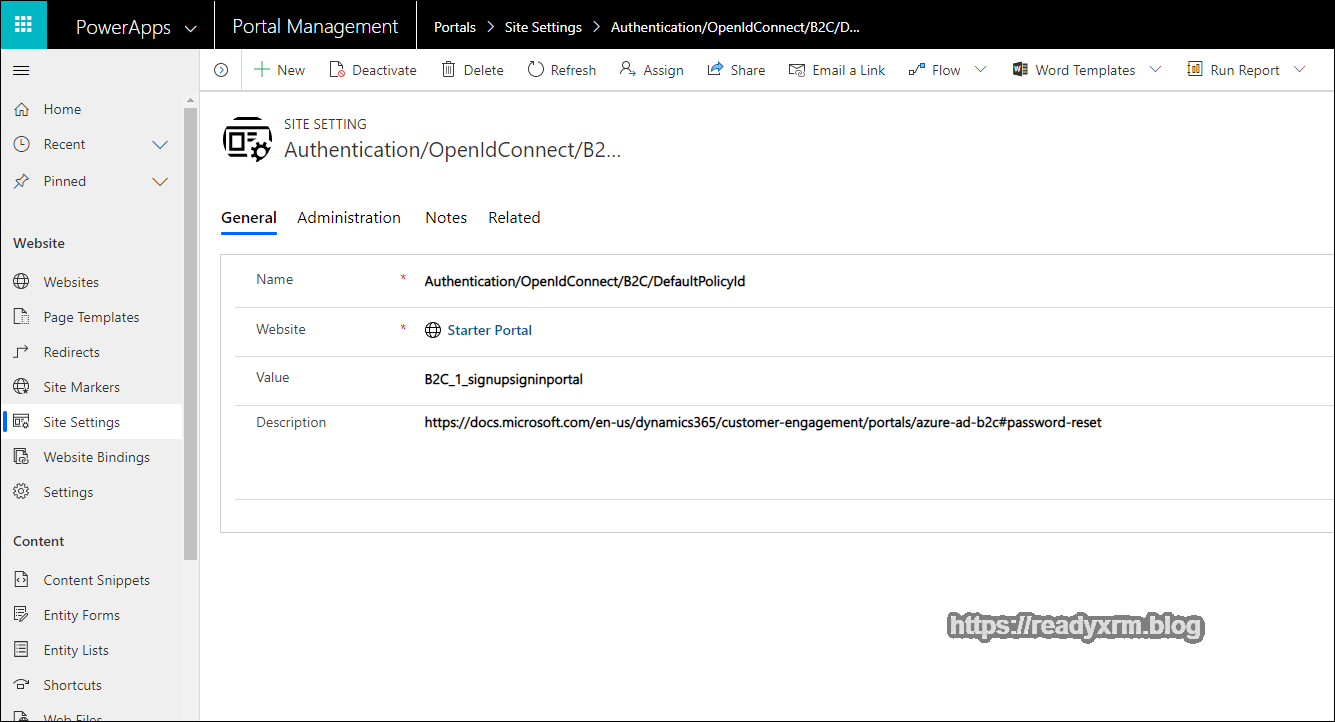
Finally enter a value for the default policy id.
Authentication/OpenIdConnect/B2C/DefaultPolicyId
Note there are other Site Setting values that can be configured for the PowerApps Portal. Verify your settings (I found that I missed the “Federation Name” a few times during my setup.)
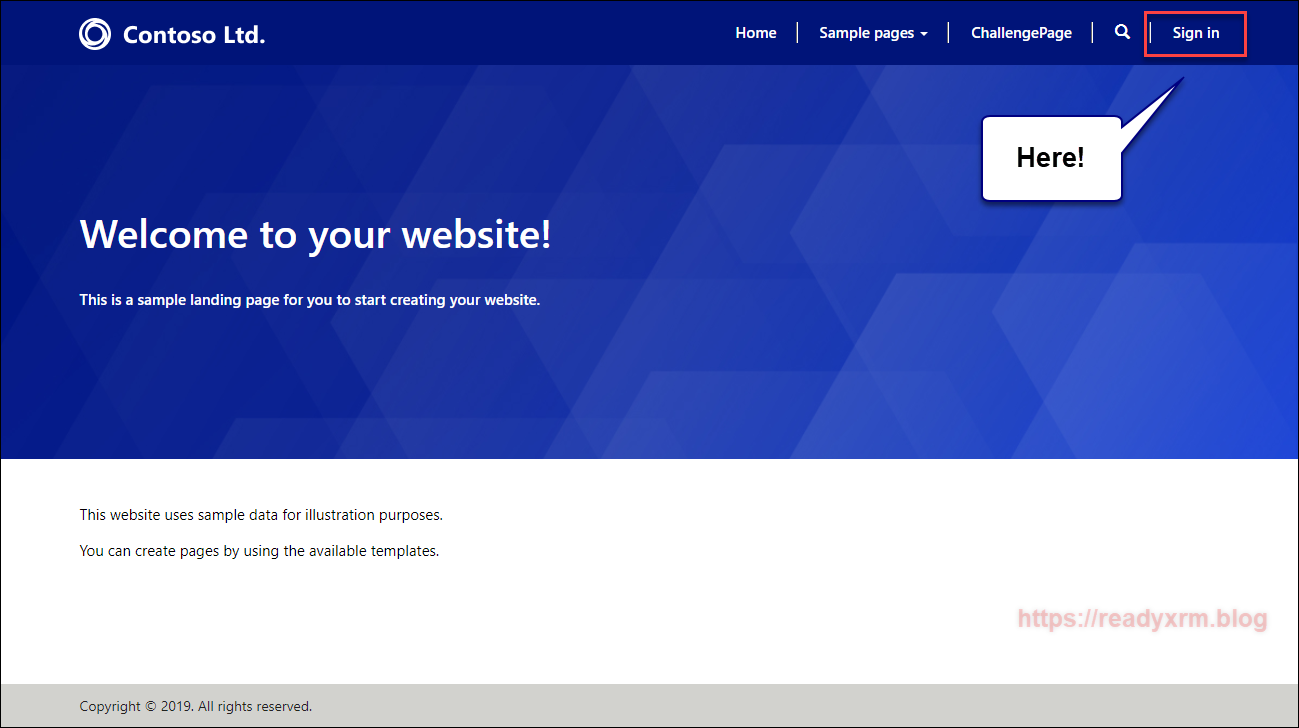
PowerApps Portal Authentication
If everything was setup properly, you should be able to login to the PowerApps Portal using Azure AD B2C.
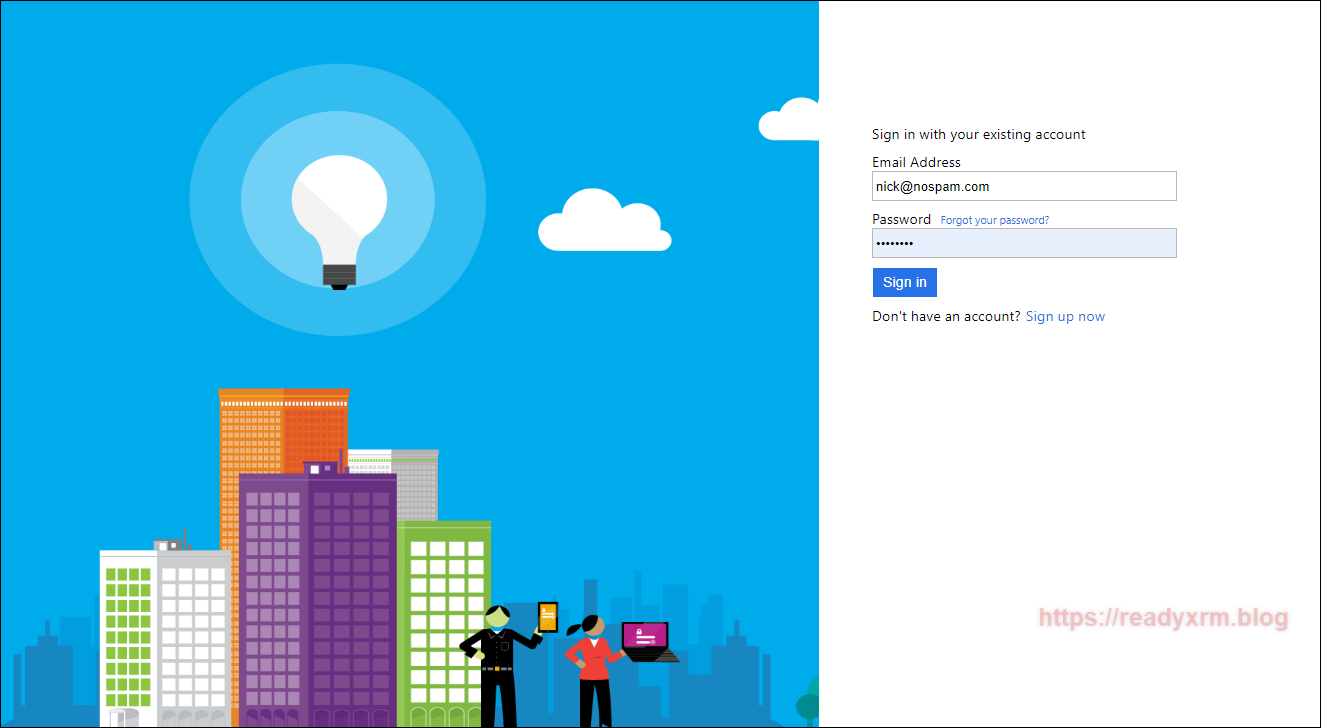
The Azure AD B2C will provide your users the ability to sign up securely as well as be able to reset their password.
You can rebrand the default Azure AD B2C page, instructions are on Microsoft Docs site. I may need to make notes someday so I could potentially create a blog post.
Summary
Setting up Azure AD B2C is not hard, but it can be a bit tedious. Hopefully these step by step instructions will be clear and allow you to configure this properly (again, speaking to my future self).
Cover Photo by CMDR Shane on Unsplash
Nick Doelman is a Microsoft Business Applications MVP and has many times stumbled on blog posts and community posts from his past self that has helped his current self. Nick also tends to post stuff on twitter so he can also find that in his timeline later at @readyxrm


Thanks for putting this together Nick. I was able to successfully setup a portal using Azure B2B for user authentication. I did however run into an issue that I can’t seem to resolve: When a new user registers, they are (as expected) asked to first verify their email address with a code (that seems to work). Once that’s done, they can continue the registration and provide a password with first/last name info. They then click “Create” and are presented with the error prompt, “The Email field is required” and a text field to enter in an email address. It’s odd because it’s already been provided/verified, but also, because it seems like you can type in *any* email address at this point and it will accept it and you’re signed in, possibly with a different email address than the one you were originally registered with.
Do you know what I may have missed in setup, or if this is a bug?
LikeLike
I believe I sorted out this issue, but I’m not sure I understand why. In your original screen cap where you’re setting up the claims for the signin user flow, you didn’t show “email” checked as a return claim. Once I checked that to make sure it was returned, things started working.
LikeLike
Have you followed same steps to configure Azure B2B AD authentication as well? Please confirm. Otherwise, need help to understand the procedure..
thanks,
LikeLike
Sorry for the long delay in responding. I have not configured Azure B2B, but if my understanding is correct, once the external users are added as guest users, you should be able to provide access using the regular Azure AD method, details here: https://docs.microsoft.com/en-us/powerapps/maker/portals/configure/configure-openid-settings I know its not the direct answer but hopefully points you in the right direction.
LikeLike
Thanks so much for the step by step. This really made things much much easier to deploy! Outstanding work.
LikeLike
Worked perfectly 🙂
LikeLike
thanks for the detailed information for configuring B2C authentication. Need similar guidance for configuring B2B authentication for Partner Portal.
Request for a quick revert.
thanks,
Pallavi
LikeLike
I believe I responded to your question in another thread, but here it is again: I have not configured Azure B2B, but if my understanding is correct, once the external users are added as guest users, you should be able to provide access using the regular Azure AD method, details here: https://docs.microsoft.com/en-us/powerapps/maker/portals/configure/configure-openid-settings I know its not the direct answer but hopefully points you in the right direction.
LikeLike
Thank you for the excellent tutorial.
Question: can I use the token provided by AAD B2C to access the CDS WebAPI?
What are some resources to learn how to do this?
Thanks.
LikeLike
Take a read of this post from Colin Vermander, hope this helps: https://colinvermander.com/portal-companion-app/
LikeLike
Thanks again Nick.
That’s a very good project, but I was thinking about sending the request from javascript (with header Authorization: ‘Bearer ‘ + ‘token_from_AADB2C’) without the need for a backend service. Is this possble at all? Or is the back-end mandatory?
What I tried is that I got the token from `/_services/auth/token?client_id=${clientId}` but when I’m sending it to CDS the response is 401-Unauthorized. I feel like I’m missing some basic setting regarding the relation between the AADB2C tenant and CDS…
LikeLike
Hi Stan, Hard to summarize in a comment, but the B2C gives the external user access to the “portal app” which is the web application that sits at x.powerappsportals.com that renders the portal metadata and CDS data. That app will have its own app user that authenticates directly to CDS. The B2C user won’t have direct access the backend. Now, if it were an Azure AD user with guest access (to CDS)… that might be an avenue (haven’t tried it or completely thought through it). Hope that helps.
LikeLike
Hi Nick.
After reading more on the subject I was able to solve/clarify some aspects about the B2C – Portal – CDS flow.
So, for everyone who’s gonna be reading this:
– preferred method for authentication for Portals (at the time of writing) is Oauth2.
– setting up the portal to work with AAD B2C will give the developer access to the token at `/_services/auth/token?client_id=${clientId}`
– calling CDS WebApi from javascript (any App, not just the portal) is NOT possible!!
– the solution, for me, is to create a Function App that will act as a proxy between the portal and the CDS WebApi (only for POST methods)
– this Function App will be registered in AAD (and in AAD B2C), will be given access to CDS with Server-to-Server authentication – https://docs.microsoft.com/en-us/powerapps/developer/common-data-service/use-single-tenant-server-server-authentication , and will also be exposing its API to the Portal.
– the portal will send the token along the request to the Function App which will be forwarding the request to CDS
– caveat: token validation, claims mapping and other auth related verifications/operations will have to be done in the Function App (by the developer).
So, there it is 🙂
Thanks again Nick.
LikeLike
Thank you for the step by step!
We are going to implement the Partner (news, some links to the documents) and Customer support portal (cases) for the client on PowerApp Portal platform.
Regarding integration with other O365 apps: We are planning to integrate documents for Partners via Sharepoint at some point later in the implementation phases.
But I have some additional questions:
– How is the existing contact in the CRM paired/matched with Azure AD B2C? Is the email key for that? What would happen in case if there is no match or multiple contacts in the system?
– Are web roles automatically assigned?
– Is it possible to modify the registration page in a way that it copies values such as VAT, company name, country, etc. to the CRM contact? We would like to have different fields in case of Partner than a Customer support portal.
– Is it possible to have B2B and B2C available together? We would implement Partner and Customer portal on the same platform and split these two by multibrand portal structure. Or can we use B2C also for partners?
Thank you!
LikeLike
Hi Miha,
Thank you for reaching out. Sorry for the delay in response.
Answers (in same order as your questions)
An existing contact has a related “External Identities” record that contains the link to the 3rd party provider.
Web roles are not automatically assigned, but you can use Power Automate to do this.
Might be possible using Attributes and Claims, but I haven’t done it.
While you can mix providers (have multiple providers) I am not sure about B2B. You could use B2C for partners to keep it consistent.
I hope that helps!
Cheers
Nick
LikeLike
I attempted this but it is still showing the default login page do I need to deactivate some of the default OOB site settings
LikeLike
I would double-check all site settings; specifically Authentication/Registration/LoginButtonAuthenticationType I know when I go through these steps, I often miss one thing, which can throw everything else off.
LikeLike
Thank you for putting this together, I wish I had found this before trudging through the setup, the Microsoft docs were a bit lacking on details. One thing I haven’t been able to find an example of yet is how to implement the profile edit user flow. The Microsoft docs walk through the process of creating the profile edit user flow in Azure but then do not say anything about configuring it in the portal. I’m wondering if this is similar to how the password reset flow is configured? I was hoping to see how this works so I could determine if I want to implement it in the portal or just rely on the portal profile management features.
LikeLike
Lol, I suffered through the docs, back tracked, and experimented a bit, so I decided to document the process and that resulted in this blog post. I have not tried the profile edit flow, so unfortunately can’t comment, but if you end up getting something to work, please post back here! I am heads down on a project now, but if I learn something I will update the post. Cheers, Nick
LikeLike
Hello,
Thanks for the great article.
I have one question regarding the login capacity. Does that means we consuimg the login capacity for the Portal using Azure AD as login mechanism? The same login price is applied here? $200 for each 100 unique login?
LikeLike
Yes, if they are external users to your organization, then the same licensing applies. Just want to note that there is a difference between Azure AD B2C and regular Azure AD. If Azure AD and are internal users, then regular Power Apps per user or per app applies. If you feel Power Apps Portals per-login licensing makes your portal overly expensive, I highly recommend reaching out to your Microsoft rep as there is room to negotiate.
LikeLike
This was an amazing resource, thank you. It was working flawlessly until we created a custom domain for the portal and configured it. Now the first time you click login it says login failed, click it again and it pops out to the AAD B2C login page but when you return it shows an error that login failed yet the user is logged in. Wondering what the configuration options need to be changed to to account for this.
THANKS!
LikeLike
Thanks for the amazing resource! Wondering how this would be configured when using a custom domain. It was working perfectly prior to setting up the custom domain. Now the first time we click login it says failed, click it again and it authenticates but returns the user and says login failed yet they are logged in. I’m assuming this is a configuration but not sure what should be added/changed. Thanks again!
LikeLike
I figured it out. You have to go back into Azure AD, click on App Registrations>Edit the app registration you set up>Authentication>Add the following URI: https://subdomain.domain.com/signin-B2C then save. After I did this it works flawlessly.
LikeLike
Great news and thank you for posting the solution! This might help someone else (maybe even me) later when referring to this post.
LikeLike
Hello,
By following your steps, I was able to configure Azure Ad B2C with the Portal.
By adding these two settings:
Authentication/[Protocol]/[Provider]/AllowContactMappingWithEmail
Authentication/UserManager/UserValidator/RequireUniqueEmail
I was able to map the signed in with the existing contact in Portal management. Using the email as unique key.
However, I would like to prevent contact creation. That happens every time a unique email address signed in from Azure Ad B2C.
I don’t want to disable “sign up” on Azure Ad B2C.
I want the users to be able to register their email on Azure and sign in as normal. But when they get redirected to Portal I show an error message that they don’t have an active membership.
LikeLike
Great tutorial. I have an issue and I am sure it is a simple fix. When the users attempt to register. Under the “external links” options they have Azure AD and a button named “B2C” How do I change that button name?
LikeLike
Hi Josh, there is a site setting called “Authentication/OpenIdConnect/[provider]/Caption” (change [provider] to the provider name) and that will change the button name. Source: https://docs.microsoft.com/en-us/powerapps/maker/portals/configure/configure-openid-settings
LikeLike
Hi Nick
Because you think it marks this unauthorized 401 error when clicking on the sing-in link of my power portal,
this is the URL generada :
“../customportal.powerappsportals.com/Account/Login/ExternalLogin?returnUrl=%2F&provider=https%3A%2F%2Ftenantb2c.b2clogin.com%2Ftfp%2F823fa09e-c8c9-40f4-9da9-87874e91b2b3%2Fb2c_1_signupsigninportal%2Fv2.0%2F”
the issuer URL is obtained according to the steps you specify from the “Run user flow” metadata.
I’ve been trying for days with this problem, I wish you could guide me, thank you
LikeLike
A 401 error is usually permissions related, so this could mean a number of things. My post is also over a year old so I realize some of the screen shots, etc may have changed. There also is a whole new (and more user friendly) process to configure authentication, I haven’t blogged on this yet, but the Microsoft Docs are pretty good: https://docs.microsoft.com/powerapps/maker/portals/configure/use-simplified-authentication-configuration I would suggest you go through the “new” method and if you are still having issues, open a support ticket as Microsoft support has visibility to the backend and can likely find your issue quicker than I could! I hope this helps. Cheers, Nick
LikeLike
Hi Nick,
I’ve provisioned a new portal, and I’ve done the Azure AD B2C configuration again on this new portal. Using this “wizard” that already provides Power Apps and has worked for me!.
I don’t know if with the previous configuration of my first portal something was corrupt and that’s why I marked that error.
I thank you,
LikeLike
Hi Nick,
Thanks for the nice explanation! I created a PowerApps Portal of my own and configured is to only use Azure B2C authentication. This works great!
However I also configured the Portal so that you can only register a new account with an invitation code.
Now if I send that invitation code and click the link I get redirected to the Azure B2C sign-in page.
On that page I then have to select create new account where I can then setup a new Azure B2C registration.
Is its possible to re-direct new users, who sign-up for the first time with their invitation code to, the sign-up page directly instead?
The current setup might be confusing since the screen shown after you redeem the portal code is more like the “normal” login screen.
Thanks in advance and again great blogs!
Kind regards,
Jelte
LikeLike
Sorry for the much delayed reply. I am not aware of a way to redirect and I totally agree it can be very confusing. I am hoping to do some more investigation into this area in the coming weeks and if I learn anything, I will definitely share.
LikeLike
Hi Nick,
Thanks for your reply!
In the meanwhile I also tried to find a solution and was inspired by a solution from Arpit.
We create a Power Automate which can be triggered from a contact form in the Portal management app. This Power Automate then creates a user in the Azure B2C tenant (with the Microsoft Graph API) and in Dynamics it will configure the contact record, sets the web authentication setup and creates an external identity.
Now if i provide the user with the password or send them the userflow password reset link they can fill out there email adress and can (re)set their password.
This does only work with “local” login since i use the email adres on the contact record so create the azure user and send my emails.
Hope this might give you some inspiration
Kind regards,
Jelte
LikeLike
Hello Nick,
I was wondering if you have had any success setting up Multi-Tenant Azure authentication for the portal. From my understanding using this approach there is no need to add them as a guest to your azure directory, but when I try logging in I get hit with an error asking me to add them on.
Thanks for your blogs, always helpful.
Evin
LikeLike
Sorry for the delayed reply. I have *not* tried this yet, but its on my (long) list of things to try out, so at this point I really can’t help too much.
LikeLike