
In case you haven’t heard, Dynamics 365 Dialogs have been on the deprecated list for a couple of years now.
Dialog Deprecation Announcement
Now, remember that “Deprecated” doesn’t mean “Removed”. It means that the particular feature will no longer get any updates or enhancements, but it will generally still be usable.
You can still build Dialogs today, and if you continue to use the Classic Web Interface, these Dialogs will continue to work.
However, as you move over the to new Unified Interface, you will find that you are unable to use your Dialogs.
Microsoft Docs even has a page stating that instead of Dialogs, to instead use Canvas based PowerApps (or Business Process Flows).
I ran into this issue recently, but the good news is that I was able to build an embedded Canvas PowerApp that not only replaced my Dialog functionality, but I feel made it better.
Business Case: Project Task Tracking
For the particular client that I am working delivers specific programs and projects. The funding agreements for these projects are based on a series of objectives, and the organization must report on the tasks and outcomes they did against the particular objectives. The monthly or quarterly report to the funding agencies also must follow a particular format.

This was an incredibly time-consuming process to fill in the report template and also go through email and notes to track all the activities. Staff would also track the work in ad-hoc Excel spreadsheets and cut and paste into the report at month end.
The client was already using Dynamics CRM for stakeholder management so I built an xRM application to track projects and related objectives.
At the end of the month, the users would run an SSRS report that was built in the required format that broke down the objectives and related tasks. The report could be then be e-mailed to the appropriate project funders.
The users could use the Dynamics CRM for Outlook client to track emails and tasks to the specific project objectives.
There were still other activity logging that needed to be done. These were tracked as tasks against the project objectives directly in Dynamics CRM.
This became a bit tedious because this involved some navigation and a series of clicks to drill down from the project form, then to the objective form, and then the user would then add the task record.
In a lot of cases, there is work being done that could potentially span multiple projects and objectives, so involved some awkward cutting and pasting.
To speed up the process, I built a Dialog in Dynamics 365 to make it easier for staff to capture and track project activity from within the project also have the ability to copy the task to multiple projects.
Part 1: The Dialog
Part 1 talks about “the old way” and provides context, if you want to see the new stuff, skip ahead to Part 2.
The structure in Dynamics 365 is pretty simple, there is a project entity with related objective child entities.

To create tasks, the user would need to drill down to the objective and then locate the Activities view to add tasks.

To make the process easier, I created a Dialog and had it launched from a button that I added with the Ribbon Workbench. The Dialog runs from the context of the project, it shows the list of objectives in a picklist and allows the user to enter in the task details.

After the task is entered, the user is provided with the option to copy the task to another project.

The user can now choose the project from a lookup.

Once the project is selected, they can again pick the objective and either keep or change the task information entered.

The Dialog is recursive so the user can copy the task to as many project/objectives as required.

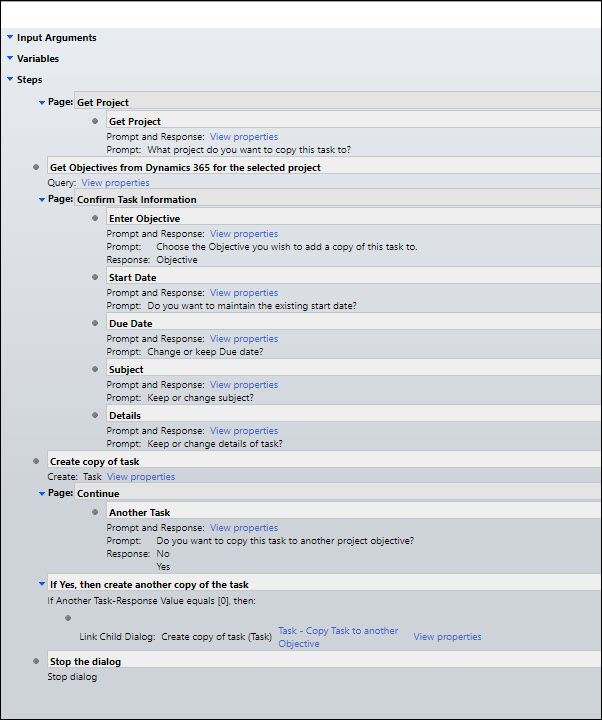
The Dialogs are actually 2 distinct Dialogs, the first is run from the context of the project. The Dialog will query for objectives based on that project. The user can choose the objective, enter details and then choose to copy the task, which will launch the “Copy Task Dialog”.

The child Dialog can continue to get called as many times as required.
The Unified Interface
I have begun to migrate this xRM App to a Model Driven PowerApp. The new Unified Interface is faster, easier to navigate and can run on different form factors. It is the future of Dynamics 365/CDS Applications.
However, it does not support the running of Dialogs! When I test the new app and attempt to run the “Task Entry Dialog”; I get an error.

I did some research and there isn’t a way to run a classic Dialog in the new Unified Interface. It is also highly unlikely that Microsoft will add this ability as the Dialogs are technically deprecated.
To re-add this functionality, my options were limited. Task Flows wouldn’t cut it as I couldn’t query data. Using Microsoft Flow also wouldn’t work on its own because you can only enter values at the start, and they also do not support lookup values.
This left me the option of creating something custom or looking to an ISV such as TKDialogs. While TKDialogs is an excellent product, in this case, it was a bit overkill for what I needed.
Part 2: The Embedded App
Microsoft recently announced the ability to embed a canvas based PowerApp on a Modal Form. This is currently in public preview. This appeared to be a great low-code, no-code solution, but could it replicate the functionality of my Dialog? The answer is it could!
The following is the end result and we will get to the actual building of the embedded PowerApp in a bit.
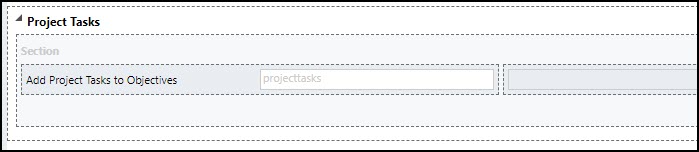
I added a new tab on the project form called “Project Tasks”, this is where I embedded my app. Currently, you can only add one embedded App per Model Driven Form.
The current entity context is passed to the Canvas App. From this, I was able to add a dropdown showing a list of the particular project’s objectives. (More on this later). Then I had fields where the user can enter in details about the task.

When the user clicks the “Add Task” button, it actually fires a Microsoft Flow that creates a new task record linked to the Objective. It then shows a success screen and can prompt the user if they want to copy the task to another project or create a new task. This now works better than the original Dialog process.

If the user decided to copy the task, they would navigate to a screen where they would choose a project, which would then provide them options for the related objective. The task information would still be present in the form so the user could edit it before copying the task.

The user could continue to copy the task to as many projects/objectives as they require. This essentially has fully replicated the original Dialog.
Part 3 – Building the Embedded Canvas App
The process of building the embedded canvas app had a few challenges but going forward, really would not take any longer than building a classic Dialog. The following is a basic overview, as each Dialog will have its own process and functions, but I hope you get the basic idea.
When I started the project, I actually built a complete standalone App for adding project tasks. This App has its benefits as well (mobile-enabled, easy to use) but I also wanted the users to be able to work within the context of the project record in the Model Driven App.
The first thing I discovered is that I was not able to use my previously built standalone Canvas App for my embedded App. Embedded Apps can only be created from within the Model Driven Form editor.
The first thing I had to do was add a simple text field to my form. I added it to a new Tab called “Project Tasks”. Note that you need to use the classic form editor experience to create embedded apps.
To create the Canvas App, you will need to look at the properties and add a Canvas app control. Note that this can only be used on the Web client.

From the field properties you will create a new Canvas App. This looks the same as any other Canvas App you would create from the Maker experience except you will have a ModelDrivenIntegration component. By default, it will link to a Gallery. This is how the context of the entity is passed to the Canvas App. Note that this component can only READ the data from the Form and we cannot update any Model Form Fields, etc. but we can write data directly to CDS using various methods.

My Dialog queried the Dynamics 365 data for a list of objectives linked to the project. For our Canvas App, we will link to the Common Data Source data, from the same environment as our Model App.

Since we only want to see objectives in context to the project, we will point a drop-down control to the CDS source with a filter based on the project entity passed to the app.
NOTE: For some reason, the Filter formula will change when the component is renamed, or other minor adjustments, and will no longer work. I highly suggest making a copy of this formula exactly and save it. When the dropdown stops working, you can paste the original working formula back.

We add date and text fields for information the user will key in. For the “Add Task” button, we actually will save the values to variables (in case we want to copy) and then launch a Microsoft Flow to create the task, and then navigate to the Success screen.

You will need to create the Flow before you can access it in the PowerApp. Choose the PowerApps trigger for it to show up in your PowerApp. The only reason why I choose Flow as opposed to writing directly to CDS from the PowerApp is that at this point you cannot set the “regarding” when you write to a task in the Canvas based PowerApp, but you can using Flow.

I created a screen for after the “Add Task” button has been clicked with options to copy or create a new task.

I created another screen to copy the task to a different project. I have a Common Data Service connection to projects. I filter the objectives dropdown to whichever project is chosen. Again, this filter changed by itself a few times so be sure to copy the formula as a backup. The “Add Task” button trigged the same Microsoft Flow as the main screen.

There is some additional functions (cancel, clear screen) and some labels and other aesthetics.
Summary
The embedded app in this case not only was a replacement for my Dialog, but also looks better, is more intuitive and has a lot more flexibility. This feature is currently in preview and is evolving, so deploy to production with care.
The fact that Dialogs are being deprecated should no longer be a concern for Dynamics 365/PowerApp makers.
Cover Photo by Cindy Chen on Unsplash
Project Photo by Jo Szczepanska on Unsplash
Nick Doelman is a Microsoft Business Applications MVP and will be speaking at User Group Summit (CRMUG/PowerAppsUG/FlowUG) in Amsterdam from March 27-29. Nick is will also be teaching his Portals Jump Start class at the UG Academy on March 25-26th.


This is very helpful blog article to learn about Microsoft dynamics 365 dialog and all the 3 parts with step by step instructions to replace it with an Embedded Canvas PowerApp. Thanks a lot!
Best Regards
RajeshN, Nous Infosystems
LikeLiked by 1 person
Thanks! I am glad you enjoyed it!
LikeLike
var url = Xrm.Page.context.getClientUrl() +
“/cs/dialog/rundialog.aspx?DialogId={xxx}” +
“&EntityName=xxx” +
“&ObjectId=” + Xrm.Page.data.entity.getId();
window.open(url);
… is still working in Unified Interface.
LikeLike
Thanks! I will check this out. This still will be a stop-gap as eventually Dialogs will go away.
LikeLike
This is really great, can you give some information about what versions of D365 this is available on? It’s obviously not on-premise 8.x, but I don’t see the option to add a canvas app on my online instance either. Do I need to opt-into something? For the people stuck on-prem, is this available in the on-prem 9.0?
LikeLike
Hi Michael, I did this on a Canadian tenant, which currently usually gets the latest preview features and updates first. I believe it should be rolled out to all datacenters across the world by now. Pretty sure that I didn’t need to opt-in to anything, the feature was just there. It won’t be available on-prem, unfortunately.
LikeLike
Nice example of a real life scenario where you’d want to embed a canvas app, but a bit pitty that you don’t have screenshots of your canvas app embedded in your model driven CE app!
LikeLike
Not sure what you are looking for? Part 2 does clearly shows the embedded canvas app on the unified interface form. Is there something specific you would like to see? Cheers, Nick
LikeLike
Hey Nick, you’re right, I skipped through the article and missed it, expecting that the result would be the final step. But you had a different order (equally good). my bad! 🙂
LikeLike
Thanks for the wonderful article Nick.
LikeLike
It’s really good that you discussed how embedded apps that work best to replace Dialog boxes not only look better but are also more flexible for easier usability and production efficiency. This is just what my dad would need when he gets his system up and working on the web and integrated into a Microsoft system. He’d want a professional Dynamics 365 consultant to be able to seamlessly interface his proprietary model into this online productivity suite.
LikeLike
Can I download the example?
LikeLike
Hi Marc, the screen shots were taking from an actual client project so I can’t really supply a solution to download at this time. I am working on an updated version for some upcoming community presentations so I might have something then. Overall, if you look at the steps as well as a few other blogs/videos that have been posted, you should be able to quickly build out something very similar.
LikeLike
Thanks, Nick, this is a nice implementation. Would a similar approach work with a much longer and more complicated dialog (i.e., one with lots of conditional steps)? Also, we have multiple dialogs on each entity, is there a way to create and access multiple Canvas Apps per entity? Thanks!
LikeLike
Unfortunately you can only have one enabled embedded canvas app per form. If you have multiple dialogs, then you potentially could have one canvas app with the main page as the “launcher” and replicate each dialog as seperate pages of the canvas app. Just an idea. https://docs.microsoft.com/en-us/powerapps/maker/model-driven-apps/embedded-canvas-app-guidelines
LikeLike
Thanks, we’re really going to have to put our thinking caps on, because we have dozens of dialogs, some of them quite involved, which we use multiple times daily. I guess we must be either amongst a tiny minority of users, or we dialog users aren’t vocal enough to elicit a response from Microsoft, because so far, I haven’t seen that any of the new functionality MS has rolled out can duplicate, either alone or in combination, the power of dialogs for our usecase. We may simply have to pony up for TKDialogs…
LikeLike
Thanks Nick, for this detailed implmentation. I have a question on this one, were you able to retrieve any lookup information from the entity embedded? Like parentcustomerid from Contact entity. I was able to read text fields from the entity(my case was Contact) using the modeldriveintegrationform option.
LikeLike
I did pull the project lookup id in order to create the objective drop down. I am travelling so it may take a day or two to find the code.
LikeLike
This link might also help:
https://powerusers.microsoft.com/t5/General-Discussion/Embedded-canvas-app-how-to-get-the-selected-lookup-field-value/td-p/332949
LikeLike
Hey Nick,
Thanks for the information, great article!
I’m really new to this so I’m having some trouble with applying this. I don’t think I clearly understand how to link the button to the Flow. Would appreciate a little more clarification on that part.
So far I’ve been unable to find a way to trigger a Flow through the embedded canvas app, or the Form itself for that matter.
Appreciate your help!
LikeLike
Here are the steps to trigger a Flow from a canvas app; https://docs.microsoft.com/en-us/powerapps/maker/canvas-apps/using-logic-flows#add-a-flow-to-an-app
To run a Flow from a form, in the new UI there is a Flow button on the menu bar. In the class web interface, I believe it needs to be turned on (sorry, I forget where)
LikeLike
Great article, thanks! I’ve used this to replace a few dialogs, however now have hit the issue of deploying! There doesn’t seem to be any way to do it at all!
If you include the canvas app in a solution, you can’t include any attached flows. You also can’t see an embedded canvas app from anywhere else.
Don’t suppose you’ve found any way to deploy this? Manually recreating is not really an option with multiple environments
LikeLike
Hi Elliott, I actually had to go in and manually update the app id when I moved from DEV to PROD, and also update the Flow connections. There is likely a better/supported way to do this now, or will be soon. Hope this helps.
LikeLike
At the time, I may have had to export/import the Canvas App separately, but I think you should be able to do this via a solution now.
LikeLike
Hi Nick,
Great article, thanks for sharing!
I’m trying this out on the case entity, with closing cases. I tried to a step further to create a button in the ribbon of the case record to start the canvas app. Unfortunately it doesn’t inherent the current entity context in that way.
Could it be possible to make it context aware, for example by adjusting the URL of the canvas app?
I tried combinations of the entity id and record id in the canvas app URL, but I don’t seem to get it to work.
LikeLike
Hi! I haven’t tried that (button) but I think that could be a great idea. If you figure it out, please post back here. I will try a few things as well. Cheers, Nick
LikeLike
Hi. Thanks for this article. Would you know if an embedded canvas app is allowed under Team Member licensing?
LikeLike