
One of the features missing from Power Apps portals (Dynamics 365 Online Portals) since it became an exclusively cloud service is the ability to write a function to create, update, read or delete (CRUD) data in the Common Data Service.
You can create and update data on a portal using Entity forms and Web forms, as well as triggering workflows. However, if you wanted to build something like a custom control such as an editable grid, you had to build some kind of companion app to call as an API from the portal page to update the data without having to navigate away from the current web page.
Introducing the Portals Web API!
Microsoft announced in October 2019 that the portal API was coming and the recent release plans state that it will be generally available in February 2021. However, over the last week or so, the preview has been rolling out to tenants allowing Power App portal developers to try out the new WebAPI.

NOTE: This is in prerelease, so it will not be supported on production system. Keep out of reach from small children and pets.
The official Microsoft Documentation can be found here:
https://docs.microsoft.com/en-us/powerapps/maker/portals/web-api-overview
The following is an overview of the steps that I took to build a *very* simple web page where I could update records in the Common Data Service.
Version Compatibility
I have a few instances and trials of various Power Platform Environments, so it took me a while to find one where I had an updated portal version. Your portal version must be 9.2.6.41 or later for this feature to work.

Use Case: Time Sheet Approval
The next step was to find a simple use case where I could try out this functionality. For my work I have built a solution using both a model-driven and canvas app that I use to manage projects and activities. There is an entity (table) to track each session of time for a particular project, such as date, amount of time and if its billable work or not.

I thought a good feature would be for a customer to be able to log into a portal and “approve” various project activities.
I could build a portal application fairly quickly with standard configuration using an Entity List to show the non-invoiced Time activities for a specific project, however, in order to “approve” the Time activity, a user would need to open the record in an Entity Form and update, submit and navigate back to the page again. I want to provide a very fast “one click” experience.
Creating a Web Template
I built a Web Template using Liquid that will display a list of billable, non-invoiced time entries for a customer to approve.
You can refer to my post from last year on how to use Liquid to build a table of entity data.
I tend to use the XrmToolBox portal code editor to create and update Web Templates.

I added HTML checkbox controls to the table code to show if a particular Time Entry was already approved or not. If a user updates the checkbox, it will trigger a JavaScript function (more on that later).
{% if time_entry.rbms_approved == true %}
   <input type="checkbox" id="approved" checked onchange="unapprove('{{ time_entry.rbms_timeentryid }}')">
{% else %}
   <input type="checkbox" id="approved" onchange="approve('{{ time_entry.rbms_timeentryid }}')">
{% endif %}
Once the Web Template was created, I needed to create a corresponding Page Template, and then added a page using that template in the Portal Management Studio.

In order to view data via Liquid on a web page, you need to configure Entity Permissions. Since we will eventually be writing back data, I made sure that the write permissions we set also. You can setup Entity permissions using the Portal Management App.

Once the entity permissions are setup, you can link them to the appropriate Web Role.
Here is how the Web Template renders on the portal;

The Good Stuff, Writing the Code
In my example, I would need to update the rbms_approved boolean field on the rbms_timeentry (custom) entity. Our next step is to create the Site Settings to allow the Portal Web API to access this entity and field.
As per the Microsoft documentation you will need to add three site setting values using the Portal Management app, one to enable the entity, one to specify the fields (I choose all fields, by setting the value to *) and another for error reporting. You need to specify the schema name in the site setting name value.

Wrapper AJAX
In order to communicate with the CDS endpoint, the code will need a token and validate that the call is coming from the portal. You really do not need to stress too much over this because Microsoft has provided a Wrapper AJAX function that you can cut and paste into your code. You can get the code by clicking this link.
I created a Web Template record exclusively to contain this code so I can re-use it for multiple templates and update it only once as it evolves.

In the Web Template for my specific use case, I simply added a reference to the Web API template by adding the following line to my web template:
{% include 'WrapperAJAX' %}
So added into my Web Template code:

Finally we can get down to writing some code to update the data in the Common Data Service.
You can add JavaScript functions to Web Templates between <script></script> tags. I added two functions that were fired from the onchange event when a user “checked” or “unchecked” an HTML checkbox.
I passed the GUID from the record that was to be updated as we need that for the Portal WebAPI
<input type="checkbox" id="approved" onchange="approve('{{ time_entry.rbms_timeentryid }}')">If the Time Entry was already approved, I would show a corresponding checkbox field as “checked” and a function call to “unapprove” the Time Entry.
<input type="checkbox" id="approved" checked onchange="unapprove('{{ time_entry.rbms_timeentryid }}')">
The onchange events on the checkbox would trigger the appropriate function:
    function approve(guid)
    {
        //function to update the Time Entry as approved
        webapi.safeAjax({
        type: "PATCH",
        url: "/_api/rbms_timeentries(" + guid + ")",
        contentType: "application/json",
        data: JSON.stringify({
        "rbms_approved": "True"
        }),
        success: function (res) {
        console.log(res);
        }
        });

    }
The GUID of the Time Entry record would be passed to the function.
We are submitting the data using the “PATCH” command to the API url, passing the GUID so the Portal Web API knows what record to update.
NOTE: You will need to specify the EntitySetName NOT the schema name. (rbms_timeentries, not rbms_timeentry) It took me a few attempts to realize this. Of course, anyone using the Common Data Service WebAPI on a regular basis would already know this.
Because I am updating a Boolean field I set the JSON string pairs to be the field name and the value “TRUE”
Once the code was saved, time to test it out!
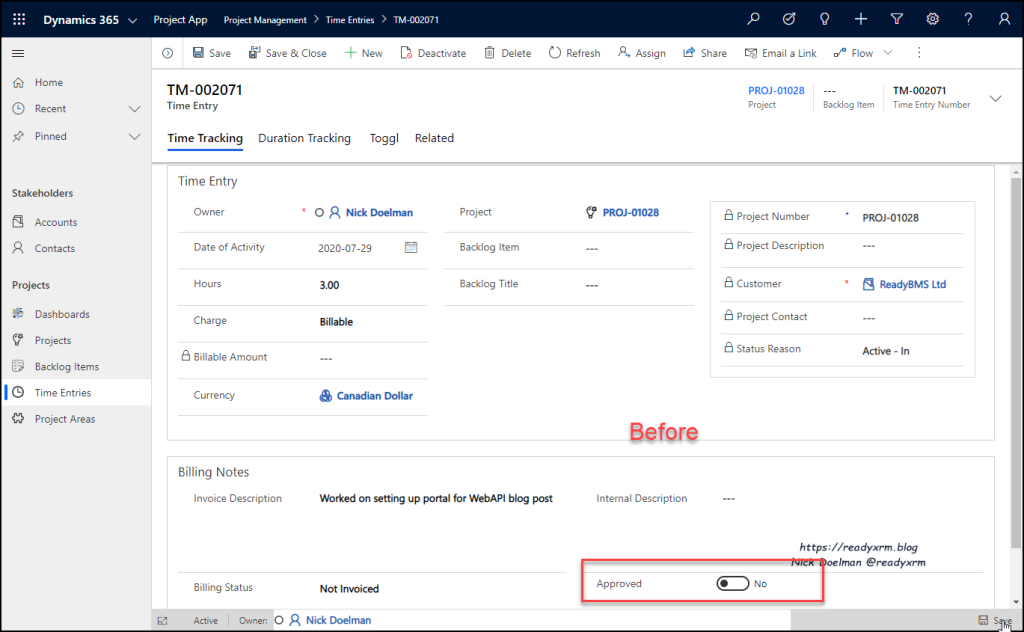
In my model-driven app I see my Time Entry record is NOT approved.
I go on the portal with an appropriate user with a web role that can access the Time Entries and “approve” a record from the list.

If I want to see the results I can hit F12 on the browser (Developer Tools) and see if the code was successful or not. (Good for troubleshooting)
I navigated back to my model-driven app and I see the record has been updated from the portal. No Entity Form Submit, No Companion App, just using the Portal Web API!

That was a very simple use case and example, I hope it inspires you with some new ways to solve some challenges when creating portal applications.
That was Update, What about Create, Read and Delete?
The Microsoft docs provide examples for also creating new records, associating records and deleting records. I encourage you to check that out and begin to experiment (I know I will be). Absent is the ability to read records from the Common Data Service.
This is because you can retrieve data using Liquid by an entity reference or FetchXML. Since Liquid is rendered on the server, you will need to retrieve any data before you start doing some major operations. Another option is that you could retrieve data using the web templates as an API.
Summary
The ability to write custom code to update data in Common Data Service from a Power Apps portal has been a long time coming, but this initial look seems to be on the right track. This feature is still in preview so it is likely to evolve over the next few months. The exciting prospect is that this will provide the foundation for Power Apps Component Framework (PCF) controls on Power Apps portals, which will open up a whole new world of possibilities.
Want to learn more about Power Apps Portals? Sign up today for my Building Power Apps portals online class at https://365.training Just need to get to fill in some gaps? The content on MS Learn has been recently updated for Power Apps portals.
Cover Photo by israel palacio on Unsplash
Celebration Photo by Lavi Perchik on Unsplash
Nick Doelman is a Microsoft Business Applications MVP who as been recently awarded for the 4th time. Follow Nick on twitter @ReadyXRM for updates on the Power Platform and Power Apps portals.


Hi Nick, thanks for this excellent article !!
Do you know how we can use the webapi to upload a file into a CDS attribute being of the new “File” type ?
Regards.
LikeLike
I have no idea and I haven’t tried it yet, something to add to the list of things to try! I would first to replicate using how it would be done in the Dynamics 365 web API and modify from there; https://docs.microsoft.com/en-us/dynamics365/customer-engagement/web-api/fileattributemetadata?view=dynamics-ce-odata-9 If you get ahead of me and try it, please post a comment back here.
LikeLike
Thanks Nick, this and your More Power to Portals session have got me up and running with the API. This is a seriously exciting and promising addition to portal capabilities and UX possibilities. I’ve had success with every field type I’ve attempted but getting nowhere with setting lookup fields on either on create or update. Have you had a go with these? I read that I need to use the @odata.bind notation but always a 403 Forbidden error even with both entities enable for the API, all fields on each entity enabled for the API and full entity permissions on the two entities I’m trying to associate 😦
LikeLike
I got my issue sorted and thought it’d be useful to share the solution / lessons learnt setting lookup fields with the Portal Web API (correct as of 18/10/20 anyway)… I hit some 403 Forbidden errors setting lookup fields as part of a Create action (I hadn’t received when setting lookup fields on existing records with an Update action).
Here’s the scenario: I have an entity called Like (musdyn_like). A like is related to both a Track (musdyn_track) and a Contact (contact) via lookup fields. My goal was to create a new Like record related to an existing contact and an existing track. Digging into the errors within Edge Developer Tools, the inner error stated that I was lacking Create permissions for the Contact and the Track entities. Seems strange as I wasn’t creating records for those entities, only creating relationships between my new Like record and existing records on those other entities.
I added the Create entity permissions for Track and Contact entities and then it worked perfectly. I double checked with advanced find and no records were created or modified on the Track or Contact entities, only on the Like entity (success!). I expect this apparent permissions issue will be resolved in a later version of the API.
Another lesson learnt is that the API (as much as I ABSOLUTELY LOVE IT) seems inconsistent in the casing required when setting lookup fields. For my custom entities, I capitalised as per the Schema Name (the norm being capitalising every word other than your publisher prefix) e.g. musdyn_Like, musdyn_Track, etc. However when setting the primary contact field on the account entity, the API failed to find PrimaryContactId but worked fine with primarycontactid
Finally – to set a lookup field, you need to append @odata.bind to the field name e.g. to set the Contact lookup, I used “musdyn_Contact@odata.bind”:”contacts({{ user.id }})” and to set the Primary Contact field on the account entity, I used “primarycontactid@odata.bind”:”contacts({{ user.id }})”
Note – I used the user object here but could equally have been a variable or a hardcoded value
I hope that helps 🙂
LikeLike
Thanks for sharing!
LikeLike
Hello Nick! Thank you for your great article. One question: I have realized that the webapi calls are NOT working if you exclude Header and footer from the Page Template. Do you think / know if there is a workaround. In my situation I don’t want to use Header and Footer, but I need to use webapi. Thank you a lot for your time. Paolo
LikeLike
Sorry for the late response but I tried it out today and confirmed the issue. Unfortunately I don’t know a of a workaround. I can ask a few folks and report back here.
LikeLike
Thank you very much Nick!
LikeLike