
Summary
Entity Lists are an easily configurable way to show list data on a Dynamics 365 Portal, but lack a couple of key features;
- Entity Lists do not have the ability to drill down to different records from the view.
- Cannot dynamically show/hide columns or highlight fields.
- Sorting requires fields to be displayed on Entity List.
Replacing an Entity List with HTML and Liquid
Entity lists provide a very fast and easy way to display specific data in a “grid” or list format on a Dynamics 365 Portal page. However, as with most Dynamics 365 projects, sometimes there are key requirements that require extensions that the out of the box features can’t accomplish.
Drill down to Different Detail records
When working directly in Dynamics 365, a user has the option to “drill down” on specific lookup field values that appear on a view in the system. When a Dynamics 365 view is used as the basis for an Entity List view on the Dynamics 365 Portal, it can only be configured to drill down to the details of that specific record only. There are times when it would be beneficial to drill down into a different record or even be able to drill down to different types of records.
Highlight or Special Formatting of Grid Fields
You can define the specific columns or fields that are shown on an entity list, but it’s difficult to apply specific formatting or even hide/show columns based on other data.
Sorting
It’s a little-known fact, but if you want to apply to sort on a specific field value on an entity list, that field column must be visible.
An alternative to an Entity List
These and other limitations to Entity Lists can be addressed by creating a custom Web Template and using standard HTML formatting and of course the Liquid markup language. While somewhat more technical to configure, this method does provide a much more flexible view and not a huge stretch of effort for someone well versed in HTML.
Scenario – Event Appearances
I have configured a Dynamics 365 Portal to show a listing of my upcoming speaker sessions and various conferences and events. (Sorry for the bit of shameless self-promotion). This was a pretty straightforward setup in Dynamics 365. I created a Model Driven PowerApp that had 2 entities (Event and Event Session).

I then very quickly configured a Portal page using the “Create Portal Content” feature in the Dynamics 365 Portals app that would show a listing of the sessions where a user could drill down and view the details. Please read my blog article on creating portal content by clicking here.

After I wired up a WebLink and added it to the Primary Navigation (WebLinkSet), I was able to navigate to my page showing a list of events and was able to drill down into the particular session.


This setup looks OK and was fast and easy to configure. However, let’s say I wanted to add a couple of features;
- Drill down to Event as well as the session
- Highlight the sessions that are Tentative
- Default sort on Display Order field without showing the Display Order field
These are items that are not easily accomplished with a standard Entity List.
The following instructions assume some basic Portal knowledge in creating Web Pages, Entity Forms, Entity Lists, Content Snippets and Site Markers. Get up to speed on these concepts on the Microsoft Docs site.
Custom Web Template
Dynamics 365 Portals allow you to create custom Web Templates using a combination of the Liquid markup language, HTML, CSS, and JavaScript. The Web Template can then be used as the foundation to display your Dynamics 365 in very customized ways.
Note: The final version of the Web Template code we are going to build can be found here.
You can create a Web Template directly in the Dynamics 365 Portals App (or via the Portals Area if you are using the Classic UI). Creating Web Templates directly in Dynamics 365 v9 does provide a small amount of intellisense but I find that isn’t the best experience.

I prefer using the Portal Code Editor on the XrmToolBox. This tool allows for a better development experience and has basic highlight and formatting of Liquid, JavaScript and HTML syntax.

To start, we will add some basic Liquid to start our Web Template. We will extend from the “Layout 1 Column” meaning we will use the layout in that template as a basis for our template and we don’t need to re-create the same code.
Every Web Template needs a “block main” to contain our custom layout information and by default, I want to show the web page copy information (if any exists).
{% extends 'Layout 1 Column' %}
{% block main %}

{%include 'Page Copy' %}
From here will slowly build out our custom Web Template.
Drill Down Detail Web Pages
From our new view, we want to be able to drill down to see details about the session and another page to see details about the event.
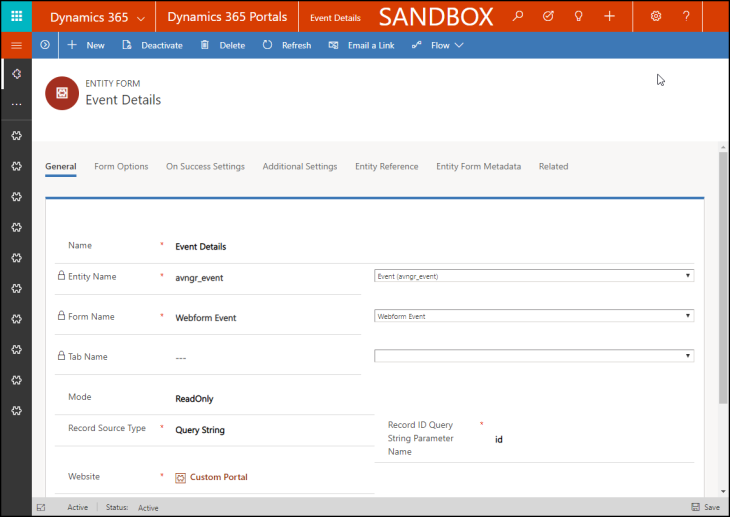
I will re-use the web page to show session information that was created using the “Create Portal Content” feature above. For the actual “Event” information, I set up a standard Web Page and Entity Form that would accept a query parameter to show the Event information from Dynamics 365. I won’t cover on how to create Web Pages or Entity Forms in deep detail here. If you are unfamiliar with these concepts, please refer to the Microsoft documentation.

Once our web pages are configured, we will create a Site Marker record for each page.
Using Site Markers means that we can adjust these pages quickly using the Portal App as opposed to hard-coding the URLs in our code.

We will create 2 site markers, one for the Event Info and another for the Event Session info.
We will add references to our Web Template Code:
{% assign SessionInfo_marker = sitemarkers["SessionInfo"] %}
{% assign event_marker = sitemarkers["EventInfo"] %}
We will refer to these Site Marker variables later.
Event Session FetchXML
We will need to query Dynamics 365 for our data. For this, we will use FetchXML to build our query. I highly recommend using the FetchXML Builder from the XrmToolBox. It is a fast and easy way to convert Dynamics 365 views to FetchXML expressions.
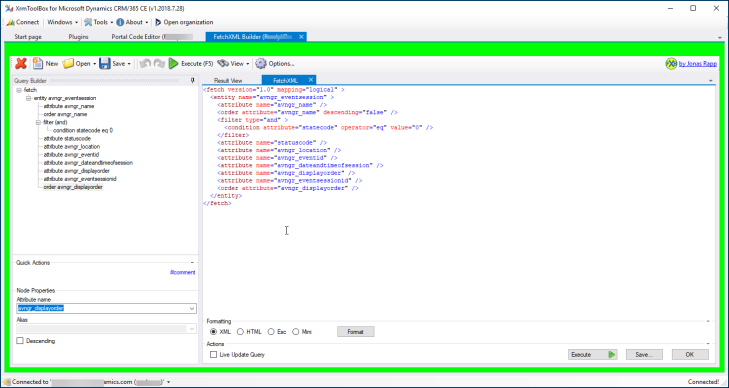
We will need to query for the fields we want to display on our view as well as add our filters and sorting. The FetchXML Builder tool also allows us to test our query to ensure that it will return data.
Once we have our FetchXML statement created, we will add that to our Web Template code using the {% fetchxml %} Liquid tag.
{% fetchxml eventsessions %}

<fetch version="1.0" mapping="logical" output-format="xml-platform" distinct='true' returntotalrecordcount='true' >
<entity name="avngr_eventsession" >
<attribute name="avngr_name" />
<filter type="and" >
<condition attribute="statecode" operator="eq" value="0" />
</filter>
<attribute name="statuscode" />
<attribute name="avngr_location" />
<attribute name="avngr_eventid" />
<attribute name="avngr_dateandtimeofsession" />
<attribute name="avngr_displayorder" />
<attribute name="avngr_eventsessionid" />
<order attribute="avngr_displayorder" />
</entity>
</fetch>

{% endfetchxml %}
Note that we will need to add the output-format and returntotalrecordcount=’true’ parameters in the opening fetch statement. I found without these I didn’t get data to return.
Note that you can use Liquid {%if else%} to manipulate your FetchXML statement, but that is a topic for another post!
Before I display any data, I want to make sure that the data was returned using the total_record_count from the results. If not data is returned, check your query and the Entity Permissions of the Portal.
{% if eventsessions.results.total_record_count > 0 %}
If no data is returned, I will display a content snippet with an informative message (see final code for how I did this).
HTML Table
Now that we have our FetchXML to query our data, we need to build out our HTML table.
If you are unfamiliar with HTML tables, review this link to get a basic understanding.
First, we are going to build out the table header. In my example, I used Portal Content Snippets for each of the column header names to demonstrate using Portal components in an HTML table but also it’s a good practice if you will have multi-language portals.

You will have options to format the table and you can set up various <div> sections for different designs.

The next section we will set up our table column headings, but instead of hard-coded values, I will use Content Snippets:

The next section is the meat and potatoes of our custom view, the table body!

Looking at each line of the table body, we can begin to see how we have a lot of customization control on each element.
I will want to loop through each of the records from our FetchXML query.
{% for eventsession in eventsessions.results.entities %}
Next, I can begin to format and convert dates into different formats from what was returned from the FetchXML query.
{% assign sessiondate = eventsession.avngr_dateandtimeofsession | date_to_iso8601 %}
For each table row (<tr>) I can display content in various formats;
Using a combination of the Site Marker we created above and the Dynamics 365 record we pulled from the FetchXML query, we can build out our “drill down” link and pass the id:
<td>
<a href="{{ SessionInfo_marker.url }}?id={{ eventsession.id }}">{{ eventsession.avngr_name }}</a>
</td>
We can also create a drill down of a related (lookup) value, this is how we can view the event information:
<td>
<a href="{{ event_marker.url }}?id= {{ eventsession.avngr_eventid.id }}">{{ eventsession.avngr_eventid.name }}</a>
</td>
Of course, we are able to show the date in various formats based on the Liquid date filters, something that we can’t easily do on an Entity List;
<td>
{{ sessiondate | date:'MM/dd/yyyy' }}
</td>
Regular data, of course, can be easily displayed in the table (best practice to filter to escape to get rid of potential formatting characters);
<td>
{{ eventsession.avngr_location | escape }}
</td>
And of course, we can use the Liquid {% if else %} tags to format table cells in specific ways (note also that option set fields we need to show the “label”);
{% if eventsession.statuscode.label == "Tentative" %}
<td bgcolor="#FF0000">
{{ eventsession.statuscode.label | escape }}
</td>
{% else %}
<td bgcolor="#00FF00">
{{ eventsession.statuscode.label | escape }}
</td>
{% endif %}
The final full code of our custom Web Template can be found on my GitHub site:
Note we need to close off the table, close the loop and end the block of our custom Web Template. We also have our display of info in case no data is returned.

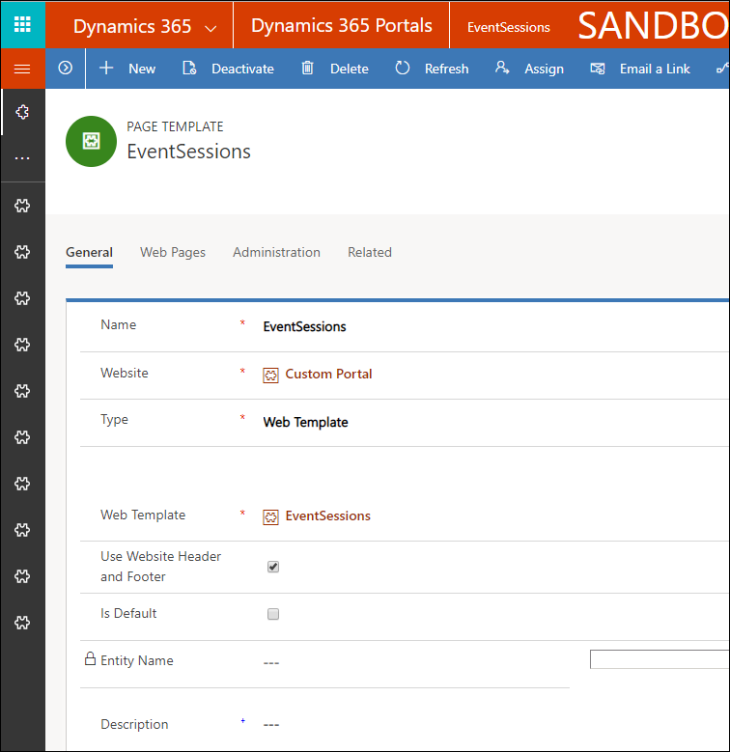
Create Page Template
Once our Web Template is created, we need to create a Page Template record. The Page Template record exists as a throwback to the Adxstudio portal days where you could create a custom ASPX page templates and point to them rather than Web Templates.
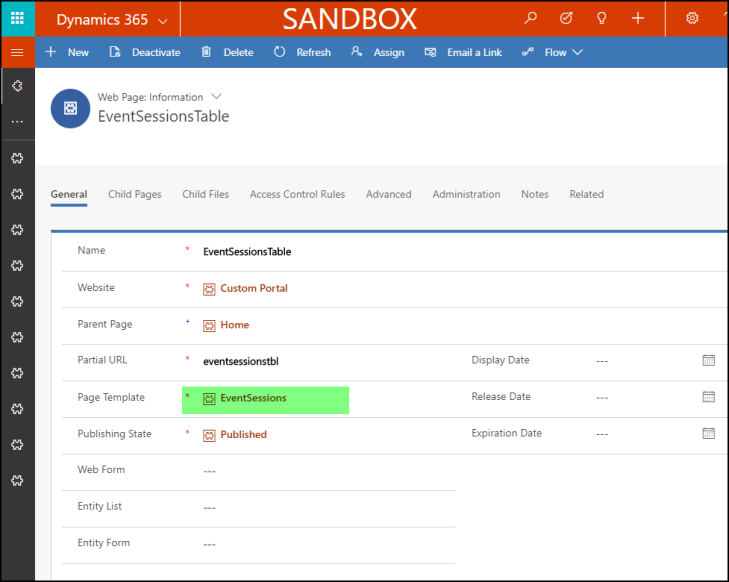
Finally, we can create a web page and use our custom Web Template as the foundation.
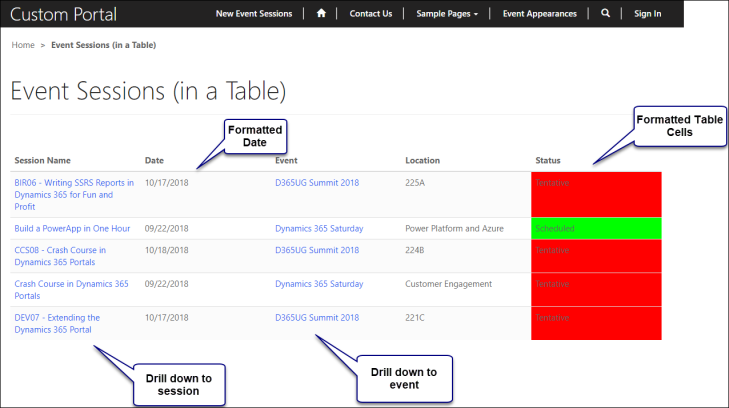
Setting up a Web Link, when we navigate to the Portal we see the results;
- There is a drill down to both the session and the event (2 different pages)
- The Date and Status fields are custom formatted
- And while not visible, by default, the data is sorted by display order field (not shown)
Summary
With this example, I show how we can use a combination of Liquid and HTML to create a custom view that has features that the entity list does not. Using this method as a foundation and some creativity, we can further extend this code to do the following:
- Show related entity fields (via the FetchXML alias).
- Manipulate the FetchXML query using Liquid if-else commands.
- Show different views with custom buttons and JavaScript.
I hope you found this example helpful in your own Portal projects.
Thank You!
A big credit needs to go out to Debra Polvi, a team member at my former employer (BDO). Debra built out a lot of code that I used as a guide to build my examples.
Nick Doelman is a Microsoft Business Applications MVP, a Portal enthusiast and actually enjoys writing code in Liquid.


very nice post
LikeLiked by 1 person
Hi Nick,
Is there a way to export the list to excel?
Thanks
LikeLike
Yes, on a regular entity list record, scroll down to “View Actions” and add a Download Button. That will render a button on the entity list where users can download info to Excel. Hope that helps!
LikeLike
Hi Nick,
Thanks for the reply but I was referring to the Liquid template list, is there a way to export that to excel? I am aware of the Default Entity list having there export feature
regards,
LikeLike
Ah! I see. I haven’t implemented a feature that does that but I did find this post that might put you on the correct path, it shows how to format data for exporting using JavaScript, it could be modified to meet your needs. Note that I haven’t personally tried it yet. https://dynamics365heroes.com/2018/04/16/dynamics-365-portals-exporting-data/
LikeLike
Thank you Nick
I will have a look to see if I can salvage something.
many thanks
LikeLike
Great! If you have success with this, please comment back here in case others have the same question.
LikeLike
Ever had any luck enabling a the search on with a custom list?
LikeLike
I haven’t dug deeply into it yet, but I will post when I eventually get around to it.
LikeLike
Hi Nick,
Do you know if it’s possible to reshape an entity list into square cells with space between them with liquid and css kode?
LikeLike
For sure, if you can do it in HTML/CSS, you just need to work your Liquid tags to display the entity list info. An example of the HTML/CSS code is here https://developer.mozilla.org/en-US/docs/Web/CSS/CSS_Grid_Layout (I just did a quick search) and it wouldn’t be hard to integrate an entity list field (like {{ eventsession.avngr_location}}) into that code. I would be very interested in seeing the results!
LikeLike
Thanks i will try and build it.
i will share my solution if i succeed
LikeLike
It’s not done but its on its way 🙂
https://ibb.co/C6PDmnr
Thanks for the helt and tip
LikeLike
Bless you, Nick. Great job as always! Appreciate your inputs. Now…
1) Need the currency format for numbers in the HTML grid. Liquid {{334444 | Money}} not working.
2) Need to right align amounts in the Entity List view displayed under this HTML Summary Totals
LikeLike
Thanks Tim, for right alignment, try using align=”right” in the table data tag (td). (If I paste the actual code, the wordpress comment interprets the code) For the money filter, I am guessing that the CDS/Dyn365 money amount is likely just interpreted as a number field so you many need to manually format it. I will play around this week, could make a good blog topic.
LikeLike
Hi Nick,
I am having trouble with the Dynamics lookup filter on my list.
i won’t show any options.
I have tried to enable entity permssions but that didnt help.
Do you have any ideer to what it could be?
LikeLike
I don’t quite understand your question? Are you not seeing any records, based on the value of a lookup field? Can you get data using an advanced find? Can you see data using a “standard” entity list?
LikeLike
The entity list works fine and if i can use the standard lookup field to filter the records.
And yes i can get the data using advanced find
You can see it in this picture https://pasteboard.co/IuDjPSw.jpg
the top “Branche Hovedgruppe” is a normal lookup field filter.
The bottom “Branche Hovedgruppe” is a dynamic lookup field but i can’t get it to show any values in it. 🙂
LikeLike
Hi Nick,
thanks for this post! It is really helpful. Your blog is fantastic!
LikeLike
Thank you for the kind words!
LikeLike
Thanks for writing this great blog. Very detailed and keeping audience in mind.
LikeLike
Hi Nick,
I’m looking to replace the output of columns based on certain conditions e.g. replacing the Href value so that we can redirect to different detail pages depending on the status of the record. I would like to do that using Liquid/Fetch, however, I do not want to render the output using Liquid as I wanna leverage the features (like workflow actions) that OOB Entity List configuration offers. Do you know if it’s possible to do that using Liquid/Fetch ie just replacing the data of the view without the need to do all the rendering?
LikeLike
In the past I have manipulated some of the standard Entity List functionality and display using JavaScript, but the work can get a bit tedious to identify the parts of the entity list and like anything, it does add a level of technical debt. Some details are here: https://docs.microsoft.com/en-us/powerapps/maker/portals/configure/entity-lists
LikeLike
just a question… Do you know if it is possible to have a lookup field value displayed in a column on an entity list (with only view action) and that one could search the entity list by values that appear in that lookup field?
The lookup relationships are EntityA — N:1 — EntityB — N:1 — EntityC (Column value)
I have not been able to find a way to do this. the lookup value appears on the entity list but is in black font color as opposed to blue font color of searchable fields.
Not looking for you to explain how to do this… rather is it possible and do-able so I am not beating a dead horse. 🙂 a clue or pointer would okay.
Thanks man!
LikeLike
Hi Darin, I believe that is a limitation but I haven’t explored it fully. What I might suggest is look at the global search functionality, it was just released a few months ago and I plan to post a blog/video on it eventually. https://docs.microsoft.com/en-us/powerapps/maker/portals/configure/search That will allow you to search across multiple entities, both system and custom entities.
LikeLike
Hi I used fetchxml and liquid code to create a report using Web template in Dynamics 365 portal. is there way to add link to download an excel file with the report data? i tried the link which was given in this post regarding exporting data in excel, is not working. Please advise me if you have any suggestions. thank you
LikeLike
I don’t have a solution, but what I might suggest is try to incorporate an approach outlined here: https://www.freakyjolly.com/create-and-download-xsl-excel-from-json-response-data-in-webpage/#.YC6lfGhKhhE
The example is not Power Apps portals related but I think the code could be incorporated, it uses a JavaScript library called SheetJS which appears to have a community edition. If you have some success, please post a comment back here! Cheers, Nick
LikeLike
Thanks a lot. It helped me to resolve the issue
LikeLike