
UPDATE 2021:
There is a new release of the Report Authoring Tools that will work on SSDT 2019.
Check out the updated blog post here:
UPDATE July 2018: I have created an updated version of this post specifically for Dynamics 365 v9 with very detailed steps. Check it out here.
UPDATE January 2018: If you happen to be developing reports for Dynamics 365 v9, the steps provided in this blog will still work however, you will need to implement a workaround in order to connect to a v9 datasource and preview your reports. Please refer to this post from the folks at Magnetism.
Over the years, I have found that there seems to be a lot of confusion around the setup and tools required to create and modify Dynamics 365/CRM SQL Server Reporting Services (SSRS) reports.
There are a lot of options for analyzing and visualizing data from Dynamics 365 such as built in views, charts and dashboards, as well as Excel and PowerBI.
Since Dynamics CRM 3.0, SSRS has been one of the core options for generating reports out of the system.
A number of reports come “out of the box” and simple table and chart reports can be created using the Report Wizard tool within Dynamics 365/CRM.
Most projects still have many specific and unique reporting needs that require custom reports to be developed that are beyond the capabilities of the Report Wizard.
It is my hope that this blog posting will provide clear instructions to anyone needing to install the necessary tools to get started writing/modifying Dynamics 365 Reports!

Part of the confusion is that the documentation from Microsoft is not fully clear (surprise!).
Another contributing factor to the confusion is that you actually need a couple of different components, one of which is Visual Studio. There are many different versions of Visual Studio available, and many get easily confused as to which version is required. Note: Its NOT Visual Studio 2015 Professional/Enterprise!
SQL Server Data Tools
The actual version you will need is this (install FIRST):
Microsoft SQL Server Data Tools – Business Intelligence for Visual Studio 2012
This is a free, lightweight (not full) Visual Studio tool from Microsoft where one can author and modify SSRS reports. If you are using Dynamics CRM on-premise, and only want to ever write T-SQL based reports, this will be the only component you will need.
Even if you have a paid version Visual Studio installed with all the latest updates and service packs, you still need to install the SSDT 2012 edition to develop SSRS reports specific for Dynamics 365/CRM.
If you happen to be writing reports for older versions of Dynamics CRM (2013 or older), then you need to install “Business Intelligence Design Studio”. This can be installed from SQL Server installation media.
Report Authoring Extensions
Ideally you want to write reports using FetchXML (your main option for Dynamics 365 Online, but also encouraged for on-premise). T-SQL might be more powerful and flexible, but this is your only option for online. Even if you are on-premise, in the future you may need to make the jump to online and your reports will migrate much smoother if they are already written in FetchXML.
Install this AFTER SSDT is installed:
Microsoft Dynamics CRM 2016 Report Authoring Extension (with SQL Server Data Tools support)
This is the add-on for SSDT that allows you to connect to Dynamics 365 Online and use FetchXML to access data.
There are versions for each Dynamics 365/CRM version, but most will work for roughly a CRM version ahead and behind. (e.g Report Authoring for CRM 2016 will work for CRM 2015 and 365)
Many will try to install this component without installing SSDT first and run into problems, confusion and delay.

Once you have successfully installed both components, you are ready to write your first report!
Since I am a nice guy, I will provide a few more steps to get you started.
You may start to search for “Visual Studio” or “Report Writer” on your workstations. You actually need to launch “SQL Server Data Tools for Visual Studio 2012”

Once SSDT starts up, create a new “Report Server Project” under “Business Intelligence Templates”. Don’t use the wizard.
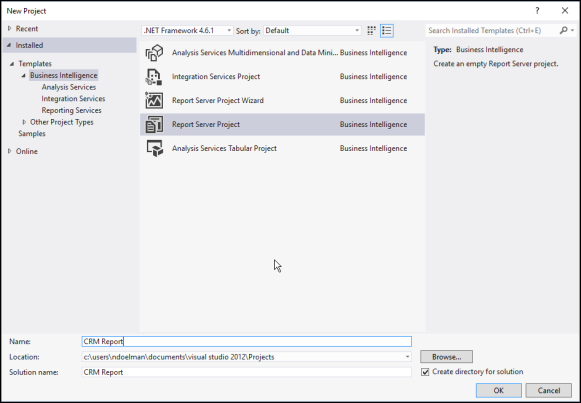
The project will add a few items to the solution. In the “Report” folder, right click and choose “Add” and then “New Item”

Then choose “Report”. Give the report a more intelligent name than “Report1.rdl” (Do as I say, not as I do)

Now you have a clean palette to work with. First you need get some raw data to start putting your report together. On the left side, right click on “Data Sources” and choose “Add Data Source”
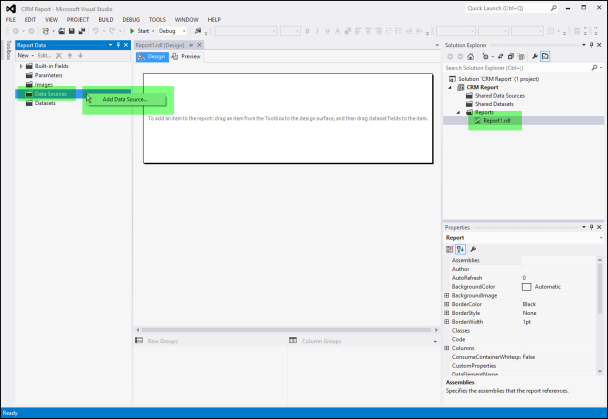
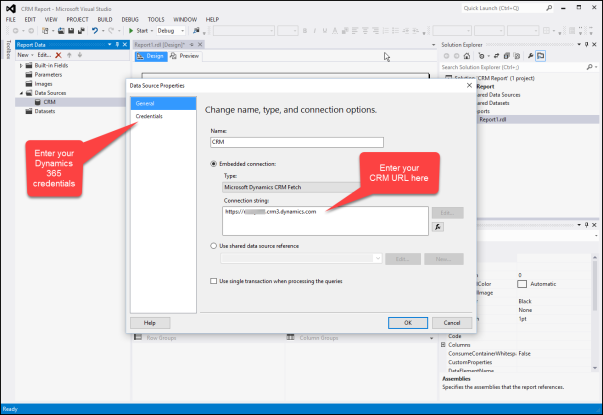
If you have successfully installed the CRM Report Authoring Extensions, you should see the type set to “Microsoft Dynamics CRM Fetch”
Put your Dynamics 365/CRM URL in the connection string box, and put in your Office 365 credentials in the designated area. Note that these credentials are only used to design and build the report. Eventually when you load it into CRM, the report will be run under the credentials (and security context) of the end user. This means that a user won’t be able to write a report to retrieve private or sensitive data.
Now right click on “Datasets” to create a dataset from Dynamics CRM.
Choose to use a “dataset embedded in my report”, choose the datasource name your created above, and enter in the FetchXML query you want to base your report on. FetchXML can be generated from Advanced Find within CRM or using various tools like the XrmToolBox.

Assuming you entered your credentials correctly, you should see the fields from your dataset on the left. You can then drag and drop the fields into tables, sections, tablixes, etc. and manipulate/filter layouts/fonts/formulas and whatever other tools SSRS provides. General Report writing is beyond the scope of this posting, but with a little practice, one can build and design very complex and useful reports.

The report itself can be previewed within the SSDT designer. Once you are satisfied, the actual RDL file can be directly uploaded into Dynamics 365/CRM.

You now should have the steps to successfully setup your workstation for CRM Report Development and have the basics to get started. Soon you will victorious in creating exciting and useful reports!

I hope you found this helpful!
Cheers
Nick


Thanks a lot for such a great post!
LikeLike
Awesome. Thanks!
LikeLike
Amazing Post ! Thanks
LikeLike
Will this work with VS 2019? It has and SSDT now?
LikeLike
No. The issue is not with SSDT 2019 but rather with the Dynamics 365 Report Authoring Extensions being only compatible with SSDT 2015. (yes, I agree they should update it!)
LikeLike